Database Management with Doctrine ORM
Doctrine is an open-source PHP library providing convenient methods for managing your database in an object-oriented way. For working with relational databases, Doctrine provides a component named Object Relational Mapper (ORM for short). With Doctrine ORM you map your database table to a PHP class (in terms of Domain Driven Design, it is also called an entity class) and a row from that table is mapped to an instance of the entity class. If you are new to Doctrine, it is recommended that you also refer to Appendix D. Introduction to Doctrine for introductory information about the Doctrine library architecture.
Note
Doctrine is a third-party library, it is not part of Laminas Framework. We cover it in this book because it provides an easy way of adding database support to your laminas-based web application.
Components covered in this chapter:
| Component | Description |
|---|---|
Doctrine\ORM |
Implements Object-Relational Mapper. |
DoctrineORMModule |
Easy integration of Doctrine ORM with Laminas. |
@Laminas\Paginator |
Support of pagination. |
Get Blog Example from GitHub
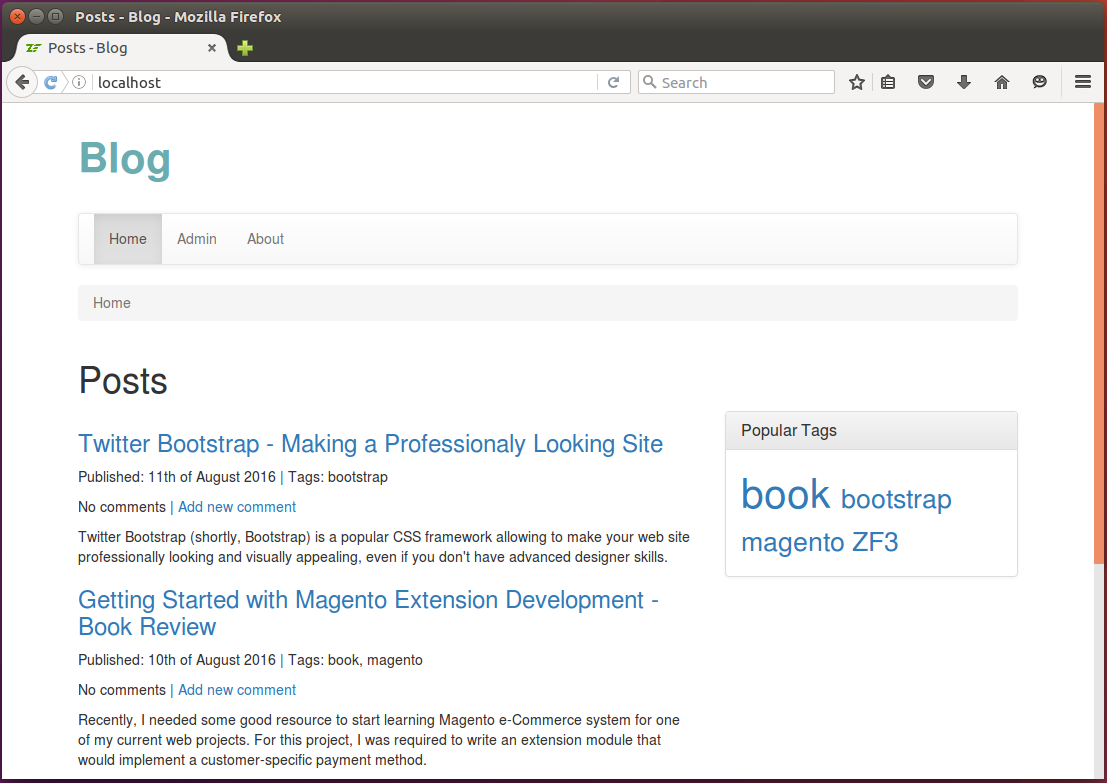
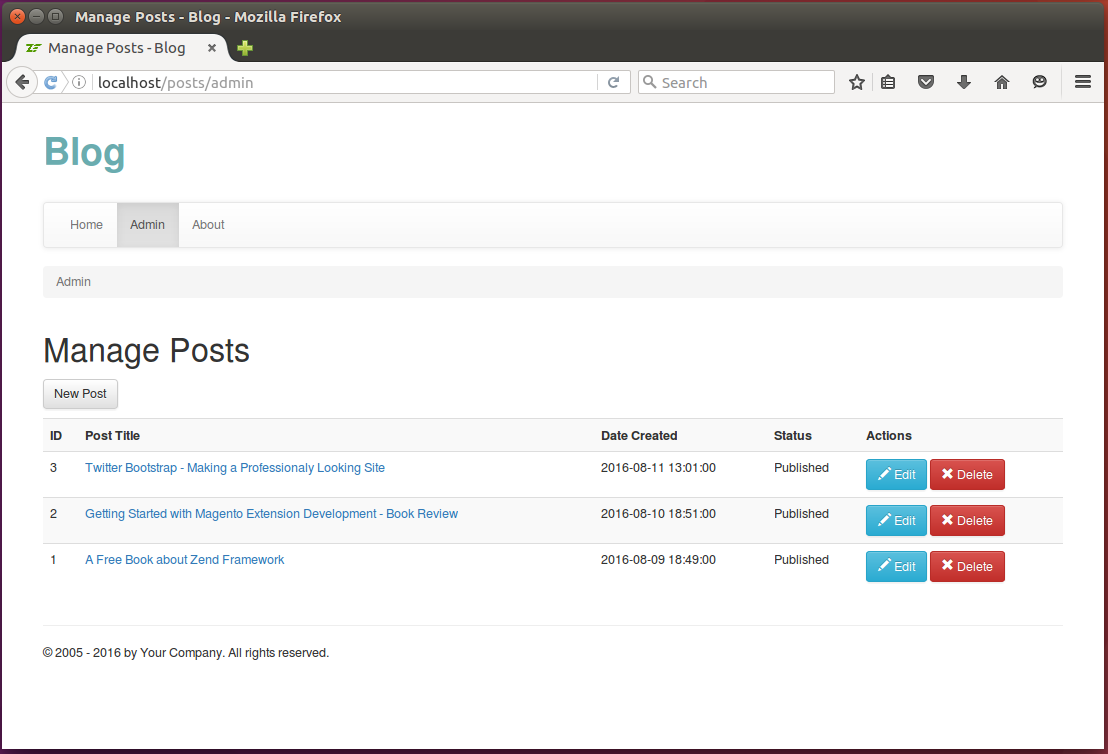
For demonstration of Doctrine ORM usage, in this chapter, we will create a real-life Blog website. Its main features are the following:
- It will store blog posts in a database and provide a user interface for accessing and managing those posts.
- It is assumed that the blog has the single author of its posts, while comments can be added by multiple blog readers.
- The website will have two pages: Home page and Admin page. The first one will display the list of recently added posts, while the latter one will allow to add, edit, view and delete posts.
For example screen shots of the Blog website, please look at the figures 12.1 and 12.2 below:
To download the Blog application, visit this page and click the Clone or Download button to download the code as a ZIP archive. When download is complete, unpack the archive to some directory.
Then navigate to the blog directory containing the
source code of the Blog web application:
/using-laminas-book-samples
  /blog
  ...
The Blog is a sample website which can be installed on your machine. To install the sample, you can either edit your default Apache virtual host file or create a new one. After editing the file, restart the Apache HTTP Server and open the website in your web browser.
For detailed installation instructions, please refer to the README.md file located in the blog directory.
For the Blog sample to work, you have to create a MySQL database. Instructions on how to do that are provided in the next section.
Creating a Simple MySQL Database
For the Blog sample to work, we need to have a database. In this book, we use MySQL database management system, which is very simple in installation and administration.
Note
For OS-specific instructions on how to install MySQL server and client, please refer to Appendix A. Configuring Web Development Environment.
Once you install MySQL, type the following command from your command shell to log into MySQL client console:
mysql -u root -p
When asked for, type the password of the root user (the password of the root user is the one you've specified during MySQL server installation). On successful login, you should see the following welcome message:
Welcome to the MySQL monitor.  Commands end with ; or \g.
Your MySQL connection id is 4
Server version: 5.7.13-0ubuntu0.16.04.2 (Ubuntu)

Copyright (c) 2000, 2016, Oracle and/or its affiliates. All rights reserved.

Oracle is a registered trademark of Oracle Corporation and/or its
affiliates. Other names may be trademarks of their respective
owners.

Type 'help;' or '\h' for help. Type '\c' to clear the current input statement.

mysql>
Now you are able to type MySQL client commands (like show databases, show tables, etc.) or
SQL queries (like SELECT or INSERT) at the MySQL prompt and see their output.
If you want to quit of the MySQL prompt, type quit and press Enter.
Creating New Database
Let's create a database and name it blog. To do that, type the following SQL statement and
press Enter:
CREATE DATABASE blog;
The expected output of this command is the following:
Query OK, 1 row affected (0.01 sec)
Note
MySQL commands are case insensitive, so you could type create database blog; with the same result.
We recommend using upper case for SQL queries, since this is a common convention.
Next, we create the user named blog and grant it all privileges for accessing and modifying the
blog database and all its tables:
GRANT ALL PRIVILEGES ON blog.* TO blog@localhost IDENTIFIED BY '<passwd>';
In the command above, replace the password placeholder with the new password for the blog user.
This password should be different than the password of the root user.
Important
Here, we create the second user blog, because it is not recommended to give the web application
ability to log into database under the root user. The root user has unlimited rights and it is
poor security practice to give an application the ability to do any actions it wants. The blog user will
have permissions to modify the blog database only, which is sufficient in our case.
You can check that the database has been created by typing the following command and pressing Enter:
show databases;
You should be able to see the output like below (note the blog line in the list of databases):
+--------------------+
| Database           |
+--------------------+
| information_schema |
| blog               |
| mysql              |
| performance_schema |
+--------------------+
Creating Tables
Next, we will create three tables typical for any simple blog: the post table will contain posts,
the comment table will contain comments to posts, and, finally, the tag table will contain tags
(a tag is some kind of a key word describing a blog post well).
Additionally, we will create the fourth auxiliary table post_tag that will be used to create
many-to-many relationship between the post and the tag tables.
Make the blog database current by typing the following from MySQL command prompt:
use blog;
To create the post table, type the following SQL statement:
CREATE TABLE `post` (
  `id` int(11) PRIMARY KEY AUTO_INCREMENT,
  `title` text NOT NULL,
  `content` text NOT NULL,
  `status` int(11) NOT NULL,
  `date_created` datetime NOT NULL
);
Note
MySQL client allows easy entering of multi-line commands. Just press Enter when you want to move the caret to the next line. The command is considered to be fully entered when the semicolon (;) character is encountered.
The expected output of this command is the following:
Query OK, 0 rows affected (0.22 sec)
Next, create the comment table by typing the following:
CREATE TABLE `comment` (
  `id` int(11) PRIMARY KEY AUTO_INCREMENT,
  `post_id` int(11) NOT NULL,
  `content` text NOT NULL,
  `author` varchar(128) NOT NULL,
  `date_created` datetime NOT NULL
);
Then, create the tag table:
CREATE TABLE `tag` (
  `id` int(11) PRIMARY KEY AUTO_INCREMENT,
  `name` VARCHAR(128)
);
And finally, create the post_tag table:
CREATE TABLE `post_tag` (
  `id` int(11) PRIMARY KEY AUTO_INCREMENT,
  `post_id` int(11) NOT NULL,
  `tag_id` int(11) NOT NULL
);
Let's fill the tables we have created with some sample data:
INSERT INTO tag(`name`) VALUES('Laminas');
INSERT INTO tag(`name`) VALUES('book');
INSERT INTO tag(`name`) VALUES('magento');
INSERT INTO tag(`name`) VALUES('bootstrap');

INSERT INTO post(`title`, `content`, `status`, `date_created`) VALUES(
   'A Free Book about Laminas Framework',
   'I''m pleased to announce that now you can read my new book "Using Laminas Framework" absolutely for free! Moreover, the book is an open-source project hosted on GitHub, so you are encouraged to contribute.',
   2, '2016-08-09 18:49');

INSERT INTO post(`title`, `content`, `status`, `date_created`) VALUES(
   'Getting Started with Magento Extension Development - Book Review',
   'Recently, I needed some good resource to start learning Magento e-Commerce system for one of my current web projects. For this project, I was required to write an extension module that would implement a customer-specific payment method.',
   2, '2016-08-10 18:51');

INSERT INTO post(`title`, `content`, `status`, `date_created`) VALUES(
   'Twitter Bootstrap - Making a Professionaly Looking Site',
   'Twitter Bootstrap (shortly, Bootstrap) is a popular CSS framework allowing to make your website professionally looking and visually appealing, even if you don''t have advanced designer skills.',
   2, '2016-08-11 13:01');

INSERT INTO post_tag(`post_id`, `tag_id`) VALUES(1, 1);
INSERT INTO post_tag(`post_id`, `tag_id`) VALUES(1, 2);
INSERT INTO post_tag(`post_id`, `tag_id`) VALUES(2, 2);
INSERT INTO post_tag(`post_id`, `tag_id`) VALUES(2, 3);
INSERT INTO post_tag(`post_id`, `tag_id`) VALUES(3, 4);

INSERT INTO comment(`post_id`, `content`, `author`, `date_created`) VALUES(
    1, 'Excellent post!', 'Oleg Krivtsov', '2016-08-09 19:20');
Note
If necessary, you can easily remove the database and all tables and data it contains by typing the following command from MySQL prompt:
DROP DATABASE blog;
Figure 12.3 graphically illustrates what entities we have in the database and what relationships between those entities present.
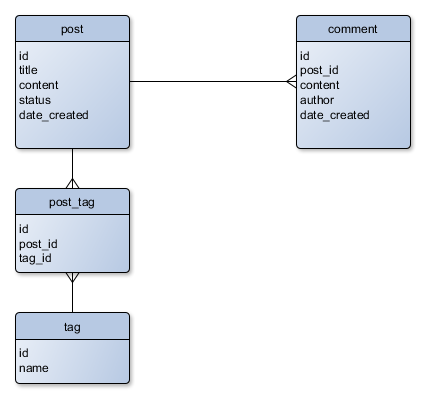
As you can see from figure 12.3, the post table is related to comment table as one-to-many,
because a single post may have many comments. This is also called the "one-to-many" relationship.
The post table is also related to the tag table as many-to-many. A single post may have many tags,
and a single tag may belong to many posts as well. Many-to-many relationship is typically implemented
through an auxiliary table (post_tag table in our case).
Importing Ready Database Schema
In the previous section, we've shown how to create the complete database schema that is used in the
Blog sample web application. In the real life, you typically do not type all those SQL
statements at the MySQL prompt. Instead, you could type the CREATE TABLE statements to a file and save
it to disk. Then you could just import that file and have the ready schema.
For your convenience, the ready schema for Blog sample can be found in APP_DIR/data/schema.mysql.sql file. The file is a plain text file containing SQL statements. To import the file, go to the APP_DIR/data/ directory and type the following command from your command shell (but not from MySQL prompt):
mysql -u root -p blog < schema.mysql.sql
When prompted for password, enter the password of the root user and press Enter.
Once this is done, log into the MySQL client and type the following commands:
use blog;

show tables;
You should see the list of tables created, something like below:
+----------------+
| Tables_in_blog |
+----------------+
| comment        |
| post           |
| post_tag       |
| tag            |
+----------------+
4 rows in set (0.00 sec)
Note
Also consider using database migrations for initializing database schema. For additional info about migrations, please refer to Database Migrations chapter.
Integrating Doctrine ORM with Laminas Framework
For easy integration with Laminas Framework, Doctrine project provides the following two components (that are actually Laminas modules):
-
DoctrineModule is a Laminas module that provides Doctrine basic functionality required by the ORM component;
-
DoctrineORMModule integrates Doctrine Object Relational Mapper (ORM) with Laminas Framework.
Each of the above Doctrine components is distributed as a Composer-installable package and is registered in Packagist.org catalogue. This is very similar to the way that Laminas Framework uses for installing its components.
Since Composer packages may depend on each other, it is enough to declare dependency only on DoctrineORMModule. This package depends on DoctrineModule and on some other Doctrine components (Doctrine\ORM, Doctrine\DBAL, Doctrine\Common, Doctrine\Annotations, etc.). So, when you install this component, Composer will install other required components automatically.
Installing Doctrine Components with Composer
In order to install required Doctrine components, we first add a dependency to the composer.json file located in the root directory of the web application (in this book, we typically denote that directory as APP_DIR).
To add the dependency, type the following commands from your command shell (replace the APP_DIR placeholder with the actual directory name of your application):
cd APP_DIR
php composer.phar require doctrine/doctrine-orm-module
The cd command above is used to make the APP_DIR directory current working directory.
And the require command tells Composer to add the package doctrine/doctrine-orm-module as a
dependency to your web application, and to download and install that dependency.
Once you run the commands above, Composer will first modify the composer.json file and create the
line like below under its require key:
{
  ...
  "require": {
    "doctrine/doctrine-orm-module": "^1.0.9",
    ...
  },
  ...
}
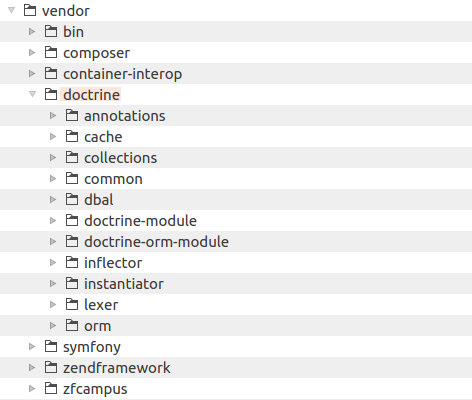
Then Composer will try to locate the dependency packages, download them to the local machine and install the files into the APP_DIR/vendor directory.
Composer will output lines indicating installation process to the terminal. As you can see from the Composer
output, when you install DoctrineORMModule component, Composer
automatically installs the DoctrineModule and all necessary Doctrine components (Doctrine\DBAL,
Doctrine\ORM, etc.)
Note
As a bonus, at the end of installation, Composer "suggests" you to install some additional packages
that might be useful for you (doctrine/migrations, doctrine/data-fixtures, etc.) If you strongly
wish, you may add those dependencies with the Composer's require command as well.
When the installation has been finished, you can find the Doctrine files in your APP_DIR/vendor directory (see the figure 12.4 below).
Note
You use the php composer.phar require command for the first time you install Doctrine. Once the
composer.json (and composer.lock) files have been modified by Composer, you are able to install (or update)
all dependencies as usual by typing the php composer.phar install or php composer.phar update
commands, respectively, from your command shell.
Loading Doctrine Integration Modules on Application Start Up
Once you have installed the DoctrineORMModule and all its dependencies, you need to add the following lines to your APP_DIR/config/modules.config.php file to enable the modules:
<?php
return [
    // Add the Doctrine integration modules.
    'DoctrineModule',
    'DoctrineORMModule',
    //...
);
The lines above let Laminas know that it should load the DoctrineModule module and DoctrineORMModule module on application start up.
Doctrine Configuration Overview
To use Doctrine with your laminas-based web application, you have to provide its configuration. The configuration tells Doctrine what databases present, how to connect to a database (what database driver, host, user name and password to use), where to locate entity classes and how to extract their annotations (metadata), how to store cached data (in the file system or to use a caching extension), and so on. This section's goal is to give you a general idea of how Doctrine configuration looks like.
The default Doctrine configuration is located in the module.config.php config file of the DoctrineORMModule. Look at the figure 12.5 below to have an idea of how the Doctrine config "tree" may look like 1. You may also refer to the module.config.php file of DoctrineORMModule for the same reason.
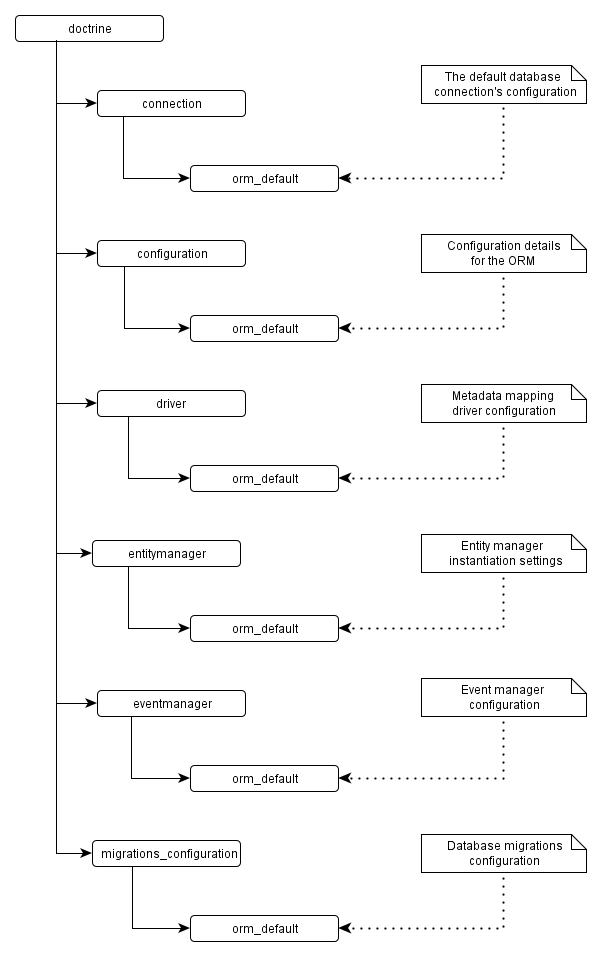
As you can see from the figure 12.5, there is the top-level key named doctrine. Under that key,
there is a number of subkeys containing the following settings:
- the
connectionkey contains the list of all databases that the web application is able to connect to. For each database connection it contains parameters like driver class name, host, user name, password and database name.
Note
By default, there is only one connection named orm_default, and you may add more database connections if required.
-
the
configurationkey contains ORM settings like caching configuration and locations of auto-generated entity proxy classes for each available connection. -
the
driverkey contains the information about where to locate entity classes for each available database connection. -
the
entitymanagerkey contains settings used for instantiating an entity manager for each database connection. -
the
eventmanagerkey contains settings for Doctrine event manager for each available connection.
Note
Doctrine uses its own implementation of event manager. If you want, you can create an event listener class and hooks some events. However, this is an advanced topic and we do not cover it in this book.
- the
migrations_configurationkey contains settings for database migrations. Database migrations are used for initializing and updating database schema in a standard and consistent way.
Overriding the Default Doctrine Configuration
As you already know from Website Operation chapter, in a laminas-based web application configuration is typically divided into two categories: application-wide configuration and module-specific configuration.
-
For storing application-wide Doctrine settings, you typically use the APP_DIR/config/autoload/global.php or APP_DIR/config/autoload/local.php config files. The first one suits well for storing settings not depending on particular environment, while the latter one suits well for storing environment-dependent settings (like database connection parameters).
-
For storing Doctrine settings specific to certain module, you use the module.config.php config file located inside the config directory of that module. This is suitable, for example, for storing the entity location settings.
When laminas-based website loads its configuration, it merges all configs into a single big array, thus forming the final Doctrine config "tree".
By adding your application-specific Doctrine configuration, you extend and/or override the default configuration tree provided by the DoctrineORMModule.
Specifying Database Connection Parameters
Below we provide content of the autoload/local.php file of the Blog web application.
This config file contains the application-wide database connection settings for the blog
MySQL database that we created earlier in this chapter:
Note
This connection is shared between all modules of the web application. If you want to create module-specific connection, consider adding the key to the module.config.php file instead.
<?php
use Doctrine\DBAL\Driver\PDOMySql\Driver as PDOMySqlDriver;

return [
    'doctrine' => [
        'connection' => [
            'orm_default' => [
                'driverClass' => PDOMySqlDriver::class,
                'params' => [
                    'host'     => '127.0.0.1',
                    'user'     => 'blog',
                    'password' => '<password>',
                    'dbname'   => 'blog',
                ]
            ],
        ],
    ],
];
Above, we have the doctrine key and connection subkey. The connection subkey contains the
orm_default subkey which is the default connection.
- The
driverClasskey provides the class name to use as a driver to the database. Since we use MySQL database, we specify theDoctrine\DBAL\Driver\PDOMySql\Driverclass name.
For your reference, in table 12.1, you can find several other often used database drivers. Each driver class supports its own set of parameters, so please refer to certain driver's code (and related documentation) for additional information.
-
The
paramskey contains the connection parameters:hostmay be either the domain name or IP address of the database server;useris the MySQL user name with granted permissions to the database;passwordis the secret word for the user name;dbnameis the name of the database.
| Method | Description |
|---|---|
Doctrine\DBAL\Driver\PDOSqlite\Driver |
SQLite driver using PDO PHP extension. |
Doctrine\DBAL\Driver\PDOMySql\Driver |
MySQL driver using PDO PHP extension. |
Doctrine\DBAL\Driver\PDOOracle\Driver |
Oracle driver using PDO PHP extension. |
Doctrine\DBAL\Driver\PDOPgSql\Driver |
PostgreSQL driver using PDO PHP extension. |
Doctrine\DBAL\Driver\PDOSqlsrv\Driver |
MS SQL Server driver using PDO PHP extension. |
Table 12.1. Often Used Database Driver Classes
Important
Because the autoload/local.php file contains environment-specific parameters, you only store its "distribution template", local.php.dist file, in version control. Each developer in your team then renames the local.php.dist file to local.php and enters his own password instead of the placeholder. The local.php file should not be version controlled, because you usually do not want other people on your team (or other people having access to your code repository) seeing the actual password.
What happens if I need several database connections?
You can easily add more database connections by adding other keys below the orm_default key.
For example, let's assume that you have another database for testing purposes. To let
Doctrine know about this database, you create the orm_test subkey below the orm_default key
and fill it with connection parameters.
About Doctrine Entities
An entity is a PHP class that is designed for storing data. For example, below you can find several often used examples of entities:
-
Userentity is designed to store information about a website visitor. It may contain properties like username, password, first name, last name, etc. -
Licenseentity is designed to store information about a software license. It may contain data like unique license key, reference to user who purchased the license, license creation date, etc. -
Paymententity may contain properties related to a purchase of some goods. The properties are: transaction ID, money amount, money currency, etc.
Note
In terms of Domain Driven Design pattern, entities are a kind of models designed for storing data. For additional examples of entities and other types of models, please refer to Model-View-Controller.
In Doctrine ORM, an entity class is mapped on a certain database table. For example, the User entity
is usually mapped on the user table (if needed, the table name may be arbitrary).
For our Blog example application, we will create three entity classes:
-
Postentity will contain data related to specific blog post. Its properties are exactly the same that we used when defining theposttable inblogdatabase schema. The entity class will also have public getter and setter methods designed for retrieving/setting the data. -
by analogy,
Commententity will contain data related to a comment to blog post. -
and
Tagentity will contain data related to a tag.
Annotations
An annotation is a special kind of a PHP comment that is preprocessed by Doctrine ORM. In other words, annotations is metadata attached to an entity class that can be read by the Doctrine ORM at run-time. Annotations provide verbose information about an entity. Annotations describe an entity and tell Doctrine ORM how to map it on a database table.
A Docblock annotation is a C++ style comment starting with slash (/) and two asterisks (*). This "starter" characters are required, otherwise Doctrine won't recognize the annotation. An example of annotation can be found below:
/**
 * This is Docblock annotation comment.
 */
Doctrine reads Docblock annotations with the help of its Doctrine\Annotations component.
Note
You might have already seen Docblock annotations if you've used phpDocumentor or Doxygen documentation generation tools. In those tools, annotation comments are serving the same goal: to describe a PHP class and its properties and methods. Then the tool goes through your code and builds HTML documentation automatically based entirely on code and annotations analysis.
For example, below, we provide the basic example of a Doctrine entity class. You can see that the class and its properties are marked with Docblock annotations with special tags (a tag starts with '@' character).
<?php
namespace Application\Entity;

use Doctrine\ORM\Mapping as ORM;

/**
 * @ORM\Entity
 * @ORM\Table(name="post")
 */
class Post
{
  /**
   * @ORM\Id
   * @ORM\GeneratedValue
   * @ORM\Column(name="id")
   */
  protected $id;

  /**
   * @ORM\Column(name="title")
   */
  protected $title;

  /**
   * @ORM\Column(name="content")
   */
  protected $content;

  /**
   * @ORM\Column(name="status")
   */
  protected $status;

  /**
   * @ORM\Column(name="date_created")
   */
  protected $dateCreated;
}
Let's review the code above:
In line 2, we declared the Application\Entity namespace in which entity classes for the Application
module live.
In line 4, you may notice that we use the Doctrine\ORM\Mapping class and its short ORM
alias for Doctrine annotations 2.
In lines 6-9, you can see a Docblock annotation for the Post class. Each annotation tag
begins with the @ character, has the name and (optional) parameters enclosed into the round braces.
Doctrine-provided tags used in annotations may be of two types: class-level and property-level. In the code above, we use the following class-level tags (describing the whole entity class):
-
@ORM\Entitytag (line 7) declares that this class is a Doctrine ORM entity; -
@ORM\Table(name="post")tag (line 8) tells Doctrine ORM that this entity class is mapped on thepostdatabase table;
Entity's properties are described with the following property-level tags:
-
@ORM\Idtells that this property is actually a unique identifier of the entity (see line 13); -
@ORM\GeneratedValueis used to tell Doctrine ORM that this property uses some auto-generated sequence for initializing itself (line 14). In MySQL, this typically means that the corresponding table column usesAUTO_INCREMENTinitializer. -
@ORM\Column(name="<column_name>")is used to tell Doctrine ORM on which table column to map this particular property (lines 15, 20, 25, 30, 35).
Note
The complete list of Doctrine-provided tags used in annotations can be found by the following link.
Creating Entities
For the Application module, entities are (by convention) stored inside the Entity
directory under the module's source directory. Entity classes live inside the Application\Entity
namespace.
Adding Post Entity
We start with creating the Post entity. Create the Post.php file under module's Entity
directory. (If you haven't created the Entity directory yet, its the right time to do that.)
Put the following code into the file:
<?php
namespace Application\Entity;

use Doctrine\ORM\Mapping as ORM;

/**
 * This class represents a single post in a blog.
 * @ORM\Entity
 * @ORM\Table(name="post")
 */
class Post
{
  // Post status constants.
  const STATUS_DRAFT       = 1; // Draft.
  const STATUS_PUBLISHED   = 2; // Published.

  /**
   * @ORM\Id
   * @ORM\GeneratedValue
   * @ORM\Column(name="id")
   */
  protected $id;

  /**
   * @ORM\Column(name="title")
   */
  protected $title;

  /**
   * @ORM\Column(name="content")
   */
  protected $content;

  /**
   * @ORM\Column(name="status")
   */
  protected $status;

  /**
   * @ORM\Column(name="date_created")
   */
  protected $dateCreated;

  // Returns ID of this post.
  public function getId()
  {
    return $this->id;
  }

  // Sets ID of this post.
  public function setId($id)
  {
    $this->id = $id;
  }

  // Returns title.
  public function getTitle()
  {
    return $this->title;
  }

  // Sets title.
  public function setTitle($title)
  {
    $this->title = $title;
  }

  // Returns status.
  public function getStatus()
  {
    return $this->status;
  }

  // Sets status.
  public function setStatus($status)
  {
    $this->status = $status;
  }

  // Returns post content.
  public function getContent()
  {
    return $this->content;
  }

  // Sets post content.
  public function setContent($content)
  {
    $this->content = $content;
  }

  // Returns the date when this post was created.
  public function getDateCreated()
  {
    return $this->dateCreated;
  }

  // Sets the date when this post was created.
  public function setDateCreated($dateCreated)
  {
    $this->dateCreated = $dateCreated;
  }
}
In the code above, we have the following things:
-
Status constants (lines 14 and 15). These constants conveniently represent possible values the
$statusproperty may receive (1 for Draft, 2 for Published). -
Protected properties (
$title,$content,$dateCreated, etc.). These are data that a typical blog post has (see table 12.2 below for reference of properties together with their brief descriptions).
Note
Please note that for properties we (by convention) use camel-case names (like $dateCreated),
while for database columns we use "canonicalized" names (in lower-case and with underscores
separating words in a name, like date_created).
| Property | Mapped on Column | Description |
|---|---|---|
$id |
id |
Unique ID of this post. |
$title |
title |
Title of this post. |
$content |
content |
Content of this post. |
$status |
status |
Status (draft/published) of this post. |
$dateCreated |
date_created |
Date when this post was created. |
Table 12.2. Properties of the Post entity
-
Entity class and its properties are marked with Docblock annotations read by Doctrine ORM at run-time allowing it to know how to map this entity and its properties on the database table and its columns.
-
Entity class has getter and setter methods (lines 45-102) allowing to access/modify the protected properties (see the table 12.3 for reference of methods and their brief descriptions).
| Method | Description |
|---|---|
| getId() | Returns ID of this post. |
| setId($id) | Sets ID of this post. |
| getTitle() | Returns title. |
| setTitle($title) | Sets title. |
| getStatus() | Returns status (draft/published). |
| setStatus($status) | Sets status. |
| getContent() | Returns post content. |
| setContent($content) | Sets post content. |
| getDateCreated() | Returns the date when this post was created. |
| setDateCreated() | Sets the date when this post was created. |
Table 12.3. Getter and setter methods of the Post entity
Note
Note that we do not mark entity class methods with Doctrine annotations. There is just no need to do that. However, you may mark methods with usual comments and non-Doctrine Docblock annotations, if you strongly wish.
Adding the Comment and Tag Entities
By analogy with the Post entity, we next create the Comment and the Tag entity classes in
the Entity directory. To do that, first, create Comment.php file and put the
following code inside of it:
<?php
namespace Application\Entity;

use Doctrine\ORM\Mapping as ORM;

/**
 * This class represents a comment related to a blog post.
 * @ORM\Entity
 * @ORM\Table(name="comment")
 */
class Comment
{
  /**
   * @ORM\Id
   * @ORM\Column(name="id")
   * @ORM\GeneratedValue
   */
  protected $id;

  /**
   * @ORM\Column(name="content")
   */
  protected $content;

  /**
   * @ORM\Column(name="author")
   */
  protected $author;

  /**
   * @ORM\Column(name="date_created")
   */
  protected $dateCreated;

  // Returns ID of this comment.
  public function getId()
  {
    return $this->id;
  }

  // Sets ID of this comment.
  public function setId($id)
  {
    $this->id = $id;
  }

  // Returns comment text.
  public function getContent()
  {
    return $this->content;
  }

  // Sets status.
  public function setContent($content)
  {
    $this->content = $content;
  }

  // Returns author's name.
  public function getAuthor()
  {
    return $this->author;
  }

  // Sets author's name.
  public function setAuthor($author)
  {
    $this->author = $author;
  }

  // Returns the date when this comment was created.
  public function getDateCreated()
  {
    return $this->dateCreated;
  }

  // Sets the date when this comment was created.
  public function setDateCreated($dateCreated)
  {
    $this->dateCreated = $dateCreated;
  }
}
Next, create Tag.php file and put the following code inside of it:
<?php
namespace Application\Entity;

use Doctrine\ORM\Mapping as ORM;

/**
 * This class represents a tag.
 * @ORM\Entity
 * @ORM\Table(name="tag")
 */
class Tag
{
  /**
   * @ORM\Id
   * @ORM\GeneratedValue
   * @ORM\Column(name="id")
   */
  protected $id;

  /**
   * @ORM\Column(name="name")
   */
  protected $name;

  // Returns ID of this tag.
  public function getId()
  {
    return $this->id;
  }

  // Sets ID of this tag.
  public function setId($id)
  {
    $this->id = $id;
  }

  // Returns name.
  public function getName()
  {
    return $this->name;
  }

  // Sets name.
  public function setName($name)
  {
    $this->name = $name;
  }
}
Since the Comment and Tag entities are analogous to the Post entity, we don't provide detailed
description of the code above.
Note
Please note that we do not create an entity for the fourth auxiliary table post_tag. That
table will be indirectly used further in this chapter when defining relationships between entities.
Specifying Relationships between Entities
Now it is time to use annotations to define relationships between entities. If you remember, we have two relationships between our entities:
- the
PostandCommententities are related as "one-to-many"; - and the
PostandTagentities are related as "many-to-many".
In Doctrine, to express a relationship between two entities, you add a private property paired with Docblock annotation.
For detailed information about relationships between entities in Doctrine, please read this page of Doctrine documentation.
OneToMany/ManyToOne
First, let's define one-to-many relationship between the Post and Comment entities. Modify the Post.php
file and add the following lines:
<?php
// ...
use Doctrine\Common\Collections\ArrayCollection;
use Application\Entity\Comment;

/**
 * This class represents a single post in a blog.
 * @ORM\Entity
 * @ORM\Table(name="post")
 */
class Post
{
  // ...

  /**
   * @ORM\OneToMany(targetEntity="\Application\Entity\Comment", mappedBy="post")
   * @ORM\JoinColumn(name="id", referencedColumnName="post_id")
   */
  protected $comments;

  /**
   * Constructor.
   */
  public function __construct()
  {
    $this->comments = new ArrayCollection();
  }

  /**
   * Returns comments for this post.
   * @return array
   */
  public function getComments()
  {
    return $this->comments;
  }

  /**
   * Adds a new comment to this post.
   * @param $comment
   */
  public function addComment($comment)
  {
    $this->comments[] = $comment;
  }
}
As you can see from the code above, we added the $comments property (line 19). This
property will be the collection of comments related to certain post.
We initialize the $comments property in class constructor (lines 24-27). By assigning it with
a new instance of Doctrine\Common\Collections\ArrayCollection class.
Note
A Doctrine ArrayCollection is an array of objects, like usual PHP array, but with additional
features required by Doctrine. It is implemented in Doctrine\Common component.
In lines 15-18, we add Doctrine annotations to the $comments property, so Doctrine knows how to
get all comments associated with the post:
- the
@ORM\OneToManytag defines that this is the one-to-many relationship between thePostentity and the (target)Commententity. - the
@ORM\JoinColumntag specifies which column to use for joining the tables associated with the entities.
The getComments() method (lines 33-36) allows getting all comments associated with the post.
We also added the addComment() method (lines 42-45) for adding new comment to post. You can notice that
we use the [] operator, just like we do with a typical PHP array.
Vice versa, we define the other side of this relationship by modifying the Comment entity as follows:
<?php
// ...
use Doctrine\Common\Collections\ArrayCollection;

// ...
class Comment
{
  /**
   * @ORM\ManyToOne(targetEntity="\Application\Entity\Post", inversedBy="comments")
   * @ORM\JoinColumn(name="post_id", referencedColumnName="id")
   */
  protected $post;

  /*
   * Returns associated post.
   * @return \Application\Entity\Post
   */
  public function getPost()
  {
    return $this->post;
  }

  /**
   * Sets associated post.
   * @param \Application\Entity\Post $post
   */
  public function setPost($post)
  {
    $this->post = $post;
    $post->addComment($this);
  }
}
In the code above, we added the $post private property to the entity class. This is not a collection,
but a single instance of Post class, because single comment always belongs to single post.
The annotation tags @ORM\ManyToOne and @ORM\JoinColumn are analogous to those we covered before.
ManyToMany
Let's now express the many-to-many relationship between the Post and Tag entities. For this relationship,
we indirectly use the auxiliary post_tag table.
Modify the Post entity as follows:
<?php
//...
use Application\Entity\Tag;

//...
class Post
{
  //...

  /**
   * @ORM\ManyToMany(targetEntity="\Application\Entity\Tag", inversedBy="posts")
   * @ORM\JoinTable(name="post_tag",
   *      joinColumns={@ORM\JoinColumn(name="post_id", referencedColumnName="id")},
   *      inverseJoinColumns={@ORM\JoinColumn(name="tag_id", referencedColumnName="id")}
   *      )
   */
  protected $tags;

  // Constructor.
  public function __construct()
  {
    //...
    $this->tags = new ArrayCollection();
  }

  // Returns tags for this post.
  public function getTags()
  {
    return $this->tags;
  }

  // Adds a new tag to this post.
  public function addTag($tag)
  {
    $this->tags[] = $tag;
  }

  // Removes association between this post and the given tag.
  public function removeTagAssociation($tag)
  {
    $this->tags->removeElement($tag);
  }
}
In the code above, we do the following:
- add
$tagsprivate property - mark the
$tagsproperty with Docblock annotations with@ORM\ManyToManyand@ORM\JoinTableannotation tags - initialize the property in constructor;
- add three methods
getTags(),addTag()andremoveTagAssociation()allowing to get/modify the property's value.
Finally, modify the Tag entity as follows:
<?php
//...
use Doctrine\Common\Collections\ArrayCollection;

class Tag
{
  // ...

  /**
   * @ORM\ManyToMany(targetEntity="\Application\Entity\Post", mappedBy="tags")
   */
  protected $posts;

  // Constructor.
  public function __construct()
  {
    $this->posts = new ArrayCollection();
  }

  // Returns posts associated with this tag.
  public function getPosts()
  {
    return $this->posts;
  }

  // Adds a post into collection of posts related to this tag.
  public function addPost($post)
  {
    $this->posts[] = $post;
  }
}
In the code above, we by analogy define the other side of the relationship and getter/setter methods for retrieving the collection of posts associated with the tag, and adding posts associated with the given tag.
Specifying Entity Locations
To let Doctrine know where to find entities for your Application module (or for another module you have), you add the following lines into your module.config.php file:
<?php
namespace Application;

use Doctrine\ORM\Mapping\Driver\AnnotationDriver;

return [
  // ...
  'doctrine' => [
        'driver' => [
            __NAMESPACE__ . '_driver' => [
                'class' => AnnotationDriver::class,
                'cache' => 'array',
                'paths' => [__DIR__ . '/../src/Entity']
            ],
            'orm_default' => [
                'drivers' => [
                    __NAMESPACE__ . '\Entity' => __NAMESPACE__ . '_driver'
                ]
            ]
        ]
    ]
];
Above, in line 2, we specify the namespace Application. This should be the name of the current
module.
Note
Note that usually we do not specify namespace in config files, but in this particular case it is
convenient to do. When we have namespace defined, we can use the __NAMESPACE__ placeholder which
expands into that namespace.
In line 8, we have doctrine key, under which we have the driver subkey.
In line 13, we tell Doctrine ORM that our entities are stored inside of Entity
directory under the module's src directory.
About Entity Manager
Entity manager is the primary access point to ORM functionality provided by Doctrine.
EntityManager is a Doctrine class that lives in Doctrine\ORM namespace and used to
retrieve entities from their repositories using search criteria and save entities
back to database.
EntityManager is registered as a service in the Laminas Framework service manager.
In your factory class, you retrieve the EntityManager from service manager as
follows (if you need a different connection than orm_default, just replace the orm_default with
the required connection name):
// Get Doctrine entity manager
$entityManager = $container->get('doctrine.entitymanager.orm_default');
The most used methods provided by the EntityManager class are listed in table 12.4 below.
| Method | Description |
|---|---|
persist($entity) |
Places new entity into entity manager (makes it managed). |
remove($entity) |
Removes an entity from database. |
flush() |
Flushes all changes to objects that have been queued up to now to the database. |
createQuery($dql) |
Creates a new Query object. |
getRepository($entityName) |
Gets the repository for an entity class. |
Table 12.4. Methods of the EntityManager
Let's review the methods from table 12.4.
To add a newly created entity to entity manager (to make the entity "managed"), you use
entity manager's persist() method.
To remove an entity from database, you use entity manager's remove() method.
When you call persist() or remove(), EntityManager remembers your changes in memory, but doesn't
apply changes to database automatically (by performance reasons). To apply changes to database in a
single transaction, you use the flush() method.
For example, look at the code example below that shows how to create an instance of the Post entity
and save it to database:
// Create new Post entity.
$post = new Post();
$post->setTitle('Top 10+ Books about Laminas Framework');
$post->setContent('Post body goes here');
$post->setStatus(Post::STATUS_PUBLISHED);
$currentDate = date('Y-m-d H:i:s');
$post->setDateCreated($currentDate);

// Add the entity to entity manager.
$entityManager->persist($post);

// Apply changes to database.
$entityManager->flush();
The createQuery() method of the entity manager is designed for creating a query from a DQL string. It returns the Query
object. You then execute the query and get results (an array of entities matching search conditions).
The getRepository() method of the entity manager is designed to get repository by entity class name. Please look
below for example where we get the repository for our Post entity:
$repository = $entityManager->getRepository(Post::class);
Entity Repositories
Conceptually, each entity class has its own repository. The repository provides methods for retrieving
entities from database. The repository can be considered as a collection of all
available entities of certain class. For example, there are repositories for our Post, Comment,
and Tag entities.
To load data from the database, you retrieve an entity from its repository. When you request the repository for an entity, it loads the data from the table mapped to the entity, and assigns entity's fields with the data.
Note
The Doctrine\ORM\EntityRepository class implements the default repository. If needed, you can,
by extending the EntityRepository, create your own repository for certain entity class.
We will show how to do that later.
The most used methods provided by the EntityRepository class are listed in table 12.5.
| Method | Description |
|---|---|
findAll() |
Finds all entities in the repository. |
find($id) |
Finds an entity by its identifier. |
findBy($criteria, $orderBy, $limit, $offset) |
Finds entities by a set of criteria. |
findOneBy($criteria, $orderBy) |
Finds a single entity by a set of criteria. |
createQueryBuilder($alias) |
Creates a new QueryBuilder instance that is prepopulated for this entity name. |
Table 12.5. Methods of the EntityRepository
The findAll() method gets all entities from repository. For simple example of its usage, look below:
// Find all posts from repository
$posts = $entityManager->getRepository(Post::class)->findAll();
The find() method is the simplest method of searching for an entity. It retrieves an entity
by its ID (primary key).
In the example below, we select post with ID = 1.
// Find post by primary key (ID)
$post = $entityManager->getRepository(Post::class)->find(1);
The findBy() takes a search criteria (and optional sorting order and limit)
arguments and returns a collection of entities matching criteria. The findOneBy() method is very
similar to findBy(), but it returns the first entity matching the criteria.
In the code example below, we use the findBy() method for selecting 50 most recent published posts:
// Find 50 most recent published posts
$posts = $entityManager->getRepository(Post::class)->findBy(
           ['status'=>Post::STATUS_PUBLISHED],
           ['dateCreated'=>'DESC'], 50);
For your convenience, the EntityRepository class also provides magic methods allowing you to query entities by attribute name
with the findByX and findOneByX methods, as follows (just substitute the X placeholder with an attribute name):
// Query a single post by ID attribute
$post = $entityManager->getRepository(Post::class)->findOneById(1);

// Query posts by status attribute
$posts = $entityManager->getRepository(Post::class)
        ->findByStatus(Post::STATUS_PUBLISHED);
And the most complex search method is the createQueryBuilder(). That method allows to create
complex DQL queries.
If standard find methods are not sufficient (or if you have complex search criteria and DQL queries),
you can create your own repository by extending the standard EntityRepository class
and encapsulate the search logic there. We will show how to do that later when implementing tag cloud feature
for our Blog sample.
Adding Blog Home Page
To show how to use EntityManager class, we will create the main page for the Blog web application.
This page will display the list of posts sorted by date in descending order.
To do that, add the constructor method and indexAction() method to the
IndexController controller class, as follows:
<?php
namespace Application\Controller;

use Laminas\Mvc\Controller\AbstractActionController;
use Laminas\View\Model\ViewModel;
use Application\Entity\Post;

class IndexController extends AbstractActionController
{
  /**
   * Entity manager.
   * @var Doctrine\ORM\EntityManager
   */
  private $entityManager;

  // Constructor method is used to inject dependencies to the controller.
  public function __construct($entityManager)
  {
    $this->entityManager = $entityManager;
  }

  // This is the default "index" action of the controller. It displays the
  // Posts page containing the recent blog posts.
  public function indexAction()
  {
    // Get recent posts
    $posts = $this->entityManager->getRepository(Post::class)
                     ->findBy(['status'=>Post::STATUS_PUBLISHED],
                              ['dateCreated'=>'DESC']);

    // Render the view template
    return new ViewModel([
      'posts' => $posts
    ]);
  }
}
In the code above, we first add the __construct() constructor method which is used to inject the Doctrine
entity manager into the controller (lines 17-20).
Inside of the indexAction() method, we get the repository of the Post entities with entity manager's getRepository() method (line 27).
With the findBy() method provided by repository, we select published posts sorted by date in
descending order. And, in line 32 we pass the selected posts to the view for rendering.
Next, create the factory for the IndexController. To do that, add the IndexControllerFactory.php file
inside of Controller/Factory directory under module's source directory. Put the following content to the
file:
<?php
namespace Application\Controller\Factory;

use Interop\Container\ContainerInterface;
use Laminas\ServiceManager\Factory\FactoryInterface;
use Application\Controller\IndexController;

/**
 * This is the factory for IndexController. Its purpose is to instantiate the
 * controller.
 */
class IndexControllerFactory implements FactoryInterface
{
    public function __invoke(ContainerInterface $container,
                     $requestedName, array $options = null)
    {
        $entityManager = $container->get('doctrine.entitymanager.orm_default');

        // Instantiate the controller and inject dependencies
        return new IndexController($entityManager);
    }
}
In the code above, you can see how we instantiate the Doctrine entity manager and inject it into the controller.
Do not forget to register our controller's factory inside module.config.php file. To do that, add the following:
//...
return [
    //...
    'controllers' => [
        //...
        'factories' => [
            Controller\IndexController::class =>
                            Controller\Factory\IndexControllerFactory::class,
        ],
    ],
    //...
];
Next, modify the index.phtml view template file in application/index directory under module's view directory and put the following content into it:
<h1>Posts</h1>

<?php foreach($posts as $post): ?>

<h3>
  <a href="#">
    <?= $this->escapeHtml($post->getTitle()); ?>
  </a>
</h3>

<p>
   <?= $this->escapeHtml($post->getContent()); ?>
</p>

<?php endforeach; ?>
In the view template above, we go in turn through the posts we selected and render each one's title and content. That simple!
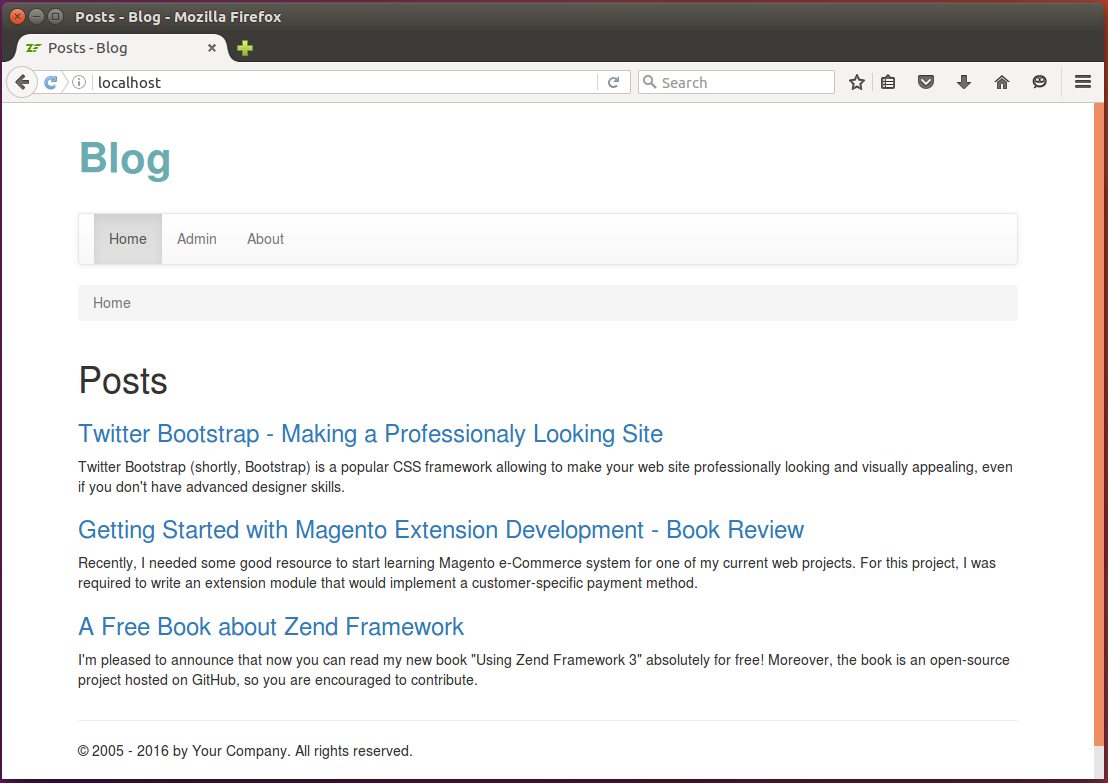
Now, if you open the Blog web application in your browser, you should be able to see the following page containing the list of posts (look at figure 12.6 below).
Adding New Post
In this section, we will create the Add New Post web page that will allow to add a new post to blog. For this, we will need four things:
- the
PostFormform model will be used for entering and validation of post title, content, status and tags; - the
PostManagerservice model will contain business logic for saving new post to database; - the
PostControllercontroller and itsPostController::addAction()action method will be used for getting form data, and callingPostManagerfor saving the data to database. - and add.phtml view template will render the form.
Adding PostForm
First, we add the PostForm form that will allow to enter data of a single post:
its title, content, comma-separated list of tags associated with the post, and status (Published or
Draft). To do that, create the PostForm.php file in Form directory under module's
source directory. Put the following content into the file:
<?php

namespace Application\Form;

use Laminas\Form\Form;
use Laminas\InputFilter\InputFilter;
use Application\Entity\Post;

/**
 * This form is used to collect post data.
 */
class PostForm extends Form
{
    /**
     * Constructor.
     */
    public function __construct()
    {
        // Define form name
        parent::__construct('post-form');

        // Set POST method for this form
        $this->setAttribute('method', 'post');

        $this->addElements();
        $this->addInputFilter();
    }

    /**
     * This method adds elements to form (input fields and submit button).
     */
    protected function addElements()
    {

        // Add "title" field
        $this->add([
            'type'  => 'text',
            'name' => 'title',
            'attributes' => [
                'id' => 'title'
            ],
            'options' => [
                'label' => 'Title',
            ],
        ]);

        // Add "content" field
        $this->add([
            'type'  => 'textarea',
            'name' => 'content',
            'attributes' => [
                'id' => 'content'
            ],
            'options' => [
                'label' => 'Content',
            ],
        ]);

        // Add "tags" field
        $this->add([
            'type'  => 'text',
            'name' => 'tags',
            'attributes' => [
                'id' => 'tags'
            ],
            'options' => [
                'label' => 'Tags',
            ],
        ]);

        // Add "status" field
        $this->add([
            'type'  => 'select',
            'name' => 'status',
            'attributes' => [
                'id' => 'status'
            ],
            'options' => [
                'label' => 'Status',
                'value_options' => [
                    Post::STATUS_PUBLISHED => 'Published',
                    Post::STATUS_DRAFT => 'Draft',
                ]
            ],
        ]);

        // Add the submit button
        $this->add([
            'type'  => 'submit',
            'name' => 'submit',
            'attributes' => [
                'value' => 'Create',
                'id' => 'submitbutton',
            ],
        ]);
    }

    /**
     * This method creates input filter (used for form filtering/validation).
     */
    private function addInputFilter()
    {

        $inputFilter = new InputFilter();
        $this->setInputFilter($inputFilter);

        $inputFilter->add([
                'name'     => 'title',
                'required' => true,
                'filters'  => [
                    ['name' => 'StringTrim'],
                    ['name' => 'StripTags'],
                    ['name' => 'StripNewlines'],
                ],
                'validators' => [
                    [
                        'name'    => 'StringLength',
                        'options' => [
                            'min' => 1,
                            'max' => 1024
                        ],
                    ],
                ],
            ]);

        $inputFilter->add([
                'name'     => 'content',
                'required' => true,
                'filters'  => [
                    ['name' => 'StripTags'],
                ],
                'validators' => [
                    [
                        'name'    => 'StringLength',
                        'options' => [
                            'min' => 1,
                            'max' => 4096
                        ],
                    ],
                ],
            ]);

        $inputFilter->add([
                'name'     => 'tags',
                'required' => true,
                'filters'  => [
                    ['name' => 'StringTrim'],
                    ['name' => 'StripTags'],
                    ['name' => 'StripNewlines'],
                ],
                'validators' => [
                    [
                        'name'    => 'StringLength',
                        'options' => [
                            'min' => 1,
                            'max' => 1024
                        ],
                    ],
                ],
            ]);

        $inputFilter->add([
                'name' => 'status',
                'required' => true,
                'validators' => [
                    [
                        'name' => 'InArray',
                        'options'=> [
                            'haystack' => [Post::STATUS_PUBLISHED, Post::STATUS_DRAFT],
                        ]
                    ],
                ],
            ]);
    }
}
As you can see from the code above, the PostForm class defines a Laminas form with title, content,
tags, and status fields. It also has the Submit button.
Since we covered forms in details in previous chapters, here we do not explain the code presented above deeply.
Adding PostManager Service
According to Domain Driven Design pattern, we put business logic into service models. In our Blog
sample, we will create and register the PostManager service. This service will have the addNewPost()
public method that will contain business logic of adding Post entity to database and associating it with
one or several Tag entities.
The PostManager service will contain business logic of the Blog sample. This business logic
includes, but not limited to, adding new post to the blog.
Create the PostManager.php file inside the Service directory under the module's source directory. Put the following content into that file:
<?php
namespace Application\Service;

use Application\Entity\Post;
use Application\Entity\Comment;
use Application\Entity\Tag;
use Laminas\Filter\StaticFilter;

// The PostManager service is responsible for adding new posts.
class PostManager
{
  /**
   * Doctrine entity manager.
   * @var Doctrine\ORM\EntityManager
   */
  private $entityManager;

  // Constructor is used to inject dependencies into the service.
  public function __construct($entityManager)
  {
    $this->entityManager = $entityManager;
  }

  // This method adds a new post.
  public function addNewPost($data)
  {
    // Create new Post entity.
    $post = new Post();
    $post->setTitle($data['title']);
    $post->setContent($data['content']);
    $post->setStatus($data['status']);
    $currentDate = date('Y-m-d H:i:s');
    $post->setDateCreated($currentDate);

    // Add the entity to entity manager.
    $this->entityManager->persist($post);

    // Add tags to post
    $this->addTagsToPost($data['tags'], $post);

    // Apply changes to database.
    $this->entityManager->flush();
  }

  // Adds/updates tags in the given post.
  private function addTagsToPost($tagsStr, $post)
  {
    // Remove tag associations (if any)
    $tags = $post->getTags();
    foreach ($tags as $tag) {
      $post->removeTagAssociation($tag);
    }

    // Add tags to post
    $tags = explode(',', $tagsStr);
    foreach ($tags as $tagName) {

      $tagName = StaticFilter::execute($tagName, 'StringTrim');
      if (empty($tagName)) {
        continue;
      }

      $tag = $this->entityManager->getRepository(Tag::class)
                 ->findOneByName($tagName);
      if ($tag == null)
        $tag = new Tag();
      $tag->setName($tagName);
      $tag->addPost($post);

      $this->entityManager->persist($tag);

      $post->addTag($tag);
    }
  }
}
In lines 25-43, we have the addNewPost() public method which takes the $data variable as argument (this variable
should contain the data entered by the website user into the form). We create a new instance of Post entity (line 28) and fill its
properties with user-provided data. We use the EntityManager's persist() method (line 36) to add the newly
created entity to entity manager. The addTagsToPost() private method is called (line 39) to assign
the post with one or several tags. And the flush() method is used for applying changes to database
in a single transaction (line 42).
The addTagsToPost() private method contains logic for removing old associations between the post and
tags (lines 49-52), then parsing comma-separated list of tags (line 55), and assigning new tags to the
post (lines 56-73).
Next, add a factory for the PostManager service. To do that, add the PostManagerFactory.php file under
the Service/Factory directory under the module's source directory. Put the following content into that file:
<?php
namespace Application\Service\Factory;

use Interop\Container\ContainerInterface;
use Laminas\ServiceManager\Factory\FactoryInterface;
use Application\Service\PostManager;

/**
 * This is the factory for PostManager. Its purpose is to instantiate the
 * service.
 */
class PostManagerFactory implements FactoryInterface
{
    public function __invoke(ContainerInterface $container,
                    $requestedName, array $options = null)
    {
        $entityManager = $container->get('doctrine.entitymanager.orm_default');

        // Instantiate the service and inject dependencies
        return new PostManager($entityManager);
    }
}
Finally, we register PostManager service by modifying module.config.php configuration file as follows:
<?php
//...
return [
    //...
    'service_manager' => [
        //...
        'factories' => [
            Service\PostManager::class => Service\Factory\PostManagerFactory::class,
        ],
    ],
    //...
];
Creating Controller Action and View Template
For post management (e.g. adding, editing, viewing and removing posts), we will create the
PostController controller class. We create the addAction() action method inside the
PostController controller class that will allow to add a new post to blog (see code below):
class PostController extends AbstractActionController
{
    /**
     * Entity manager.
     * @var Doctrine\ORM\EntityManager
     */
    private $entityManager;

    /**
     * Post manager.
     * @var Application\Service\PostManager
     */
    private $postManager;

    /**
     * Constructor is used for injecting dependencies into the controller.
     */
    public function __construct($entityManager, $postManager)
    {
        $this->entityManager = $entityManager;
        $this->postManager = $postManager;
    }

    /**
     * This action displays the "New Post" page. The page contains
     * a form allowing to enter post title, content and tags. When
     * the user clicks the Submit button, a new Post entity will
     * be created.
     */
    public function addAction()
    {
        // Create the form.
        $form = new PostForm();

        // Check whether this post is a POST request.
        if ($this->getRequest()->isPost()) {

            // Get POST data.
            $data = $this->params()->fromPost();

            // Fill form with data.
            $form->setData($data);
            if ($form->isValid()) {

                // Get validated form data.
                $data = $form->getData();

                // Use post manager service to add new post to database.
                $this->postManager->addNewPost($data);

                // Redirect the user to "index" page.
                return $this->redirect()->toRoute('application');
            }
        }

        // Render the view template.
        return new ViewModel([
            'form' => $form
        ]);
    }
}
Above, in line 33, we create an instance of PostForm form.
In line 36, we check whether this is a POST request. If the request is a POST request, we fill the
form with input data and validate the data. In case of valid data, we call the addNewPost() method
on the PostManager service (line 49), and redirect the user to the list of posts.
To instantiate the PostController, we will need a factory. Create the controller factory by adding the
PostControllerFactory.php file to the Controller/Factory directory under the module's source directory:
<?php
namespace Application\Controller\Factory;

use Interop\Container\ContainerInterface;
use Laminas\ServiceManager\Factory\FactoryInterface;
use Application\Service\PostManager;
use Application\Controller\PostController;

/**
 * This is the factory for PostController. Its purpose is to instantiate the
 * controller.
 */
class PostControllerFactory implements FactoryInterface
{
    public function __invoke(ContainerInterface $container,
                           $requestedName, array $options = null)
    {
        $entityManager = $container->get('doctrine.entitymanager.orm_default');
        $postManager = $container->get(PostManager::class);

        // Instantiate the controller and inject dependencies
        return new PostController($entityManager, $postManager);
    }
}
Next, register the PostController controller inside the module.config.php file:
<?php
//...
return [
    //...
    'controllers' => [
        //...
        'factories' => [
            Controller\PostController::class =>
                           Controller\Factory\PostControllerFactory::class,
        ],
    ],
    //...
];
Then, add the posts route for the new controller (modify the module.config.php as follows):
<?php
//...
return [
    //...
    'router' => [
        'routes' => [
            //...
            'posts' => [
                'type'    => Segment::class,
                'options' => [
                    'route'    => '/posts[/:action[/:id]]',
                    'constraints' => [
                        'action' => '[a-zA-Z][a-zA-Z0-9_-]*',
                        'id' => '[0-9]*'
                    ],
                    'defaults' => [
                        'controller'    => Controller\PostController::class,
                        'action'        => 'index',
                    ],
                ],
            ],
        ],
    ],
    //...
];
Finally, we add the view template. Create the add.phtml file in application/post directory under module's view directory and put the following content into it:
<?php
$form = $this->form;
$form->get('title')->setAttributes([
    'class'=>'form-control',
    'placeholder'=>'Enter post title here'
    ]);
$form->get('content')->setAttributes([
    'class'=>'form-control',
    'placeholder'=>'Type content here',
    'rows'=>6
    ]);
$form->get('tags')->setAttributes([
    'class'=>'form-control',
    'placeholder'=>'comma, separated, list, of, tags'
    ]);
$form->get('status')->setAttributes([
    'class'=>'form-control'
    ]);
$form->get('submit')->setAttributes(['class'=>'btn btn-primary']);
$form->prepare();

?>

<h1>Add New Post</h1>

<p>
    Please fill out the following form and click the <i>Create</i> button.
</p>

<div class="row">
    <div class="col-md-6">
        <?= $this->form()->openTag($form); ?>

        <div class="form-group">
            <?= $this->formLabel($form->get('title')); ?>
            <?= $this->formElement($form->get('title')); ?>
            <?= $this->formElementErrors($form->get('title')); ?>
        </div>

        <div class="form-group">
            <?= $this->formLabel($form->get('content')); ?>
            <?= $this->formElement($form->get('content')); ?>
            <?= $this->formElementErrors($form->get('content')); ?>
        </div>

        <div class="form-group">
            <?= $this->formLabel($form->get('tags')); ?>
            <?= $this->formElement($form->get('tags')); ?>
            <?= $this->formElementErrors($form->get('tags')); ?>
            <p class="help-block">Separate tags with comma.</p>
        </div>

        <div class="form-group">
            <?= $this->formLabel($form->get('status')); ?>
            <?= $this->formElement($form->get('status')); ?>
            <?= $this->formElementErrors($form->get('status')); ?>
        </div>

        <?= $this->formElement($form->get('submit')); ?>

        <?= $this->form()->closeTag(); ?>
    </div>
</div>
Now, if you open the URL http://localhost/posts/add in your web browser, you should see the Add New Post page like shown in figure 12.7 below:
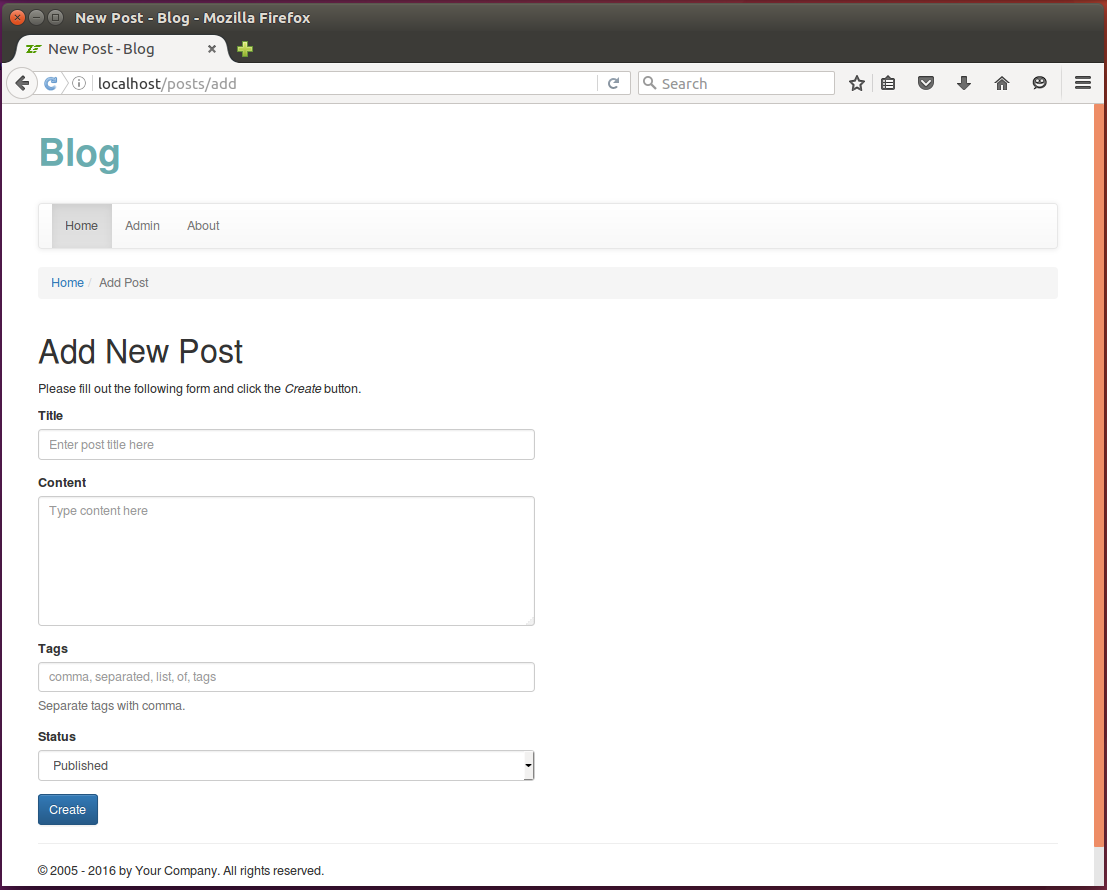
Filling the form and clicking the Create button results in saving the new post to database. Then you are able to see the newly created post in the list of posts at the Home page.
Editing Existing Post
In this section, we will implement the Edit Post page which contains the form allowing to edit the data of existing post, send new data to server and apply changes to database. Site visitor will be able to see the page by entering the following URL in browser's navigation bar: http://localhost/posts/edit/<id>, where <id> is the unique identifier of the post.
To implement this page we need the following things:
- create a form that would allow to enter post title, content, etc. For this page, we can
successfully reuse the
PostFormform we created earlier (we just rename the Create button caption into Save). - add
updatePost()method to thePostManagerservice. The method would find the post by ID in database and update its data; - add
convertTagsToString()method to thePostManagerservice. This method would take the post entity, and on output produce string containing comma-separated list of tags; - add the
PostController::editAction()action method that would take user input, pass it to models and return data for rendering; - and add the edit.phtml view template file that would render the form.
Modifying PostManager
First, we add the updatePost() and convertTagsToString() methods to the PostManager service
model as follows:
<?php
//...
class PostManager
{
    //...

    // This method allows to update data of a single post.
    public function updatePost($post, $data)
    {
        $post->setTitle($data['title']);
        $post->setContent($data['content']);
        $post->setStatus($data['status']);

        // Add tags to post
        $this->addTagsToPost($data['tags'], $post);

        // Apply changes to database.
        $this->entityManager->flush();
    }

    // Converts tags of the given post to comma separated list (string).
    public function convertTagsToString($post)
    {
        $tags = $post->getTags();
        $tagCount = count($tags);
        $tagsStr = '';
        $i = 0;
        foreach ($tags as $tag) {
            $i ++;
            $tagsStr .= $tag->getName();
            if ($i < $tagCount)
                $tagsStr .= ', ';
        }

        return $tagsStr;
    }
}
Above, we have the updatePost() method (lines 8-19) that takes an existing Post entity,
the new title, content, status and the list of tags. It then updates entity's properties and
saves changes to database using flush() method.
Note
Note that the updatePost() method doesn't use the persist() method of entity manager, because
here we have existing post, not a new one.
Then, we have the convertTagsToString() method (lines 22-36) which takes the post, goes through
Tag entities associated with the post and formats and returns the comma-separated list of tags.
Adding Controller Action and View Template
Next, add the editAction() to PostController controller class as follows:
<?php
namespace Application\Controller;
//...
use Application\Form\PostForm;
use Application\Entity\Post;

class PostController extends AbstractActionController
{
  // This action displays the page allowing to edit a post.
  public function editAction()
  {
    // Create the form.
    $form = new PostForm();

    // Get post ID.
    $postId = $this->params()->fromRoute('id', -1);

    // Find existing post in the database.
    $post = $this->entityManager->getRepository(Post::class)
                ->findOneById($postId);
    if ($post == null) {
      $this->getResponse()->setStatusCode(404);
      return;
    }

    // Check whether this post is a POST request.
    if ($this->getRequest()->isPost()) {

      // Get POST data.
      $data = $this->params()->fromPost();

      // Fill form with data.
      $form->setData($data);
      if ($form->isValid()) {

        // Get validated form data.
        $data = $form->getData();

        // Use post manager service to add new post to database.
        $this->postManager->updatePost($post, $data);

        // Redirect the user to "admin" page.
        return $this->redirect()->toRoute('posts', ['action'=>'admin']);
      }
    } else {
      $data = [
               'title' => $post->getTitle(),
               'content' => $post->getContent(),
               'tags' => $this->postManager->convertTagsToString($post),
               'status' => $post->getStatus()
            ];

      $form->setData($data);
    }

    // Render the view template.
    return new ViewModel([
            'form' => $form,
            'post' => $post
        ]);
  }
}
In the code above, we extract the post ID using the fromRoute() method of the params() controller
plugin. Then we search for post having such ID using the findOneBy() method provided by the
entity repository.
Then we check if this is a POST request. If this is the POST request, we fill in and validate the form
with POST data. Then we use the updatePost() method of the PostManager service.
Finally, create the application/post/edit.phtml file under the module's view directory. Place the following content there:
<?php
$form = $this->form;
$form->get('title')->setAttributes([
    'class'=>'form-control',
    'placeholder'=>'Enter post title here'
    ]);
$form->get('content')->setAttributes([
    'class'=>'form-control',
    'placeholder'=>'Type content here',
    'rows'=>6
    ]);
$form->get('tags')->setAttributes([
    'class'=>'form-control',
    'placeholder'=>'comma, separated, list, of, tags'
    ]);
$form->get('status')->setAttributes([
    'class'=>'form-control'
    ]);
$form->get('submit')->setAttributes(['class'=>'btn btn-primary']);
$form->get('submit')->setValue('Save');
$form->prepare();

?>

<h1>Edit Post</h1>

<p>
    Please fill out the following form and click the *Save* button.
</p>

<div class="row">
    <div class="col-md-6">
        <?= $this->form()->openTag($form); ?>

        <div class="form-group">
            <?= $this->formLabel($form->get('title')); ?>
            <?= $this->formElement($form->get('title')); ?>
            <?= $this->formElementErrors($form->get('title')); ?>
        </div>

        <div class="form-group">
            <?= $this->formLabel($form->get('content')); ?>
            <?= $this->formElement($form->get('content')); ?>
            <?= $this->formElementErrors($form->get('content')); ?>
        </div>

        <div class="form-group">
            <?= $this->formLabel($form->get('tags')); ?>
            <?= $this->formElement($form->get('tags')); ?>
            <?= $this->formElementErrors($form->get('tags')); ?>
            <p class="help-block">Separate tags with comma.</p>
        </div>

        <div class="form-group">
            <?= $this->formLabel($form->get('status')); ?>
            <?= $this->formElement($form->get('status')); ?>
            <?= $this->formElementErrors($form->get('status')); ?>
        </div>

        <?= $this->formElement($form->get('submit')); ?>

        <?= $this->form()->closeTag(); ?>
    </div>
</div>
Now, if you open the URL http://localhost/posts/edit/<id> in your web browser, you should be able to see the Edit Post page that allows to edit an existing post (see the figure 12.8 below):
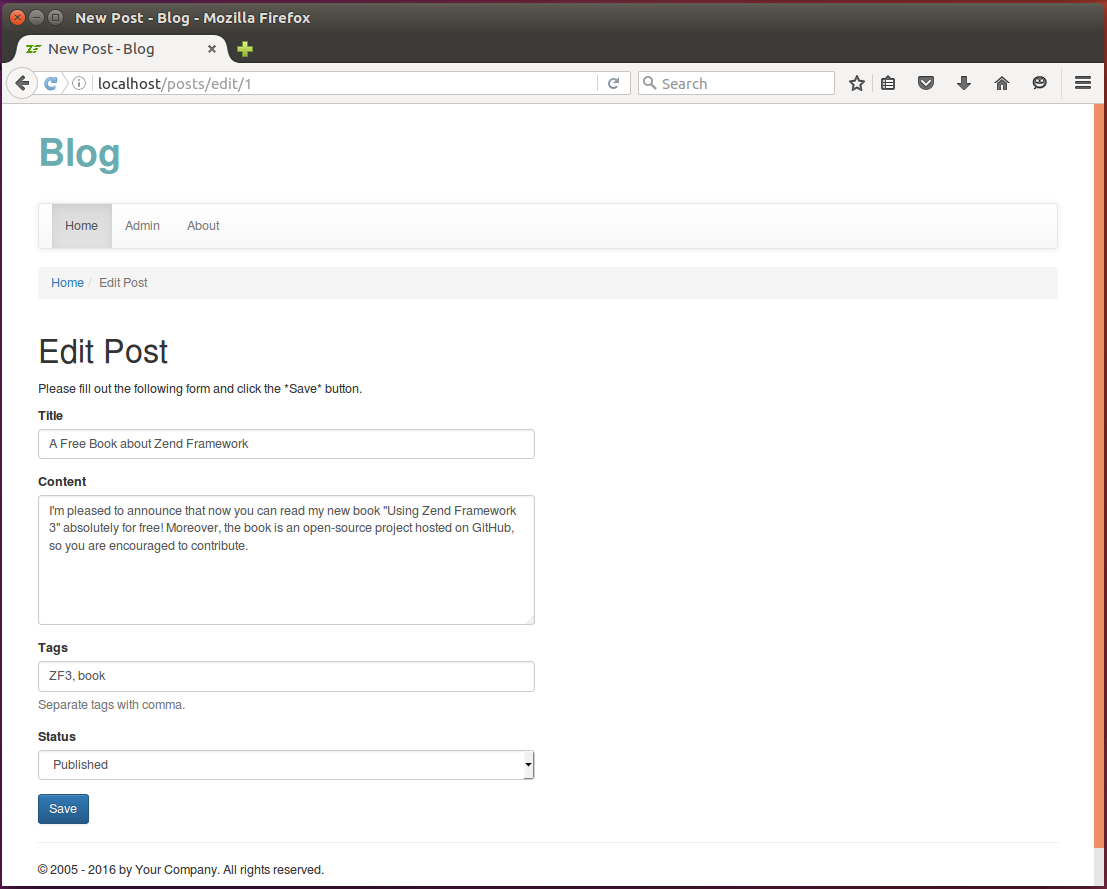
Clicking the Save button results in saving the changes to database.
Deleting a Post
In this section, we will implement the deleteAction() action of the PostController. This action
will allow to delete certain post given its ID. The action will take ID as a GET variable, look if
a post with such ID exists, and if exists, deletes the post, its related comments and tag associations.
Site visitor will be able to trigger the action by entering the following URL in browser's navigation
bar: http://localhost/posts/delete/<id>, where <id> is the unique
identifier of the post. Finally, the action redirects the site visitor to the Admin page.
Modifying PostManager
First, we'll add the removePost() method to the PostManager service. This method will remove the
post and its associated comments. It will also remove associations between post and tags.
<?php
//...
class PostManager
{
  //...

  // Removes post and all associated comments.
  public function removePost($post)
  {
    // Remove associated comments
    $comments = $post->getComments();
    foreach ($comments as $comment) {
      $this->entityManager->remove($comment);
    }

    // Remove tag associations (if any)
    $tags = $post->getTags();
    foreach ($tags as $tag) {
      $post->removeTagAssociation($tag);
    }

    $this->entityManager->remove($post);

    $this->entityManager->flush();
  }
}
In the code above, we first retrieve all comments associated with the post using the getComments()
method of the Post entity. Then we call EntityManager's remove() method and pass it each comment
that we want to remove.
Next, we get all tags associated with the post by calling Post's getTags() method. We remove
association between the post and tag (but not tag itself!) with the help of the Post's removeTagAssociation()
method (see below for the code of the method).
Finally, we remove the post itself by calling the EntityManager's remove() method. We apply changes
to database with the flush() method.
And here is the code of the Post::removeTagAssociation() method:
// Removes association between this post and the given tag.
public function removeTagAssociation($tag)
{
  $this->tags->removeElement($tag);
}
Adding Controller Action
The PostController::deleteAction() method retrieves the ID of the post to be removed, checks
whether this is a valid post ID. If so, it calls the PostManager::removePost() method to
remove the post and apply changes to database. Finally, it redirects the site visitor to the Admin page.
<?php

//..
class PostController extends AbstractActionController
{
  // This "delete" action displays the Delete Post page.
  public function deleteAction()
  {
    $postId = $this->params()->fromRoute('id', -1);

    $post = $this->entityManager->getRepository(Post::class)
                ->findOneById($postId);
    if ($post == null) {
      $this->getResponse()->setStatusCode(404);
      return;
    }

    $this->postManager->removePost($post);

    // Redirect the user to "index" page.
    return $this->redirect()->toRoute('posts', ['action'=>'admin']);
  }
}
Implementing Post Preview
In this section, we will create controller's action and its corresponding view template that would allow site visitors to preview certain post by entering the following URL in browser's navigation bar: http://localhost/posts/view/<id>, where <id> is the unique identifier of the post.
The page will also allow to add comments to the post using the form located at the bottom of the page. For example of what we are trying to achive, please look at the figure 12.9 below:
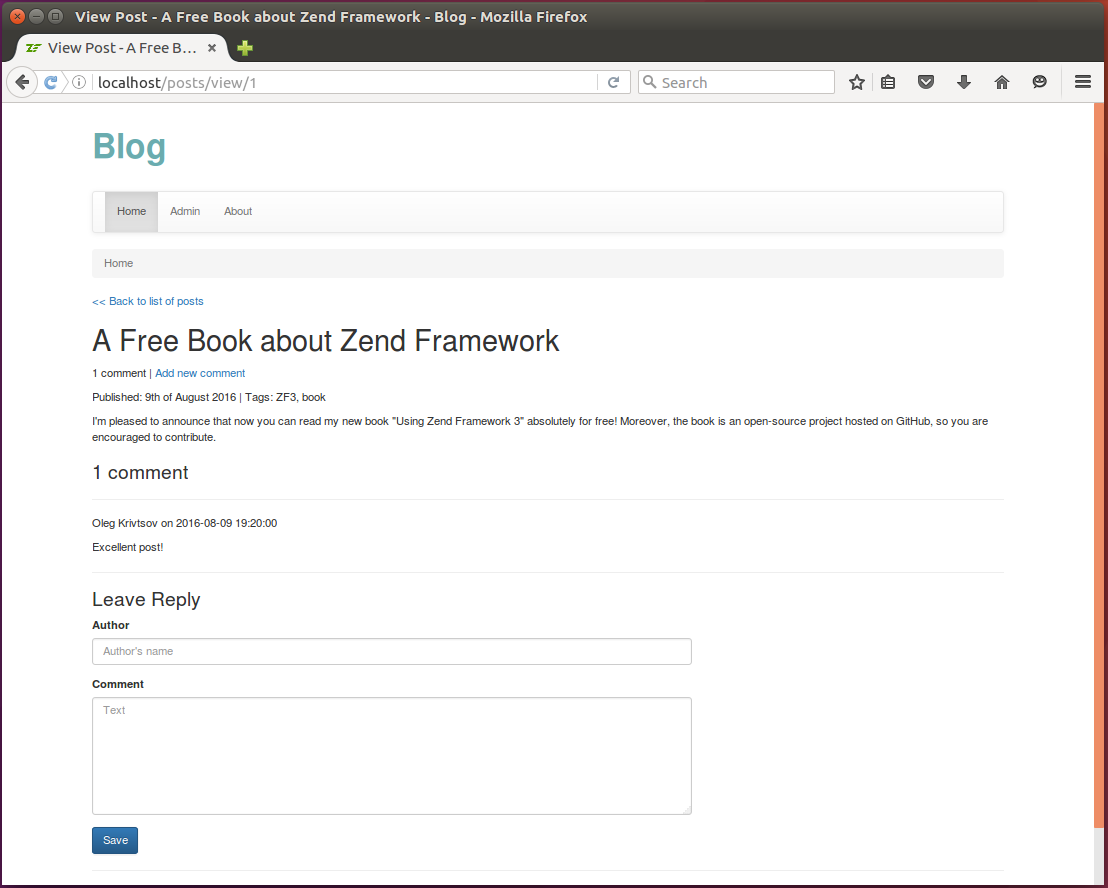
So, for this we need four things:
- to create the form that would allow to enter the comment and its author's name;
- to modify the
PostManagerand add all necessary business logic; - to create
PostController::viewAction()controller's action; - and to create the view.phtml view template.
Adding CommentForm
First, we implement the CommentForm form that will allow to add a comment to a post.
Create the CommentForm.php file in Form directory under module's source directory.
Put the following content into the file:
<?php
namespace Application\Form;

use Laminas\Form\Form;
use Laminas\InputFilter\InputFilter;

/**
 * This form is used to collect comment data.
 */
class CommentForm extends Form
{
  // Constructor.
  public function __construct()
  {
    // Define form name
    parent::__construct('comment-form');

    // Set POST method for this form
    $this->setAttribute('method', 'post');

    $this->addElements();
    $this->addInputFilter();
  }

  // This method adds elements to form (input fields and submit button).
  protected function addElements()
  {
    // Add "author" field
    $this->add([
            'type'  => 'text',
            'name' => 'author',
            'attributes' => [
                'id' => 'author'
            ],
            'options' => [
                'label' => 'Author',
            ],
        ]);

    // Add "comment" field
    $this->add([
           'type'  => 'textarea',
            'name' => 'comment',
            'attributes' => [
                'id' => 'comment'
            ],
            'options' => [
                'label' => 'Comment',
            ],
        ]);

    // Add the submit button
    $this->add([
            'type'  => 'submit',
            'name' => 'submit',
            'attributes' => [
                'value' => 'Save',
                'id' => 'submitbutton',
            ],
        ]);
  }

  // This method creates input filter (used for form filtering/validation).
  private function addInputFilter()
  {
    $inputFilter = new InputFilter();
    $this->setInputFilter($inputFilter);

    $inputFilter->add([
                'name'     => 'author',
                'required' => true,
                'filters'  => [
                    ['name' => 'StringTrim'],
                ],
                'validators' => [
                    [
                        'name'    => 'StringLength',
                        'options' => [
                            'min' => 1,
                            'max' => 128
                        ],
                    ],
                ],
            ]);

    $inputFilter->add([
                'name'     => 'comment',
                'required' => true,
                'filters'  => [
                    ['name' => 'StripTags'],
                ],
                'validators' => [
                    [
                        'name'    => 'StringLength',
                        'options' => [
                            'min' => 1,
                            'max' => 4096
                        ],
                    ],
                ],
            ]);
  }
}
As you see from the code above, the CommentForm form contains the author, comment fields, and the Submit button.
Since we covered forms in details in previous chapters, here we do not explain the code presented above deeply.
Modifying PostManager
Here, we add two methods:
- the
getCommentCountStr()method will format the comment count string for the given post (e.g., "No comments", "1 comment", "2 comments", etc.) - and the
addCommentToPost()method will be used for adding a new comment to post.
<?php
//...

/**
 * The PostManager service is responsible for adding new posts.
 */
class PostManager
{
    //...

    // Returns count of comments for given post as properly formatted string.
    public function getCommentCountStr($post)
    {
        $commentCount = count($post->getComments());
        if ($commentCount == 0)
            return 'No comments';
        else if ($commentCount == 1)
            return '1 comment';
        else
            return $commentCount . ' comments';
    }


    // This method adds a new comment to post.
    public function addCommentToPost($post, $data)
    {
        // Create new Comment entity.
        $comment = new Comment();
        $comment->setPost($post);
        $comment->setAuthor($data['author']);
        $comment->setContent($data['comment']);
        $currentDate = date('Y-m-d H:i:s');
        $comment->setDateCreated($currentDate);

        // Add the entity to entity manager.
        $this->entityManager->persist($comment);

        // Apply changes.
        $this->entityManager->flush();
    }
}
Adding Controller Action and View Template
Now, add the PostController::viewAction() method and put the following code there:
<?php
//...
use Application\Form\CommentForm;
use Application\Entity\Comment;

class PostController extends AbstractActionController
{
  /**
   * This action displays the "View Post" page allowing to see the post title
   * and content. The page also contains a form allowing
   * to add a comment to post.
   */
  public function viewAction()
  {
    $postId = $this->params()->fromRoute('id', -1);

    $post = $this->entityManager->getRepository(Post::class)
              ->findOneById($postId);

    if ($post == null) {
      $this->getResponse()->setStatusCode(404);
      return;
    }

    $commentCount = $this->postManager->getCommentCountStr($post);

    // Create the form.
    $form = new CommentForm();

    // Check whether this post is a POST request.
    if($this->getRequest()->isPost()) {

      // Get POST data.
      $data = $this->params()->fromPost();

      // Fill form with data.
      $form->setData($data);
      if($form->isValid()) {

        // Get validated form data.
        $data = $form->getData();

        // Use post manager service to add new comment to post.
        $this->postManager->addCommentToPost($post, $data);

        // Redirect the user again to "view" page.
        return $this->redirect()->toRoute('posts', ['action'=>'view', 'id'=>$postId]);
      }
    }

    // Render the view template.
    return new ViewModel([
      'post' => $post,
      'commentCount' => $commentCount,
      'form' => $form,
      'postManager' => $this->postManager
    ]);
  }
}
Finally, add the view.phtml view template file and put the following content there:
<?php
$form = $this->form;
$form->get('author')->setAttributes([
'class'=>'form-control',
'placeholder'=>'Author\'s name'
]);
$form->get('comment')->setAttributes([
'class'=>'form-control',
'rows'=>6,
'placeholder'=>'Text'
]);
$form->get('submit')->setAttributes(['class'=>'btn btn-primary']);
$form->prepare();
?>
<a href="
<?= $this->url('application', ['action'=>'index']); ?>">
<< Back to list of posts
</a>
<h1>
<?= $this->escapeHtml($post->getTitle()); ?>
</h1>
<p class="comments-header">
<?= $this->escapeHtml($postManager->getCommentCountStr($post)); ?> |
<a href="#comment">
Add new comment
</a>
</p>
<p>
Published: <?= $this->escapeHtml(date('jS \of F Y', strtotime($post->getDateCreated()))); ?>
| Tags: <?= $this->escapeHtml($postManager->convertTagsToString($post)); ?>
</p>
<p>
<?= $this->escapeHtml($post->getContent()); ?>
</p>
<h3><?= $this->escapeHtml($postManager->getCommentCountStr($post)); ?></h3>
<?php foreach ($post->getComments() as $comment): ?>
<hr>
<p>
<?= $this->escapeHtml($comment->getAuthor()) ?> on
<?= $this->escapeHtml($comment->getDateCreated()); ?>
</p>
<p>
<?= $this->escapeHtml($comment->getContent()); ?>
</p>
<?php endforeach; ?>
<hr>
<a name="comment"></a>
<h3>Leave Reply</h3>
<div class="row">
<div class="col-md-8">
<?= $this->form()->openTag($form); ?>
<div class="form-group">
<?= $this->formLabel($form->get('author')); ?>
<?= $this->formElement($form->get('author')); ?>
<?= $this->formElementErrors($form->get('author')); ?>
</div>
<div class="form-group">
<?= $this->formLabel($form->get('comment')); ?>
<?= $this->formElement($form->get('comment')); ?>
<?= $this->formElementErrors($form->get('comment')); ?>
</div>
<?= $this->formElement($form->get('submit')); ?>
<?= $this->form()->closeTag(); ?>
</div>
</div>
Implementing Admin Page
Admin page of the Blog sample web application contains the list of all blog posts (either published or drafts), and allows to view, edit and delete posts.
To implement this page, add the adminAction() action method to the PostController
class, as follows:
<?php

//..
class PostController extends AbstractActionController
{
  /**
   * This "admin" action displays the Manage Posts page. This page contains
   * the list of posts with an ability to edit/delete any post.
  */
  public function adminAction()
  {
    // Get posts
    $posts = $this->entityManager->getRepository(Post::class)
               ->findBy([], ['dateCreated'=>'DESC']);

    // Render the view template
    return new ViewModel([
            'posts' => $posts,
            'postManager' => $this->postManager
        ]);
  }
}
We will also need to show a post status in text form ('Draft' or 'Published').
Conversion of integer post status to string can be implemented in the getPostStatusAsString() method
of PostManager service. Add the getPostStatusAsString() method to PostManager class
as follows:
/**
 * Returns status as a string.
 */
public function getPostStatusAsString($post)
{
    switch ($post->getStatus()) {
        case Post::STATUS_DRAFT: return 'Draft';
        case Post::STATUS_PUBLISHED: return 'Published';
    }

    return 'Unknown';
}
Finally, add the corresponding view template file admin.phtml to the application/post directory under module's view directory:
<h1>Manage Posts</h1>

<p>
<a class="btn btn-default" href="
    <?= $this->url('posts', ['action'=>'add']); ?>">
    New Post
</a>
</p>

<table class="table table-striped">

   <tr>
        <th>ID</th>
        <th>Post Title</th>
        <th>Date Created</th>
        <th>Status</th>
        <th>Actions</th>
    </tr>

    <?php foreach ($posts as $post): ?>

    <tr>
        <td><?= $this->escapeHtml($post->getId()); ?></td>
        <td>
            <a href="<?= $this->url('posts', ['action'=>'view', 'id'=>$post->getId()]); ?>">
                <?= $this->escapeHtml($post->getTitle()); ?>
            </a>
        </td>
        <td><?= $this->escapeHtml($post->getDateCreated()); ?></td>
        <td><?= $this->escapeHtml($postManager->getPostStatusAsString($post)); ?></td>
        <td>
            <a class="btn btn-info" href="<?= $this->url('posts',
                    ['action'=>'edit', 'id'=>$post->getId()]); ?>">
                <span class="glyphicon glyphicon-pencil" ></span> Edit
            </a>
            <a class="btn btn-danger" href="<?= $this->url('posts',
                    ['action'=>'delete', 'id'=>$post->getId()]); ?>">
                <span class="glyphicon glyphicon-remove"></span> Delete
            </a>
        </td>
    </tr>

    <?php endforeach; ?>

</table>
Now, if you open the URL http://localhost/posts/admin in web browser's navigation bar, you should be able to see the page like in figure 12.10 below:
Implementing Tag Cloud
Another major feature we implement in the Blog sample will be the tag cloud. The tag cloud appears on the Home page. The tag cloud contains most popular tags, and tag's font size varies depending on popularity of the tag: most popular tags appear larger than less popular ones. Clicking the tag in the tag cloud results in filtering posts by this tag.
For example of what we are trying to achieve, please look at the right side of the figure 12.11 below:
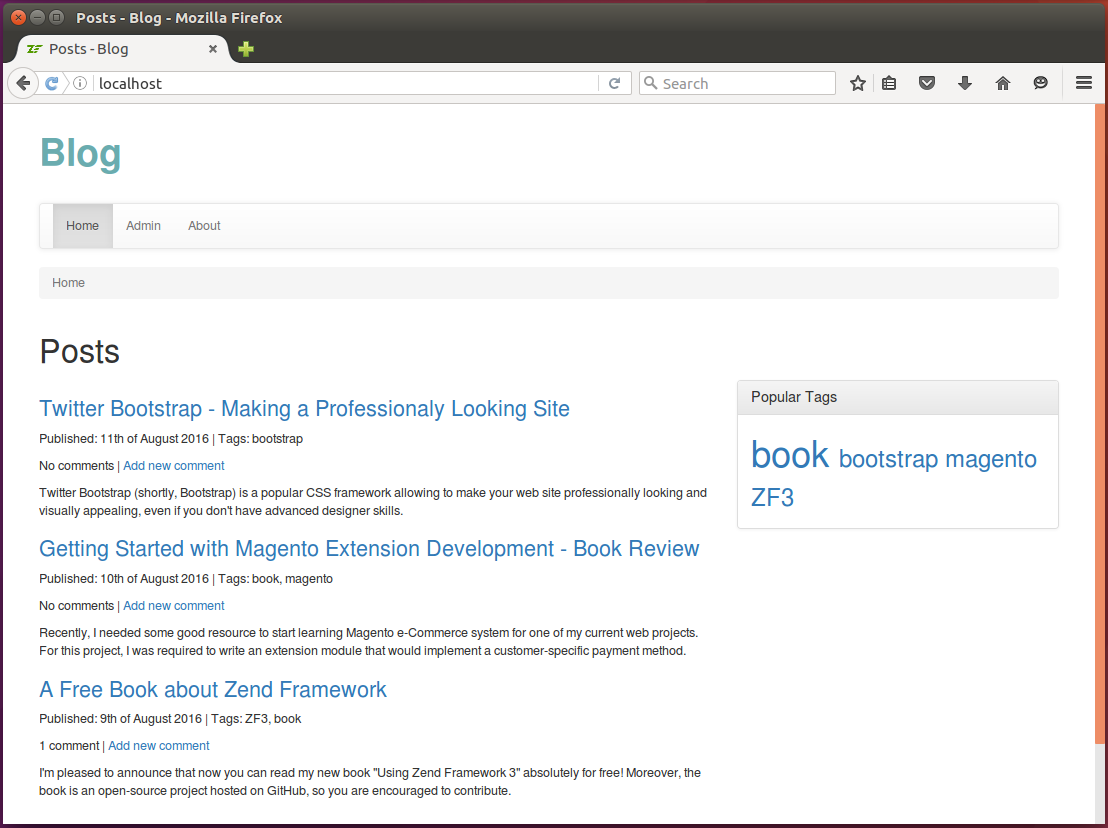
For this feature, we need the following things:
- to create the
PostRepositorycustom entity repository class that would encapsulate the complex logic of filtering posts by tag; - to modify the
PostManagerand add functionality for calculating font sizes for the tag cloud; - to add controller's action and corresponding view template.
Adding Custom Post Repository
Earlier we mentioned that by default Doctrine uses the Doctrine\ORM\EntityRepository as the
default repository class. Custom repository is a class extended from EntityRepository class.
It is typically used when you need to encapsulate complex DQL queries and search logic in a single place in your code.
Note
It is also possible to put the DQL queries to controller class, but that would make controllers "fat". Since we use MVC pattern, we strive to avoid that.
What is DQL?
DQL is similar to SQL in sense that it allows to write and execute queries to database, but the result of a query is an array of objects rather than an array of table rows. For more information on DQL and its usage examples, please refer to this page.
For our Blog sample web application, we need a custom repository which allows to find published
posts having at least one tag (to calculate total count of tagged posts), and, to find published
posts filtered by particular tag. We plan to encapsulate this search logic into the custom PostRepository repository.
Note
Doctrine works with custom repositories transparently. This means, that you retrieve the repository
from EntityManager as usual and still can use its findBy(), findOneBy() and other methods.
Create the PostRepository.php file inside the Repository directory under the module's source directory.
Below, you can find the code of PostRepository class that has two public methods:
- the
findPostsHavingAnyTag()method is designed to select all posts that have status Published and have one or more tags assigned; - and the
findPostsByTag()method is designed to return all published posts that have the particular tag assigned (to filter posts by the given tag).
<?php
namespace Application\Repository;

use Doctrine\ORM\EntityRepository;
use Application\Entity\Post;

// This is the custom repository class for Post entity.
class PostRepository extends EntityRepository
{
  // Finds all published posts having any tag.
  public function findPostsHavingAnyTag()
  {
    $entityManager = $this->getEntityManager();

    $queryBuilder = $entityManager->createQueryBuilder();

    $queryBuilder->select('p')
        ->from(Post::class, 'p')
        ->join('p.tags', 't')
        ->where('p.status = ?1')
        ->orderBy('p.dateCreated', 'DESC')
        ->setParameter('1', Post::STATUS_PUBLISHED);

    $posts = $queryBuilder->getQuery()->getResult();

    return $posts;
  }

  // Finds all published posts having the given tag.
  public function findPostsByTag($tagName)
  {
    $entityManager = $this->getEntityManager();

    $queryBuilder = $entityManager->createQueryBuilder();

    $queryBuilder->select('p')
        ->from(Post::class, 'p')
        ->join('p.tags', 't')
        ->where('p.status = ?1')
        ->andWhere('t.name = ?2')
        ->orderBy('p.dateCreated', 'DESC')
        ->setParameter('1', Post::STATUS_PUBLISHED)
        ->setParameter('2', $tagName);

    $posts = $queryBuilder->getQuery()->getResult();

    return $posts;
  }
}
In the code above, we use the query builder to conveniently create complex DQL queries.
In lines 17-22, we create a query which selects all published posts ordering them by date created in descending order. Because we join posts with tags, here we only select posts which have at least one tag. In line 24, we execute the query. If you are curious what DQL the query builder creates, here it is:
SELECT p FROM \Application\Entity\Post p JOIN p.tags t
WHERE p.status=?1 ORDER BY p.dateCreated DESC
In lines 36-43, we create a query that filters posts by tag name. An analogous DQL is presented below:
SELECT p FROM \Application\Entity\Post p JOIN p.tags t
WHERE p.status=?1 AND t.name=?2 ORDER BY p.dateCreated DESC
Note
To learn more about Doctrine query builder, please refer to this page.
To let Doctrine know that it should use the custom repository for Post entity,
modify the Post entity's annotation as follows:
<?php
//...

/**
 * This class represents a single post in a blog.
 * @ORM\Entity(repositoryClass="\Application\Repository\PostRepository")
 * @ORM\Table(name="post")
 */
class Post
{
  //...
}
Above, in line 6, we use the repositoryClass parameter of the @ORM\Entity tag to tell Doctrine
that it should use PostRepository repository.
Calculating Tag Cloud
Business logic for the tag cloud feature will be stored inside of the PostManager::getTagCloud() method,
as follows:
<?php
//...
class PostManager
{
  //...

  // Calculates frequencies of tag usage.
  public function getTagCloud()
  {
    $tagCloud = [];

    $posts = $this->entityManager->getRepository(Post::class)
                    ->findPostsHavingAnyTag();
    $totalPostCount = count($posts);

    $tags = $this->entityManager->getRepository(Tag::class)
                ->findAll();
    foreach ($tags as $tag) {

      $postsByTag = $this->entityManager->getRepository(Post::class)
                    ->findPostsByTag($tag->getName());

      $postCount = count($postsByTag);
      if ($postCount > 0) {
        $tagCloud[$tag->getName()] = $postCount;
      }
    }

    $normalizedTagCloud = [];

    // Normalize
    foreach ($tagCloud as $name=>$postCount) {
      $normalizedTagCloud[$name] =  $postCount/$totalPostCount;
    }

    return $normalizedTagCloud;
  }
}
In the code above, we have the getTagCloud() method that selects all post having at least
one tag attached and calculates the "frequency" of each available tag (how often the tag appears).
Then it normalizes the frequency values (makes them to be between 0 and 1.0).
Modifying Controller Action
Here we will modify the IndexController to implement tag filter.
<?php
//...
class IndexController extends AbstractActionController
{
    /**
     * Post manager.
     * @var Application\Service\PostManager
     */
    private $postManager;

    // Constructor is used for injecting dependencies into the controller.
    public function __construct($entityManager, $postManager)
    {
        $this->entityManager = $entityManager;
        $this->postManager = $postManager;
    }

    public function indexAction()
    {
        $tagFilter = $this->params()->fromQuery('tag', null);

        if ($tagFilter) {

            // Filter posts by tag
            $posts = $this->entityManager->getRepository(Post::class)
                    ->findPostsByTag($tagFilter);

        } else {
            // Get recent posts
            $posts = $this->entityManager->getRepository(Post::class)
                    ->findBy(['status'=>Post::STATUS_PUBLISHED],
                             ['dateCreated'=>'DESC']);
        }

        // Get popular tags.
        $tagCloud = $this->postManager->getTagCloud();

        // Render the view template.
        return new ViewModel([
            'posts' => $posts,
            'postManager' => $this->postManager,
            'tagCloud' => $tagCloud
        ]);
    }
}
The action method will retrieve the tag from the GET variable tag if the variable doesn't
present in HTTP request, all posts are retrieved as usual. If the variable present, we use our
custom repository's findPostsByTag() method to filter posts.
In line 36, we call the PostManager::getTagCloud() that returns array of tags and their frequencies.
We use this information for rendering the cloud.
Note
Please note that we are now using the PostManager service in our controller and have to inject it into
the constructor. Do not forget to modify the controller factory to do that.
Rendering Tag Cloud
Finally, modify the index.phtml file to make it look like follows:
<h1>Posts</h1>

<div class="row">

    <div class="col-md-8">

    <?php foreach($posts as $post): ?>

    <h3>
        <a href="<?= $this->url('posts', ['action'=>'view', 'id'=>$post->getId()]); ?>">
            <?= $this->escapeHtml($post->getTitle()); ?>
        </a>
    </h3>

    <p>
        Published: <?= $this->escapeHtml(date('jS \of F Y', strtotime($post->getDateCreated()))); ?>
        | Tags: <?= $this->escapeHtml($postManager->convertTagsToString($post)); ?>
    </p>

    <p class="comments-header">
        <?= $this->escapeHtml($postManager->getCommentCountStr($post)); ?> |
        <a href="<?= $this->url('posts', ['action'=>'view', 'id'=>$post->getId()],
                ['fragment'=>'comment']); ?>">
            Add new comment
        </a>
    </p>

    <p>
        <?= $this->escapeHtml($post->getContent()); ?>
    </p>

    <?php endforeach; ?>

    </div>

    <div class="col-md-4">
        <div class="panel panel-default">
            <div class="panel-heading">
                <h3 class="panel-title">Popular Tags</h3>
            </div>
            <div class="panel-body">
                <?php foreach($this->tagCloud as $tagName=>$frequency): ?>

                <a href="<?= $this->url('application', ['action'=>'index'],
                    ['query'=>['tag'=>$tagName]]); ?>">

                    <span style="font-size:<?= $this->escapeHtml(0.9 + $frequency*3) ?>em">
                        <?= $this->escapeHtml($tagName); ?>
                    </span>

                </a>

                <?php endforeach; ?>
            </div>
        </div>
    </div>
</div>
Implementing Pagination
For now we have only several posts on our Posts page. But assume there are many (hundreds of) posts. The page will be loading very slowly. Also, it would be very inconvenient to scroll the page to read all posts. In this situation, pagination would help.
Note
Pagination is when you divide your results into pages and navigate through pages by clicking page number links on pagination widget.
An example of pagination widget styled with Twitter Bootstrap is presented below:
Doctrine ORM Paginator
The Doctrine\ORM component provides a paginator class named Paginator living in Doctrine\ORM\Tools\Pagination namespace.
It can take a Doctrine Query object as input and provides several methods for getting paged results (we won't discuss
those methods here for simplicity). But, Doctrine ORM module doesn't provide any view helpers to visualize the pagination
widget. For that, we can use the pagination functionality provided by Laminas Framework.
Note
Although we plan to use Laminas pagination component, we will still use Doctrine ORM paginator internally for consuming data. Laminas paginator will be just a wrapper for Doctrine ORM paginator.
Laminas Paginator
In Laminas Framework, pagination is implemented in @Laminas\Paginator component. If you haven't installed this
component, do so by typing the following command:
php composer.phar require laminas/laminas-paginator
The @Laminas\Paginator component provides the @Paginator class. Its most useful methods are listed in table 12.6:
| Method | Description |
|---|---|
setDefaultScrollingStyle($scrollingStyle = 'Sliding') |
Sets scrolling style. |
setDefaultItemCountPerPage($count) |
Sets maximum count of results per page. |
setCurrentPageNumber($pageNumber) |
Sets current page number. |
count() |
Retuns number of pages. |
getTotalItemCount() |
Returns total number of results. |
getCurrentItems() |
Gets items on the current page. |
Table 12.6. Methods of Laminas Paginator class
The @Paginator class is very generic and doesn't know the underlying
data model, so you need to have an adapter which provides the data to paginator. The DoctrineORMModule module
provides such adapter (DoctrineORMModule\Paginator\Adapter\DoctrinePaginator class) which we can use to get data from ORM
paginator and pass it to Laminas paginator.
For example, assume we have a Query with a DQL that selects all published posts.
To get the paginated results with this query, we can use the following code:
<?php
use DoctrineORMModule\Paginator\Adapter\DoctrinePaginator as DoctrineAdapter;
use Doctrine\ORM\Tools\Pagination\Paginator as ORMPaginator;
use Laminas\Paginator\Paginator;

// Create Laminas paginator.
$adapter = new DoctrineAdapter(new ORMPaginator($query, false));
$paginator = new Paginator($adapter);

// Set page number and page size.
$paginator->setDefaultItemCountPerPage(10);
$paginator->setCurrentPageNumber(1);

// Walk through the current page of results.
foreach ($paginator as $post) {
    // Do something with the current post.
}
Now let's apply this example to our Blog application. We want to display the paginated posts on the main page of the Blog website.
Modifying PostRepository
First of all, we'll have to slightly modify the way we get the list of posts. Previously, we used the findBy() method
of the EntityRepository, which returns array of posts. But now we'll have to do that with our custom repository class
PostRepository, because Doctrine ORM paginator takes Query object on input, not an array of posts.
Add the following method to PostRepository class:
public function findPublishedPosts()
{
    $entityManager = $this->getEntityManager();

    $queryBuilder = $entityManager->createQueryBuilder();

    $queryBuilder->select('p')
        ->from(Post::class, 'p')
        ->where('p.status = ?1')
        ->orderBy('p.dateCreated', 'DESC')
        ->setParameter('1', Post::STATUS_PUBLISHED);

    return $queryBuilder->getQuery();
}
And change the findPostsByTag() method, because we want it to also return Query instead of array:
public function findPostsByTag($tagName)
{
    $entityManager = $this->getEntityManager();

    $queryBuilder = $entityManager->createQueryBuilder();

    $queryBuilder->select('p')
        ->from(Post::class, 'p')
        ->join('p.tags', 't')
        ->where('p.status = ?1')
        ->andWhere('t.name = ?2')
        ->orderBy('p.dateCreated', 'DESC')
        ->setParameter('1', Post::STATUS_PUBLISHED)
        ->setParameter('2', $tagName);

    return $queryBuilder->getQuery();
}
You will also need to slightly modify the PostManager::getTagCloud() method, because it expects an array of posts, but
now it will receive the Query. It is a simple and obvious modification, so we won't describe how to do that (refer to Blog sample for the complete code).
Modifying IndexController
Next, modify the indexAction() method of the IndexController as follows:
<?php
namespace Application\Controller;

// Add aliases for paginator classes
use DoctrineORMModule\Paginator\Adapter\DoctrinePaginator as DoctrineAdapter;
use Doctrine\ORM\Tools\Pagination\Paginator as ORMPaginator;
use Laminas\Paginator\Paginator;
// ...

class IndexController extends AbstractActionController
{
    // ...

    public function indexAction()
    {
        $page = $this->params()->fromQuery('page', 1);
        $tagFilter = $this->params()->fromQuery('tag', null);

        if ($tagFilter) {

            // Filter posts by tag
            $query = $this->entityManager->getRepository(Post::class)
                    ->findPostsByTag($tagFilter);

        } else {
            // Get recent posts
            $query = $this->entityManager->getRepository(Post::class)
                    ->findPublishedPosts();
        }

        $adapter = new DoctrineAdapter(new ORMPaginator($query, false));
        $paginator = new Paginator($adapter);
        $paginator->setDefaultItemCountPerPage(1);
        $paginator->setCurrentPageNumber($page);

        // Get popular tags.
        $tagCloud = $this->postManager->getTagCloud();

        // Render the view template.
        return new ViewModel([
            'posts' => $paginator,
            'postManager' => $this->postManager,
            'tagCloud' => $tagCloud
        ]);
    }
}
You can notice that in line 16 we get the current page number from a GET parameter. So, you can set the page of results by entering the
following URL in your browser: http://localhost/application/index?page=<page>". The default page number is 1.
In lines 22 and 27, we retrieve the Query object from our PostRepository instead of array of posts.
We then pass this Query object to the Laminas paginator in line 31.
In lines 33-34 we set current page number and page size on the paginator.
In line 41, we pass the paginator (!) instead of array of posts for rendering to view template.
Visualizing the Pagination Widget
Now it's left the last but not least part of our work. We need to display the pagination widget in our view template.
To do that with nice Bootstrap styling, we will need to first create a partial view template view/application/partial/paginator.phtml and put the following code into that file:
<?php if ($this->pageCount): ?>
<nav>
<ul class="pagination">
<!-- Previous page link -->
<?php if (isset($this->previous)): ?>
<li>
<a href="<?= $this->url($this->route, [], ['query'=>['page'=>$this->previous]]); ?>" aria-label="Previous">
<span aria-hidden="true">«</span>
</a>
</li>
<?php else: ?>
<li>
<span aria-hidden="true">«</span>
</li>
<?php endif; ?>
<!-- Numbered page links -->
<?php foreach ($this->pagesInRange as $page): ?>
<?php if ($page != $this->current): ?>
<li>
<a href="<?= $this->url($this->route, [], ['query'=>['page'=>$page]]); ?>"><?= $this->escapeHtml($page); ?></a>
</li>
<?php else: ?>
<li>
<span aria-hidden="true"><b><?= $this->escapeHtml($page); ?></b></span>
</li>
<?php endif; ?>
<?php endforeach; ?>
<!-- Next page link -->
<?php if (isset($this->next)): ?>
<li>
<a href="<?php echo $this->url($this->route, [], ['query'=>['page'=>$this->next]]); ?>" aria-label="Next">
<span aria-hidden="true">»</span>
</a>
</li>
<?php else: ?>
<li>
<span aria-hidden="true">»</span>
</li>
<?php endif; ?>
</ul>
</nav>
<?php endif; ?>
The partial view template will be used by the Laminas @PaginationControl view helper to visualize the pagination widget. As you
can see, this partial view template takes several input variables ($pageCount, pagesInRange, $current, $previous, $next, $route)
that are used to control how the widget will look like.
Now let's display the widget on our view/application/index/index.phtml view template below the list of posts, as follows:
<?= $this->paginationControl($posts,
            'Sliding',
            'application/partial/paginator',
            ['route' => 'application']); ?>
The @PaginationControl view helper accepts four arguments:
- the
$postsis the @Paginatorobject that we passed from controller's action with the @ViewModel[Laminas\View\Model\ViewModel] variable container. - the "Sliding" argument is the style of pagination. For additional info on available pagination styles, please refer to Laminas Framework documentation.
- the "application/partial/paginator" is the name of the partial view template containing the markup for the pagination widget.
- the fourth argument can be used to pass parameters to the partial view template. For example we pass it the
routeparameter, which is used to generate clickable page links.
Results
Hooray! Our blog application is ready now. The main page of the website now contains a nice looking pagination widget (see the figure 12.13 below):
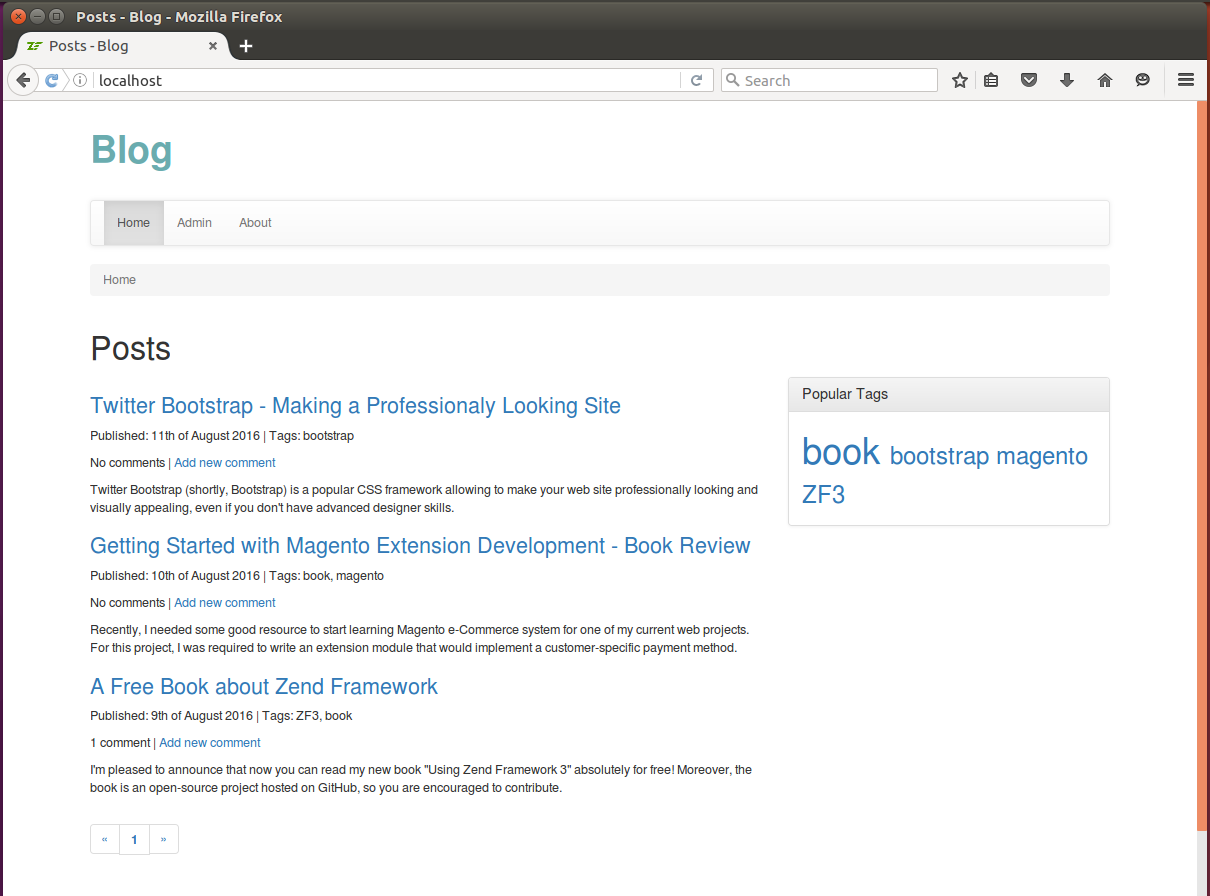
Note
In this chapter we implemented only the simplest pagination. For real websites, in addition to pagination, you might also want to allow interactively sorting your results by certain fields. For such complex tabular data display, consider using the DataTables or BootGrid jQuery plugins.
Summary
Doctrine is not part of Laminas Framework, but we cover its usage in this book because it provides an easy way of accessing a database and providing object persistence to your application.
In this chapter, we've covered the usage of the Object Relational Mapper (ORM) component of the Doctrine library. The ORM is designed for database management in an object-oriented style. With ORM, you map a database table to a PHP class known as an entity. Columns of that table are mapped to the properties of the entity class.
To load data from the database, you retrieve an entity from its repository. The repository is a class that can be considered as a collection of all available entities. The repository loads data from the corresponding database table, and fills one or more entity instance's fields with that data.
-
The tree in figure 12.5 may be different than you have in your own application, because some keys were omitted here for simplicity. ↩
-
Doctrine-provided annotation tags are implemented as classes living inside of
Doctrine\ORM\Mappingnamespace. This is to avoid annotation naming collisions (assume the case when some other component has an annotation namedEntityorTable, the collision would happen). ↩