Advanced Usage of Forms
In previous chapters, you've learned about form usage basics: what HTML forms are and how you define form models and form presentation in Laminas Framework. In this chapter, you will learn some advanced form usage topics such as security form elements (CAPTCHA and CSRF), and so on.
Laminas components covered in this chapter:
| Component | Description |
|---|---|
@Laminas\Captcha |
Implements various CAPTCHA algorithms. |
@Laminas\Form |
Contains base form model classes. |
@Laminas\Filter |
Contains various filters classes. |
@Laminas\Validator |
Implements various validator classes. |
@Laminas\InputFilter |
Implements a container for filters/validators. |
Form Security Elements
We will consider the usage of two form security elements provided by
Laminas Framework: @Captcha[Laminas\Form\Element\Captcha] and @Csrf[Laminas\Form\Element\Csrf] (both classes belong to
@Laminas\Form\Element[Laminas\Form] namespace). By adding those elements to your form
model (and rendering them in a view template), you will make your form
resistant to hacker attacks.
CAPTCHA
A CAPTCHA (stands for "Completely Automated Public Turing test to tell Computers and Humans Apart") is a challenge-response test used in web sites for determining whether the user is a human or a robot.
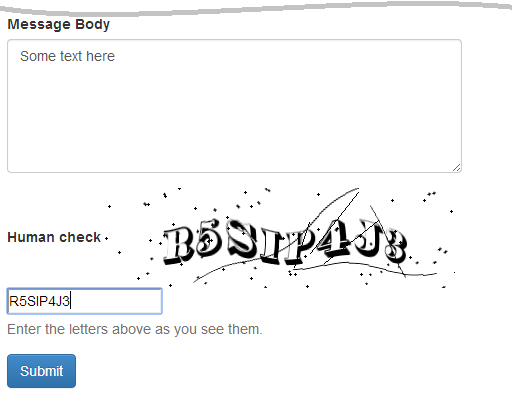
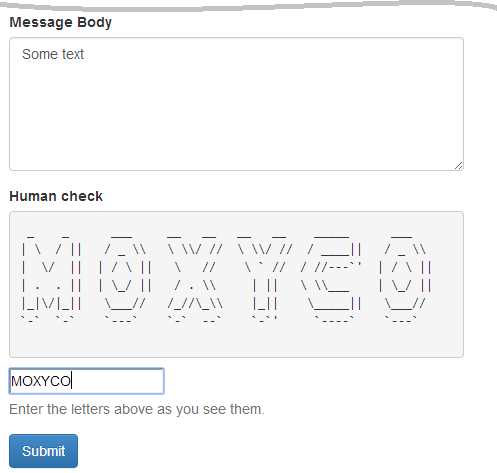
There are several types of CAPTCHA. The most widely used one requires that the user type the letters of a distorted image that is shown on the web page (see figure 11.1 for some examples).

A typical CAPTCHA test works using the following algorithm:
- Some secret sequence of characters (word) is generated server-side.
- The secret word is saved in a PHP session variable.
- The distorted image is generated based on the secret word. The image is then displayed on the web page to site user.
- The site user is asked to type characters shown on the image.
- If the characters typed by user are the same as the secret word saved in the session, the test is considered passed.
The goal of the CAPTCHA test is to protect your form from filling and submission by an automated process (so called robot). Usually, such robots send spam messages to forums, hack passwords on site login forms, or perform some other malicious actions.
What is a CAPTCHA Test?
The CAPTCHA test allows to reliably distinguish humans from robots, because humans are easily able to recognise and reproduce characters from the distorted image, while robots are not (at the current stage of evolution of computer vision algorithms).
CAPTCHA Types
In Laminas Framework, there are several CAPTCHA types available (they all belong
to the @Laminas\Captcha component):
-
Dumb. This is a very simple CAPTCHA algorithm which requires that site user enter the word letters in reverse order. We will not consider this type in details here, because it provides too low protection level.
-
Image. A CAPTCHA algorithm distorting an image with addition of some noise in form of dots and line curves (figure 11.1, a).
-
Figlet. An unusual CAPTCHA type using FIGlet program instead of an image distortion algorithm. The FIGlet is an open-source program which generates the CAPTCHA image of many small ASCII letters (figure 11.1, b).
The @Laminas\Captcha component provides a unified interface for all CAPTCHA
types (the @AdapterInterface[Laminas\Captcha\AdapterInterface] interface). The @AbstractAdapter[Laminas\Captcha\AdapterInterface] base class implements
that interface, and all other CAPTCHA algorithms are derived from the abstract adapter
class 1. The class inheritance diagram is shown in figure 11.2 below.
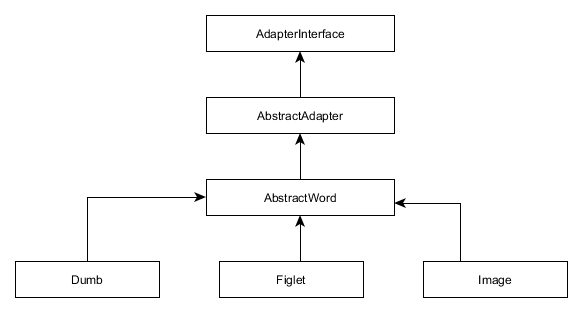
As you can see from the figure 11.2, there is another base class for all
CAPTCHA types that utilize some secret word of characters: the @AbstractWord[Laminas\Captcha\AbstractWord] class. This
base class provides methods for generating random sequence of characters and for adjusting
word generation options.
CAPTCHA Form Element & View Helper
Laminas provides the dedicated form element class and view helper class for letting you use CAPTCHA fields on your forms.
To add a CAPTCHA field to a form model, you use the @Captcha[Laminas\Form\Element\Captcha] class that belongs
to @Laminas\Form component and lives in @Laminas\Form\Element[Laminas\Form] namespace.
The @Captcha[Laminas\Form\Element\Captcha] element class can be used with any CAPTCHA algorithm (listed
in the previous section) from @Laminas\Captcha component. For this purpose,
the element class has the setCaptcha() method which takes either an instance of a
class implementing @Laminas\Captcha\AdapterInterface interface, or an array containing CAPTCHA
configuration 2. By the setCaptcha() method, you can attach the desired CAPTCHA type to the element.
You add the @Captcha element to a form model as usual, with the add() method
provided by the @Laminas\Form\Form base class. As usual, you can pass it either an instance of
the @Laminas\Form\Element\Captcha class or provide an array of configuration options specific
to certain CAPTCHA algorithm (in that case, the element and its associated CAPTCHA algorithm
will automatically be instantiated and configured by the factory class).
The code example below shows how to use the latter method (passing a configuration array).
We prefer this method because it requires less code to write. It is assumed that you call
this code inside of form model's addElements() protected method:
<?php
// Add the CAPTCHA field to the form model
$this->add([
  'type'  => 'captcha',
  'name' => 'captcha',
  'options' => [
    'label' => 'Human check',
    'captcha' => [
      'class' => '<captcha_class_name>', //
      // Certain-class-specific options follow here ...
    ],
  ],
]);
In the example above, we call the add() method provided by the @Form[Laminas\Form\Form] base class
and pass it an array describing the element to insert (line 3):
- The
typekey of the array (line 4), as usual, may either be a fully qualified class name of the element (@Laminas\Form\Element\Captcha) or its short alias ("captcha"). - The
namekey (line 5) is the value for the "name" attribute of the HTML form field. - The
optionskey contains the options for the attached CAPTCHA algorithm. Theclasskey (line 9) may either contain the full CAPTCHA class name (e.g. @Laminas\Captcha\Image) or its short alias (e.g. "Image"). Other, adapter-specific, options may be added to the key as well. We will show how to do that a little bit later.
For generating the HTML markup for the element, you may use the @FormCaptcha
view helper class (belonging to @Laminas\Form\View\Helper[Laminas\Form] namespace). But, as you might
learn from the previous chapter, typically you use the generic @FormElement view helper instead,
like shown in the code below:
<?= $this->formElement($form->get('captcha')); ?>
It is assumed that you call the view helper inside of your view template.
Next, we provide two examples illustrating how to use different CAPTCHA types provided by Laminas:
the @Image[Laminas\Captcha\Image] and @Figlet[Laminas\Captcha\Figlet]. We will show how to add a CAPTCHA field to the
feedback form that we used in examples of the previous chapters.
Example 1: Adding Image CAPTCHA to the ContactForm
W> Image CAPTCHA requires that you have PHP GD extension installed with PNG W> support and FT fonts.
To add the @Image[Laminas\Captcha\Image] CAPTCHA to your form model, call the form's add()
method as follows:
<?php
namespace Application\Form;
// ...

class ContactForm extends Form
{
    // ...
    protected function addElements()
    {
        // ...

        // Add the CAPTCHA field
        $this->add([
            'type'  => 'captcha',
            'name' => 'captcha',
            'attributes' => [
            ],
            'options' => [
                'label' => 'Human check',
                'captcha' => [
                    'class' => 'Image',
                    'imgDir' => 'public/img/captcha',
                    'suffix' => '.png',
                    'imgUrl' => '/img/captcha/',
                    'imgAlt' => 'CAPTCHA Image',
                    'font'   => './data/font/thorne_shaded.ttf',
                    'fsize'  => 24,
                    'width'  => 350,
                    'height' => 100,
                    'expiration' => 600,
                    'dotNoiseLevel' => 40,
                    'lineNoiseLevel' => 3
                ],
            ],
        ]);
    }
}
Above, the captcha key of the configuration array (see line 20) contains the following
parameters for configuring the @Image[Laminas\Captcha\Image] CAPTCHA algorithm attached to the form element:
-
the
classparameter (line 21) should be either the fully qualified CAPTCHA adapter class name (@\Laminas\Captcha\Image) or its short alias (@Image[Laminas\Captcha\Image]). -
the
imgDirparameter (line 22) should be the path to the directory where to save the generated distorted images (in this example, we will save the images to the APP_DIR/public/img/captcha directory). -
the
suffixparameter (line 23) defines the extension for a generated image file (".png" in this example). -
the
imgUrlparameter (line 24) defines the base part of the URL for opening generated CAPTCHA images in a web browser. In this example, site visitors will be able to access CAPTCHA images using URLs like "http://localhost/img/captcha/<ID>", where ID is a unique ID of certain image. -
the
imgAltparameter (line 25) is an (optional) alternative text to show if CAPTCHA image can't be loaded by the web browser (the "alt" attribute of<img>tag). -
the
fontparameter (line 26) is the path to the font file. You can download a free TTF font, for example, from here. In this example, we use Thorne Shaded font, which we downloaded and put into the APP_DIR/data/font/thorne_shaded.ttf file. -
the
fsizeparameter (line 27) is a positive integer number defining the font size. -
the
width(line 28) andheightparameters (line 29) define the width and height (in pixels) of the generated image, respectively. -
the
expirationparameter (line 30) defines the expiration period (in seconds) of the CAPTCHA images. Once an image expires, it is removed from disk. -
the
dotNoiseLevelparameter (line 31) andlineNoiseLevelparameter (line 32) define the image generation options (dot noise level and line noise level, respectively).
To render the CAPTCHA field, add the following lines to your contact-us.phtml view template file:
<div class="form-group">
  <?= $this->formLabel($form->get('captcha')); ?>
  <?= $this->formElement($form->get('captcha')); ?>
  <?= $this->formElementErrors($form->get('captcha')); ?>
  <p class="help-block">Enter the letters above as you see them.</p>
</div>
Finally, create the APP_DIR/public/img/captcha directory that will store generated CAPTCHA
images. Adjust directory permissions to make the directory writeable by the Apache Web Server.
In Linux Ubuntu, this is typically accomplished by the following shell commands (replace the APP_DIR
placeholder with the actual directory name of your web application):
mkdir APP_DIR/public/img/captcha
chown -R www-data:www-data APP_DIR
chmod -R 775 APP_DIR
Above, the mkdir command creates the directory, and chown and chmod commands
set the Apache user to be the owner of the directory and allow the web server to write
to the directory, respectively.
Now, if you open the "http://localhost/contactus" page in your web browser, the CAPTCHA image will be generated based on a random sequence of letters and digits saved in session. You should see something like in the figure 11.3 below.
When you fill the form fields in and press the Submit button, the letters
entered into the Human check field will be transferred to server as part of
HTTP request. Then, on form validation, the @Laminas\Form\Element\Captcha class
will compare the submitted letters to those stored in PHP session. If the letters
are identical, the form is considered valid; otherwise form validation fails.
Once the PHP renderer processes the view template, it generates HTML markup for the CAPTCHA element as shown below:
<div class="form-group">
  <label for="captcha">Human check</label>
  <img width="350" height="100" alt="CAPTCHA Image"
       src="/img/captcha/df344b37500dcbb0c4d32f7351a65574.png">
  <input name="captcha[id]" type="hidden"
         value="df344b37500dcbb0c4d32f7351a65574">
  <input name="captcha[input]" type="text">
  <p class="help-block">Enter the letters above as you see them.</p>
</div>
Example 2: Adding a FIGlet CAPTCHA to the ContactForm
To use the FIGlet CAPTCHA element with your form, replace the form element definition from the previous example with the following code:
<?php
// Add the CAPTCHA field
$this->add([
    'type'  => 'captcha',
    'name' => 'captcha',
    'attributes' => [
    ],
    'options' => [
        'label' => 'Human check',
        'captcha' => [
            'class' => 'Figlet',
            'wordLen' => 6,
            'expiration' => 600,
        ],
    ],
]);
Above, the captcha key of the configuration array (see line 10) contains the following
parameters for configuring the @Figlet[Laminas\Captcha\Figlet] CAPTCHA algorithm attached to the form element:
-
the
classparameter (line 11) should be either the full CAPTCHA adapter class name (@\Laminas\Captcha\Figlet) or its short alias (@Figlet[Laminas\Captcha\Figlet]). -
the
wordLenparameter (line 12) defines the length of the secret word to be generated. -
the
expirationparameter (line 13) defines the CAPTCHA expiration period (in seconds).
Now, open the "http://localhost/contactus" page in your web browser. Once that is done, you should see a page like in the figure 11.4 below.
Once the PHP renderer processes the view template, it generates HTML markup for the CAPTCHA element like shown below:
<div class="form-group">
  <label for="captcha">Human check</label>
    <pre>
 __   _    __   __   _    _      ___     _    _    __   __
| || | ||  \ \\/ // | \  / ||   / _ \\  | || | ||  \ \\/ //
| '--' ||   \ ` //  |  \/  ||  | / \ || | || | ||   \ ` //
| .--. ||    | ||   | .  . ||  | \_/ || | \\_/ ||    | ||
|_|| |_||    |_||   |_|\/|_||   \___//   \____//     |_||
`-`  `-`     `-`'   `-`  `-`    `---`     `---`      `-`'

</pre>
<input name="captcha[id]" type="hidden"
       value="b68b010eccc22e78969764461be62714">
<input name="captcha[input]" type="text">
<p class="help-block">Enter the letters above as you see them.</p>
</div>
CSRF Prevention
Cross-site request forgery (CSRF) is a kind of hacker attack which forces the user's browser to transmit an HTTP request to an arbitrary site. Through the CSRF attack, the malicious script is able to send unauthorized commands from a user that the website trusts. This attack is typically performed on pages containing forms for submission of some sensitive data (e.g. money transfer forms, shopping carts etc.)
To better understand how this attack works, take a look at figure 11.5.

Figure 11.5 illustrates an example CSRF attack on a payment gateway website:
-
You log into your account at payment gateway web site https://payment.com. Please note that the SSL-protected connection (HTTPS) is used here, but it doesn't protect from such kind of attacks.
-
Typically, you set check on the "Remember Me" check box of the login form to avoid entering user name and password too often. Once you logged in to your account, your web browser saves your session information to a cookie variable on your machine.
-
On the payment gateway site, you use the payment form https://payment.com/moneytransfer.php to buy some goods. Please note that this payment form will later be used as a vulnerability allowing to perform the CSRF attack.
-
Next you use the same web browser to visit some website you like. Assume the website contains cool pictures http://coolpictures.com. Unfortunately, this web site is infected by a malicious script, masqueraded by an
<img src="image.php">HTML tag. Once you open the HTML page in your web browser, it loads all its images, thus executing the malicious image.php script. -
The malicious script checks the cookie variable, and if it presents, it performs the "session riding" and can act on behalf of the logged in user. It is now able to submit the payment form to the payment gateway site.
Note
The above described CSRF attack is possible it the web form on the payment gateway site does not check the source of the HTTP request. The people who maintain the payment gateway site must put more attention in making its forms more secure.
To prevent CSRF attacks to a form, one has to require a special token with the form, as follows:
-
For certain form, generate a random sequence of bytes (token) and save it server-side in PHP session data.
-
Add a hidden field to form and set its value with the token.
-
Once the form is submitted by the user, compare the hidden value passed in the form with the token saved server-side. If they match, consider the form data secure.
If a malicious user will try to attack the site by submitting the form, he will not be able to put right token in the form submissions, because the token is not stored in cookies.
Example: Adding a CSRF Element to Form
In Laminas Framework, to add a CSRF protection to your form model,
you use the @Laminas\Form\Element\Csrf form element class.
The @Csrf[Laminas\Form\Element\Csrf] element has no visual representation (you will not see it on the screen).
To insert a CSRF element to your form model, add the following lines in its addElements() method:
// Add the CSRF field
$this->add([
  'type'  => 'csrf',
  'name' => 'csrf',
  'options' => [
    'csrf_options' => [
      'timeout' => 600
    ]
  ],
]);
Above, we use the @Form[Laminas\Form\Form]'s add() method (line 2), to which we pass a configuration array
describing the CSRF element. The element will be automatically instantiated and initialized
by the factory.
In line 3, we specify the class name for the CSRF element. This either may be the fully qualified class
name (@Laminas\Form\Element\Csrf) or a short alias ("csrf").
In line 4, we set the "name" attribute for the element. In this example, we use "csrf" name, but you may use any other name, on your choice.
In line 6, inside of csrf_options array, we specify the options specific to
@Laminas\Form\Element\Csrf class. We set the timeout option to 600 (look at line 7),
which means the CSRF check expires in 600 seconds (10 minutes) after form creation.
To render the CSRF field, in your view template .phtml file, add the following line:
<?= $this->formElement($form->get('csrf')); ?>
When the PHP renderer evaluates the view template, it generates the HTML markup for the CSRF field like shown below:
<input type="hidden" name="csrf" value="1bc42bd0da4800fb55d16e81136fe177">
As you can see from the HTML markup code above, the form now contains a hidden field with a randomly generated token. Since the attacker script doesn't know this token, it won't be able to submit its correct value, thus the CSRF attack becomes prevented.
What happens if CSRF element validation fails?
If during the form validation the CSRF check fails, the form is considered invalid and the user will see it again to fix input errors, but he won't see the error message for the CSRF element (we don't want hackers to know for sure what's wrong with the form).
Using Validation Groups
Sometimes it may be useful to temporarily disable validation of some form elements. You can do that with a feature called validation groups.
By default, all form elements are validated. A validation group allows to disable validation of certain fields.
For example, assume you implement a form named PaymentForm, which allows you to select a payment method of several alternatives (credit card, bank transfer and cash).
If the user selects credit card, you also want him to enter the credit card number; else if user selects bank transfer, you
want him to enter bank account number; and finally, if the cash is selected, user does not need to enter additional information.
For this form, you will have to dynamically hide and display dependent fields in client's browser with JavaScript.
How would you validate such form in your controller's action? The problem is that some fields depend on others. The card_number field is required
only when payment_method is the "credit card", otherwise it is optional. The same is for the bank_account field - it is required
only when payment_method is the "bank transfer".
We can handle this case elegantly with the validation group. The @Form[Laminas\Form\Form] class provides the setValidationGroup() method,
which accepts the list of fields that you want to validate; all other fields will be suppressed and not validated.
// First, we will validate the "payment_method" field.
$form->setValidationGroup(['payment_method']);
if ($form->isValid())
{
    $data = $form->getData();

    $paymentMethod = $data['payment_method'];

    // Next, validate the dependent fields
    if ($paymentMethod=='credit_card') {
        $form->setValidationGroup(['payment_method', 'card_number']);
    } else if ($paymentMethod=='bank_account') {
        $form->setValidationGroup(['payment_method', 'bank_account']);
    }

    if ($form->isValid()) {
        $data = $form->getData();

        // Do something with the data
        // ...
    }
}
You can see this example in action in the Form Demo sample web application bundled with this book. Just type "http://localhost/payment" URL in your browser.
Implementing Multi-Step Forms
In this section, we will provide instructions on how to implement a multi-step form with Laminas. A multi-step form is a form having a lot of fields, and which is displayed in several steps. To store the current step and user-entered data between page requests, PHP sessions are utilized.
For example, user registration can be performed in several steps: on the first step you display the page allowing to enter login and password, on the second step you display the page where the site visitor can enter his personal information, and on the third step, the visitor can enter billing information. Another example of a multi-step form is a Survey form. This form would display a question and possible variants of the answer. This form would have as many steps as many questions are in the survey.
In this section we will implement the User Registration form allowing to collect information about the user being registered.
You can see this complete working example in action as part of Form Demo sample web application bundled with this book.
Enabling Sessions
Note
If you are new to the PHP sessions feature, please refer to Working with Sessions before reading this section.
Session support is implemented in @Laminas\Session component, so you have to install it if you hadn't done that before.
Next, modify your APP_DIR/config/global.php config file as follows:
<?php
use Laminas\Session\Storage\SessionArrayStorage;
use Laminas\Session\Validator\RemoteAddr;
use Laminas\Session\Validator\HttpUserAgent;

return [
    // Session configuration.
    'session_config' => [
        // Session cookie will expire in 1 hour.
        'cookie_lifetime' => 60*60*1,
        // Store session data on server maximum for 30 days.
        'gc_maxlifetime'  => 60*60*24*30,
    ],
    // Session manager configuration.
    'session_manager' => [
        // Session validators (used for security).
        'validators' => [
            RemoteAddr::class,
            HttpUserAgent::class,
        ]
    ],
    // Session storage configuration.
    'session_storage' => [
        'type' => SessionArrayStorage::class
    ],

    // ...
];
Then add the following lines to your module.config.php to register the UserRegistration session container:
<?php
return [
    // ...
    'session_containers' => [
        'UserRegistration'
    ],
];
Done! Now we can use session container in our code. Next, we will implement the RegistrationForm
form model.
Adding RegistrationForm
The RegistrationForm form model will be used for collecting data about the user (email, full name,
password, personal information and billing information). We will add elements to this form in three portions,
thus allowing to use it as a multi-step form.
To add the form model, create the RegistrationForm.php file in the Form directory under the Application module's source directory:
<?php
namespace Application\Form;
use Laminas\Form\Form;
use Laminas\InputFilter\InputFilter;
use Application\Validator\PhoneValidator;
/**
* This form is used to collect user registration data. This form is multi-step.
* It determines which fields to create based on the $step argument you pass to
* its constructor.
*/
class RegistrationForm extends Form
{
/**
* Constructor.
*/
public function __construct($step)
{
// Check input.
if (!is_int($step) || $step<1 || $step>3)
throw new \Exception('Step is invalid');
// Define form name
parent::__construct('registration-form');
// Set POST method for this form
$this->setAttribute('method', 'post');
$this->addElements($step);
$this->addInputFilter($step);
}
/**
* This method adds elements to form (input fields and submit button).
*/
protected function addElements($step)
{
if ($step==1) {
// Add "email" field
$this->add([
'type' => 'text',
'name' => 'email',
'attributes' => [
'id' => 'email'
],
'options' => [
'label' => 'Your E-mail',
],
]);
// Add "full_name" field
$this->add([
'type' => 'text',
'name' => 'full_name',
'attributes' => [
'id' => 'full_name'
],
'options' => [
'label' => 'Full Name',
],
]);
// Add "password" field
$this->add([
'type' => 'password',
'name' => 'password',
'attributes' => [
'id' => 'password'
],
'options' => [
'label' => 'Choose Password',
],
]);
// Add "confirm_password" field
$this->add([
'type' => 'password',
'name' => 'confirm_password',
'attributes' => [
'id' => 'confirm_password'
],
'options' => [
'label' => 'Type Password Again',
],
]);
} else if ($step==2) {
// Add "phone" field
$this->add([
'type' => 'text',
'name' => 'phone',
'attributes' => [
'id' => 'phone'
],
'options' => [
'label' => 'Mobile Phone',
],
]);
// Add "street_address" field
$this->add([
'type' => 'text',
'name' => 'street_address',
'attributes' => [
'id' => 'street_address'
],
'options' => [
'label' => 'Street address',
],
]);
// Add "city" field
$this->add([
'type' => 'text',
'name' => 'city',
'attributes' => [
'id' => 'city'
],
'options' => [
'label' => 'City',
],
]);
// Add "state" field
$this->add([
'type' => 'text',
'name' => 'state',
'attributes' => [
'id' => 'state'
],
'options' => [
'label' => 'State',
],
]);
// Add "post_code" field
$this->add([
'type' => 'text',
'name' => 'post_code',
'attributes' => [
'id' => 'post_code'
],
'options' => [
'label' => 'Post Code',
],
]);
// Add "country" field
$this->add([
'type' => 'select',
'name' => 'country',
'attributes' => [
'id' => 'country',
],
'options' => [
'label' => 'Country',
'empty_option' => '-- Please select --',
'value_options' => [
'US' => 'United States',
'CA' => 'Canada',
'BR' => 'Brazil',
'GB' => 'Great Britain',
'FR' => 'France',
'IT' => 'Italy',
'DE' => 'Germany',
'RU' => 'Russia',
'IN' => 'India',
'CN' => 'China',
'AU' => 'Australia',
'JP' => 'Japan'
],
],
]);
} else if ($step==3) {
// Add "billing_plan" field
$this->add([
'type' => 'select',
'name' => 'billing_plan',
'attributes' => [
'id' => 'billing_plan',
],
'options' => [
'label' => 'Billing Plan',
'empty_option' => '-- Please select --',
'value_options' => [
'Free' => 'Free',
'Bronze' => 'Bronze',
'Silver' => 'Silver',
'Gold' => 'Gold',
'Platinum' => 'Platinum'
],
],
]);
// Add "payment_method" field
$this->add([
'type' => 'select',
'name' => 'payment_method',
'attributes' => [
'id' => 'payment_method',
],
'options' => [
'label' => 'Payment Method',
'empty_option' => '-- Please select --',
'value_options' => [
'Visa' => 'Visa',
'MasterCard' => 'Master Card',
'PayPal' => 'PayPal'
],
],
]);
}
// Add the CSRF field
$this->add([
'type' => 'csrf',
'name' => 'csrf',
'attributes' => [],
'options' => [
'csrf_options' => [
'timeout' => 600
]
],
]);
// Add the submit button
$this->add([
'type' => 'submit',
'name' => 'submit',
'attributes' => [
'value' => 'Next Step',
'id' => 'submitbutton',
],
]);
}
/**
* This method creates input filter (used for form filtering/validation).
*/
private function addInputFilter($step)
{
$inputFilter = new InputFilter();
$this->setInputFilter($inputFilter);
if ($step==1) {
$inputFilter->add([
'name' => 'email',
'required' => true,
'filters' => [
['name' => 'StringTrim'],
],
'validators' => [
[
'name' => 'EmailAddress',
'options' => [
'allow' => \Laminas\Validator\Hostname::ALLOW_DNS,
'useMxCheck' => false,
],
],
],
]);
$inputFilter->add([
'name' => 'full_name',
'required' => true,
'filters' => [
['name' => 'StringTrim'],
['name' => 'StripTags'],
['name' => 'StripNewlines'],
],
'validators' => [
[
'name' => 'StringLength',
'options' => [
'min' => 1,
'max' => 128
],
],
],
]);
// Add input for "password" field
$inputFilter->add([
'name' => 'password',
'required' => true,
'filters' => [
],
'validators' => [
[
'name' => 'StringLength',
'options' => [
'min' => 6,
'max' => 64
],
],
],
]);
// Add input for "confirm_password" field
$inputFilter->add([
'name' => 'confirm_password',
'required' => true,
'filters' => [
],
'validators' => [
[
'name' => 'Identical',
'options' => [
'token' => 'password',
],
],
],
]);
} else if ($step==2) {
$inputFilter->add([
'name' => 'phone',
'required' => true,
'filters' => [
],
'validators' => [
[
'name' => 'StringLength',
'options' => [
'min' => 3,
'max' => 32
],
],
[
'name' => PhoneValidator::class,
'options' => [
'format' => PhoneValidator::PHONE_FORMAT_INTL
]
],
],
]);
// Add input for "street_address" field
$inputFilter->add([
'name' => 'street_address',
'required' => true,
'filters' => [
['name' => 'StringTrim'],
],
'validators' => [
['name'=>'StringLength', 'options'=>['min'=>1, 'max'=>255]]
],
]);
// Add input for "city" field
$inputFilter->add([
'name' => 'city',
'required' => true,
'filters' => [
['name' => 'StringTrim'],
],
'validators' => [
['name'=>'StringLength', 'options'=>['min'=>1, 'max'=>255]]
],
]);
// Add input for "state" field
$inputFilter->add([
'name' => 'state',
'required' => true,
'filters' => [
['name' => 'StringTrim'],
],
'validators' => [
['name'=>'StringLength', 'options'=>['min'=>1, 'max'=>32]]
],
]);
// Add input for "post_code" field
$inputFilter->add([
'name' => 'post_code',
'required' => true,
'filters' => [
],
'validators' => [
['name' => 'IsInt'],
['name'=>'Between', 'options'=>['min'=>0, 'max'=>999999]]
],
]);
// Add input for "country" field
$inputFilter->add([
'name' => 'country',
'required' => false,
'filters' => [
['name' => 'Alpha'],
['name' => 'StringTrim'],
['name' => 'StringToUpper'],
],
'validators' => [
['name'=>'StringLength', 'options'=>['min'=>2, 'max'=>2]]
],
]);
} else if ($step==3) {
// Add input for "billing_plan" field
$inputFilter->add([
'name' => 'billing_plan',
'required' => true,
'filters' => [
],
'validators' => [
[
'name' => 'InArray',
'options' => [
'haystack'=>[
'Free',
'Bronze',
'Silver',
'Gold',
'Platinum'
]
]
]
],
]);
// Add input for "payment_method" field
$inputFilter->add([
'name' => 'payment_method',
'required' => true,
'filters' => [
],
'validators' => [
[
'name' => 'InArray',
'options' => [
'haystack'=>[
'PayPal',
'Visa',
'MasterCard',
]
]
]
],
]);
}
}
}
As you can see from the code above, the RegistrationForm is a usual form model, but it accepts the $step argument
in its constructor allowing to specify what form elements to use on the current step.
Adding RegistrationController
Next, we'll add the RegistrationController controller class. To do that, create the RegistrationController.php
file under the Controller directory and add the following code into it:
<?php
namespace Application\Controller;

use Laminas\Mvc\Controller\AbstractActionController;
use Laminas\View\Model\ViewModel;
use Application\Form\RegistrationForm;
use Laminas\Session\Container;

/**
 * This is the controller class displaying a page with the User Registration form.
 * User registration has several steps, so we display different form elements on
 * each step. We use session container to remember user's choices on the previous
 * steps.
 */
class RegistrationController extends AbstractActionController
{
    /**
     * Session container.
     * @var Laminas\Session\Container
     */
    private $sessionContainer;

    /**
     * Constructor. Its goal is to inject dependencies into controller.
     */
    public function __construct($sessionContainer)
    {
        $this->sessionContainer = $sessionContainer;
    }

    /**
     * This is the default "index" action of the controller. It displays the
     * User Registration page.
     */
    public function indexAction()
    {
        // Determine the current step.
        $step = 1;
        if (isset($this->sessionContainer->step)) {
            $step = $this->sessionContainer->step;
        }

        // Ensure the step is correct (between 1 and 3).
        if ($step<1 || $step>3)
            $step = 1;

        if ($step==1) {
            // Init user choices.
            $this->sessionContainer->userChoices = [];
        }

        $form = new RegistrationForm($step);

        // Check if user has submitted the form
        if($this->getRequest()->isPost()) {

            // Fill in the form with POST data
            $data = $this->params()->fromPost();

            $form->setData($data);

            // Validate form
            if($form->isValid()) {

                // Get filtered and validated data
                $data = $form->getData();

                // Save user choices in session.
                $this->sessionContainer->userChoices["step$step"] = $data;

                // Increase step
                $step ++;
                $this->sessionContainer->step = $step;

                // If we completed all 3 steps, redirect to Review page.
                if ($step>3) {
                    return $this->redirect()->toRoute('registration',
                                ['action'=>'review']);
                }

                // Go to the next step.
                return $this->redirect()->toRoute('registration');
            }
        }

        $viewModel = new ViewModel([
            'form' => $form
        ]);
        $viewModel->setTemplate("application/registration/step$step");

        return $viewModel;
    }

    /**
     * The "review" action shows a page allowing to review data entered on previous
     * three steps.
     */
    public function reviewAction()
    {
        // Validate session data.
        if(!isset($this->sessionContainer->step) ||
           $this->sessionContainer->step<=3 ||
           !isset($this->sessionContainer->userChoices)) {
            throw new \Exception('Sorry, the data is not available for review yet');
        }

        // Retrieve user choices from session.
        $userChoices = $this->sessionContainer->userChoices;

        return new ViewModel([
            'userChoices' => $userChoices
        ]);
    }
}
In the class above, we have three methods:
-
The
__construct()constructor is used to inject the dependency - the session container - into the controller. -
The
indexAction()action method extracts the current step from session and initializes the form model. If the user has submitted the form, we extract data from form and save it to session, incrementing the step. If the step is greater than 3, we redirect the user to the "Review" page. -
The
reviewAction()action method extracts the data entered by the user on all three steps and passes it to the view for rendering.
Adding RegistrationControllerFactory
Next, we add the factory for the RegistrationController. To do that, add the RegistrationControllerFactory.php file
inside the Controller/Form directory under the module's source directory. Put the following code into it:
<?php
namespace Application\Controller\Factory;

use Interop\Container\ContainerInterface;
use Laminas\ServiceManager\Factory\FactoryInterface;
use Application\Controller\RegistrationController;

/**
 * This is the factory for RegistrationController. Its purpose is to instantiate the
 * controller and inject dependencies into it.
 */
class RegistrationControllerFactory implements FactoryInterface
{
    public function __invoke(ContainerInterface $container,
                       $requestedName, array $options = null)
    {
        $sessionContainer = $container->get('UserRegistration');

        // Instantiate the controller and inject dependencies
        return new RegistrationController($sessionContainer);
    }
}
Do not forget to register the controller in the module.config.php file!
Adding View Templates
Now, let's add the view templates for the controller actions. We have four view templates: step1.phtml, step2.phtml,
step3.phtml and review.phtml. The first three ones are used by the indexAction() and the last is used by the reviewAction().
Add step1.phtml file inside the application/registration directory and put the following code into it:
<?php
$form->get('email')->setAttributes([
    'class'=>'form-control',
    'placeholder'=>'name@yourcompany.com'
    ]);

$form->get('full_name')->setAttributes([
    'class'=>'form-control',
    'placeholder'=>'John Doe'
    ]);

$form->get('password')->setAttributes([
    'class'=>'form-control',
    'placeholder'=>'Type password here (6 characters at minimum)'
    ]);

$form->get('confirm_password')->setAttributes([
    'class'=>'form-control',
    'placeholder'=>'Repeat password'
    ]);

$form->get('submit')->setAttributes(array('class'=>'btn btn-primary'));

$form->prepare();
?>

<h1>User Registration - Step 1</h1>

<div class="row">
    <div class="col-md-6">
        <?= $this->form()->openTag($form); ?>

        <div class="form-group">
            <?= $this->formLabel($form->get('email')); ?>
            <?= $this->formElement($form->get('email')); ?>
            <?= $this->formElementErrors($form->get('email')); ?>
        </div>

        <div class="form-group">
            <?= $this->formLabel($form->get('full_name')); ?>
            <?= $this->formElement($form->get('full_name')); ?>
            <?= $this->formElementErrors($form->get('full_name')); ?>
        </div>

        <div class="form-group">
            <?= $this->formLabel($form->get('password')); ?>
            <?= $this->formElement($form->get('password')); ?>
            <?= $this->formElementErrors($form->get('password')); ?>
        </div>

        <div class="form-group">
            <?= $this->formLabel($form->get('confirm_password')); ?>
            <?= $this->formElement($form->get('confirm_password')); ?>
            <?= $this->formElementErrors($form->get('confirm_password')); ?>
        </div>

        <div class="form-group">
        <?= $this->formElement($form->get('submit')); ?>
        </div>

        <?= $this->formElement($form->get('csrf')); ?>

        <?= $this->form()->closeTag(); ?>
    </div>
</div>
Next, add step2.phtml file inside the application/registration directory and put the following code into it:
<?php
$form->get('phone')->setAttributes([
    'class'=>'form-control',
    'placeholder'=>'Phone number in international format'
    ]);

$form->get('street_address')->setAttributes([
    'class'=>'form-control',
    ]);

$form->get('city')->setAttributes([
    'class'=>'form-control',
    ]);

$form->get('state')->setAttributes([
    'class'=>'form-control',
    ]);

$form->get('post_code')->setAttributes([
    'class'=>'form-control',
    ]);

$form->get('country')->setAttributes([
    'class'=>'form-control'
    ]);

$form->get('submit')->setAttributes(array('class'=>'btn btn-primary'));

$form->prepare();
?>

<h1>User Registration - Step 2 - Personal Information</h1>

<div class="row">
    <div class="col-md-6">
        <?= $this->form()->openTag($form); ?>

        <div class="form-group">
            <?= $this->formLabel($form->get('phone')); ?>
            <?= $this->formElement($form->get('phone')); ?>
            <?= $this->formElementErrors($form->get('phone')); ?>
        </div>

        <div class="form-group">
            <?= $this->formLabel($form->get('street_address')); ?>
            <?= $this->formElement($form->get('street_address')); ?>
            <?= $this->formElementErrors($form->get('street_address')); ?>
        </div>

        <div class="form-group">
            <?= $this->formLabel($form->get('city')); ?>
            <?= $this->formElement($form->get('city')); ?>
            <?= $this->formElementErrors($form->get('city')); ?>
        </div>

        <div class="form-group">
            <?= $this->formLabel($form->get('state')); ?>
            <?= $this->formElement($form->get('state')); ?>
            <?= $this->formElementErrors($form->get('state')); ?>
        </div>

        <div class="form-group">
            <?= $this->formLabel($form->get('post_code')); ?>
            <?= $this->formElement($form->get('post_code')); ?>
            <?= $this->formElementErrors($form->get('post_code')); ?>
        </div>

        <div class="form-group">
            <?= $this->formLabel($form->get('country')); ?>
            <?= $this->formElement($form->get('country')); ?>
            <?= $this->formElementErrors($form->get('country')); ?>
        </div>

        <div class="form-group">
        <?= $this->formElement($form->get('submit')); ?>
        </div>

        <?= $this->formElement($form->get('csrf')); ?>

        <?= $this->form()->closeTag(); ?>
    </div>
</div>
Next, add step3.phtml file inside the application/registration directory and put the following code into it:
<?php
$form->get('billing_plan')->setAttributes([
    'class'=>'form-control',
    ]);

$form->get('payment_method')->setAttributes([
    'class'=>'form-control',
    ]);

$form->get('submit')->setAttributes(array('class'=>'btn btn-primary'));

$form->prepare();
?>

<h1>User Registration - Step 3 - Billing Information</h1>

<div class="row">
    <div class="col-md-6">
        <?= $this->form()->openTag($form); ?>

        <div class="form-group">
            <?= $this->formLabel($form->get('billing_plan')); ?>
            <?= $this->formElement($form->get('billing_plan')); ?>
            <?= $this->formElementErrors($form->get('billing_plan')); ?>
        </div>

        <div class="form-group">
            <?= $this->formLabel($form->get('payment_method')); ?>
            <?= $this->formElement($form->get('payment_method')); ?>
            <?= $this->formElementErrors($form->get('payment_method')); ?>
        </div>

        <div class="form-group">
        <?= $this->formElement($form->get('submit')); ?>
        </div>

        <?= $this->formElement($form->get('csrf')); ?>

        <?= $this->form()->closeTag(); ?>
    </div>
</div>
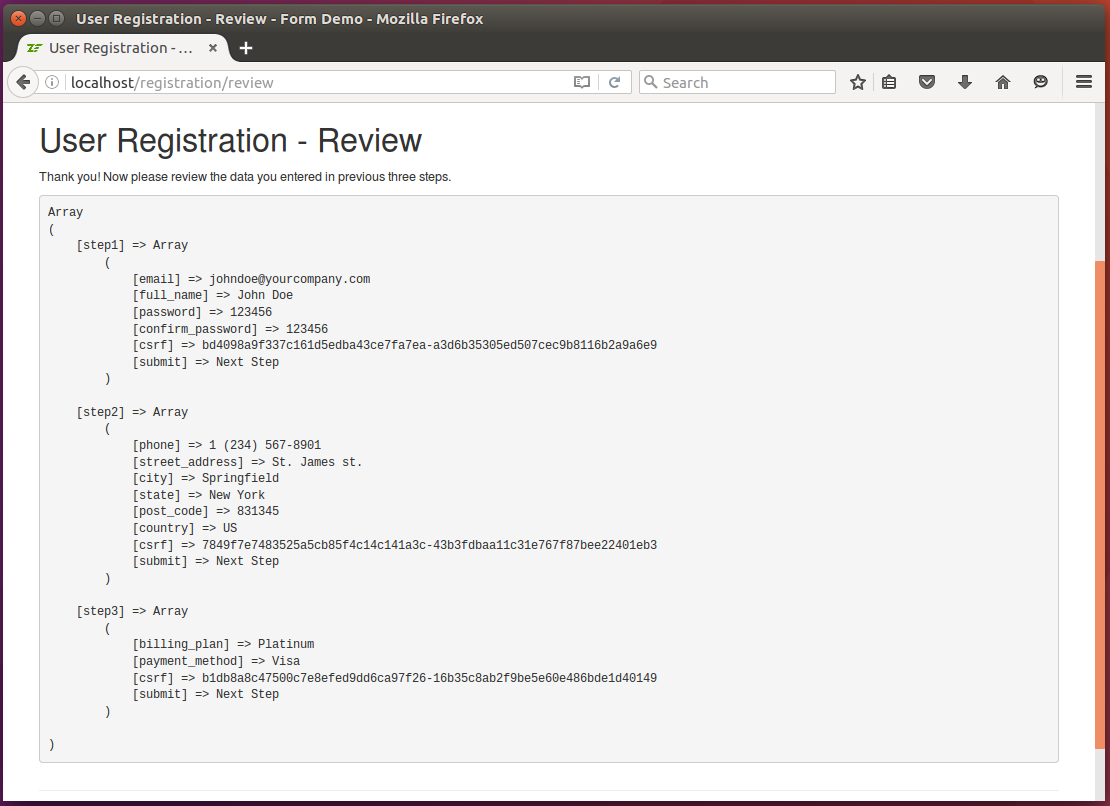
And finally, add review.phtml file inside the application/registration directory and put the following code into it:
<h1>User Registration - Review</h1>

<p>Thank you! Now please review the data you entered in previous three steps.</p>

<pre>
<?php print_r($userChoices); ?>
</pre>
Adding Route
Add the following route inside your module.config.php config file:
'registration' => [
    'type'    => Segment::class,
    'options' => [
        'route'    => '/registration[/:action]',
        'constraints' => [
            'action' => '[a-zA-Z][a-zA-Z0-9_-]*'
        ],
        'defaults' => [
            'controller'    => Controller\RegistrationController::class,
            'action'        => 'index',
        ],
    ],
],
Great! Now everything is ready for seeing the results!
Results
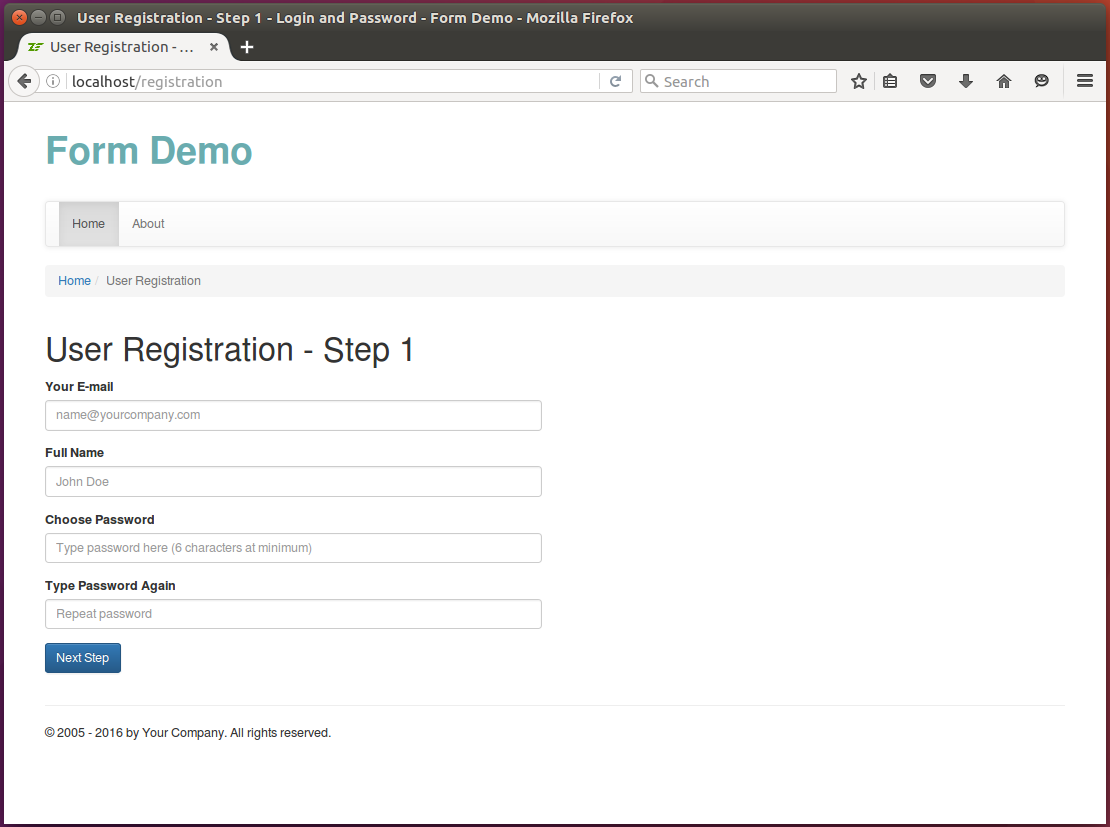
To see our multi-step form in action, enter the "http://localhost/registration" URL into your browser's navigation bar. The User Registration - Step 1 page appears (see figure 11.6 below):
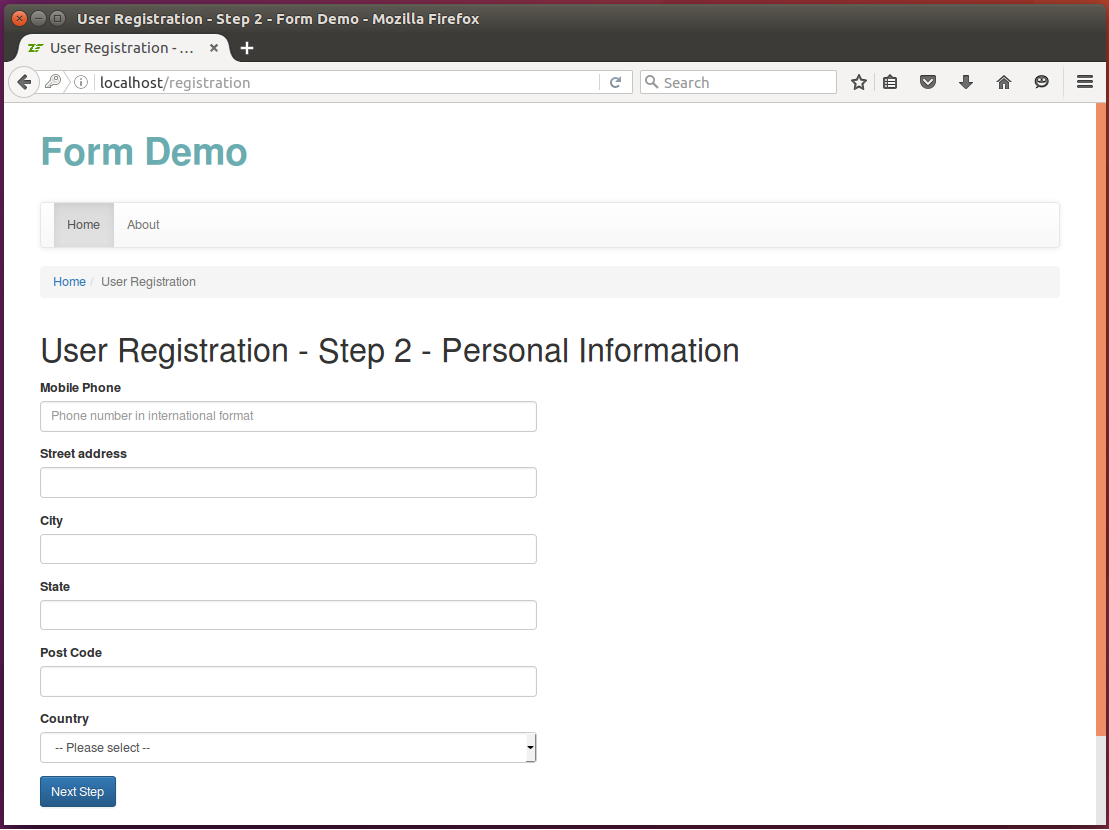
Once the user enters his E-mail, full name and password and clicks Next, he is redirected to the next step (see figure 11.7):
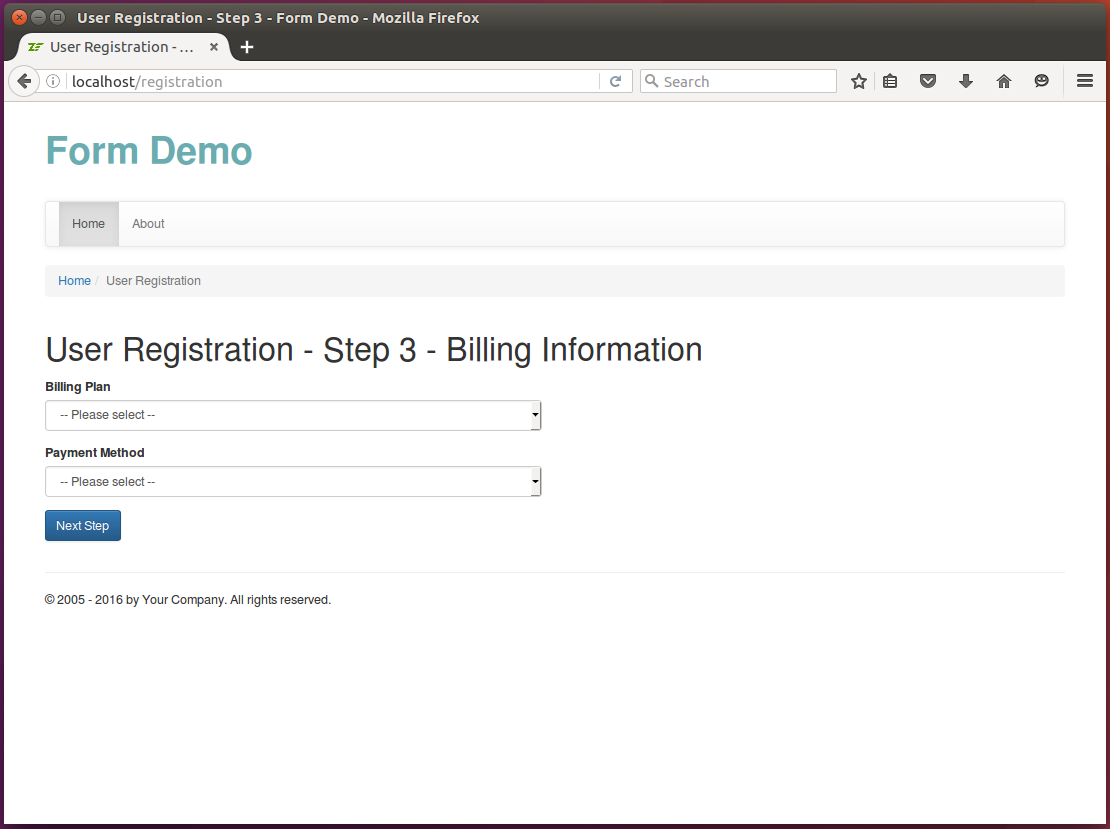
And the final step is shown in figure 11.8 below:
Clicking Next results in displaying the Review page allowing to see the data entered on the previous three steps:
You can find this complete example in the Form Demo sample application bundled with this book.
Summary
In this chapter, we have discussed some advanced form usage capabilities.
Laminas Framework provides two classes whose purpose is enhancing form security: @Captcha
and @Csrf[Laminas\Form\Element\Csrf]. A CAPTCHA is a type of challenge-response test used to determine whether or
not the user is a human. CAPTCHA elements are used on form to prevent form submission by a
malicious automated process (a robot). The latter element, @Csrf[Laminas\Form\Element\Csrf], is used for Cross-Site
Request Forgery (abbreviated as CSRF) hacker attack prevention.
We have also learned of how to implement a multi-step forms with the help of sessions.
-
The adapter is a design pattern that translates one interface for a class into a compatible interface, which helps two (or several) incompatible interfaces to work together. Typically, CAPTCHA algorithms have different public methods, but since they all implement @
AbstractAdapter[Laminas\Captcha\AdapterInterface] interface, the caller may use any CAPTCHA algorithm in the same common manner (by calling the methods provided by the base interface). ↩ -
In the latter case (configuration array), the CAPTCHA algorithm will be automatically instantiated and initialized by the factory class @
Laminas\Captcha\Factory. ↩