Model-View-Controller
In this chapter, you will learn about the models, views and controllers (the MVC design pattern). A web application uses the MVC pattern to separate business logic from presentation. The goal of this is to allow for code reusability and separation of concerns.
Laminas components covered in this chapter:
| Component | Description |
|---|---|
@Laminas\Mvc |
Support of MVC pattern. Implements base controller classes, controller plugins, etc. |
@Laminas\View |
Implements the functionality for variable containers, rendering a web page and common view helpers. |
@Laminas\Http |
Implements a wrapper around HTTP request and response. |
Get the Hello World Example from GitHub
In this and in the next chapters, we will provide some code samples that you may want to reproduce yourself. It may be difficult for a novice to write code without mistakes. If you are stuck or can not understand why your code does not work, you can download the complete Hello World web application from GitHub code hosting. Code examples from this chapter are mostly the part of this Hello World sample application.
To download the Hello World application, visit this page and click the Clone or Download button to download the code as a ZIP archive (see figure 4.1). When download is complete, unpack the archive to some directory.

Then navigate to the helloworld directory containing the complete
source code of the Hello World example:
/using-laminas-book-samples
   /helloworld
     ...
The Hello World is a complete website which can be installed on your machine. To install the example, you can either edit your default Apache virtual host file or create a new one. After editing the file, restart the Apache HTTP Server and open the website in your web browser.
Separating Business Logic from Presentation
A typical website has three kinds of functionality: code implementing business logic, code implementing user interaction and code rendering HTML pages (presentation). Before PHP frameworks, programmers usually merged these three types of code in a single big PHP script file, which made it a pain to test and maintain such code, especially when you write a large website.
Since that time, PHP became object-oriented, and now you can organize your code into classes. The Model-View-Controller (MVC) pattern is just a set of advices telling you how to organize your classes in a better manner, to make them easy to maintain.
In MVC, classes implementing your business logic are called models, code snippets rendering HTML pages are called views, and the classes responsible for interacting with user are called controllers.
Note
Views are implemented as code snippets, not as classes. This is because views are typically very simple and contain only the mixture of HTML and inline PHP code.
The main objective of the MVC concept is to separate the business logic (models) from its visualization (views). This is also called the separation of concerns, when each layer does its specific tasks only.
By separating your models from views, you reduce the number of dependencies between them. Therefore, changes made to one of the layers have the lowest possible impact on other layers. This separation also improves the code reusability. For example, you can create multiple visual representations for the same models (changeable themes).
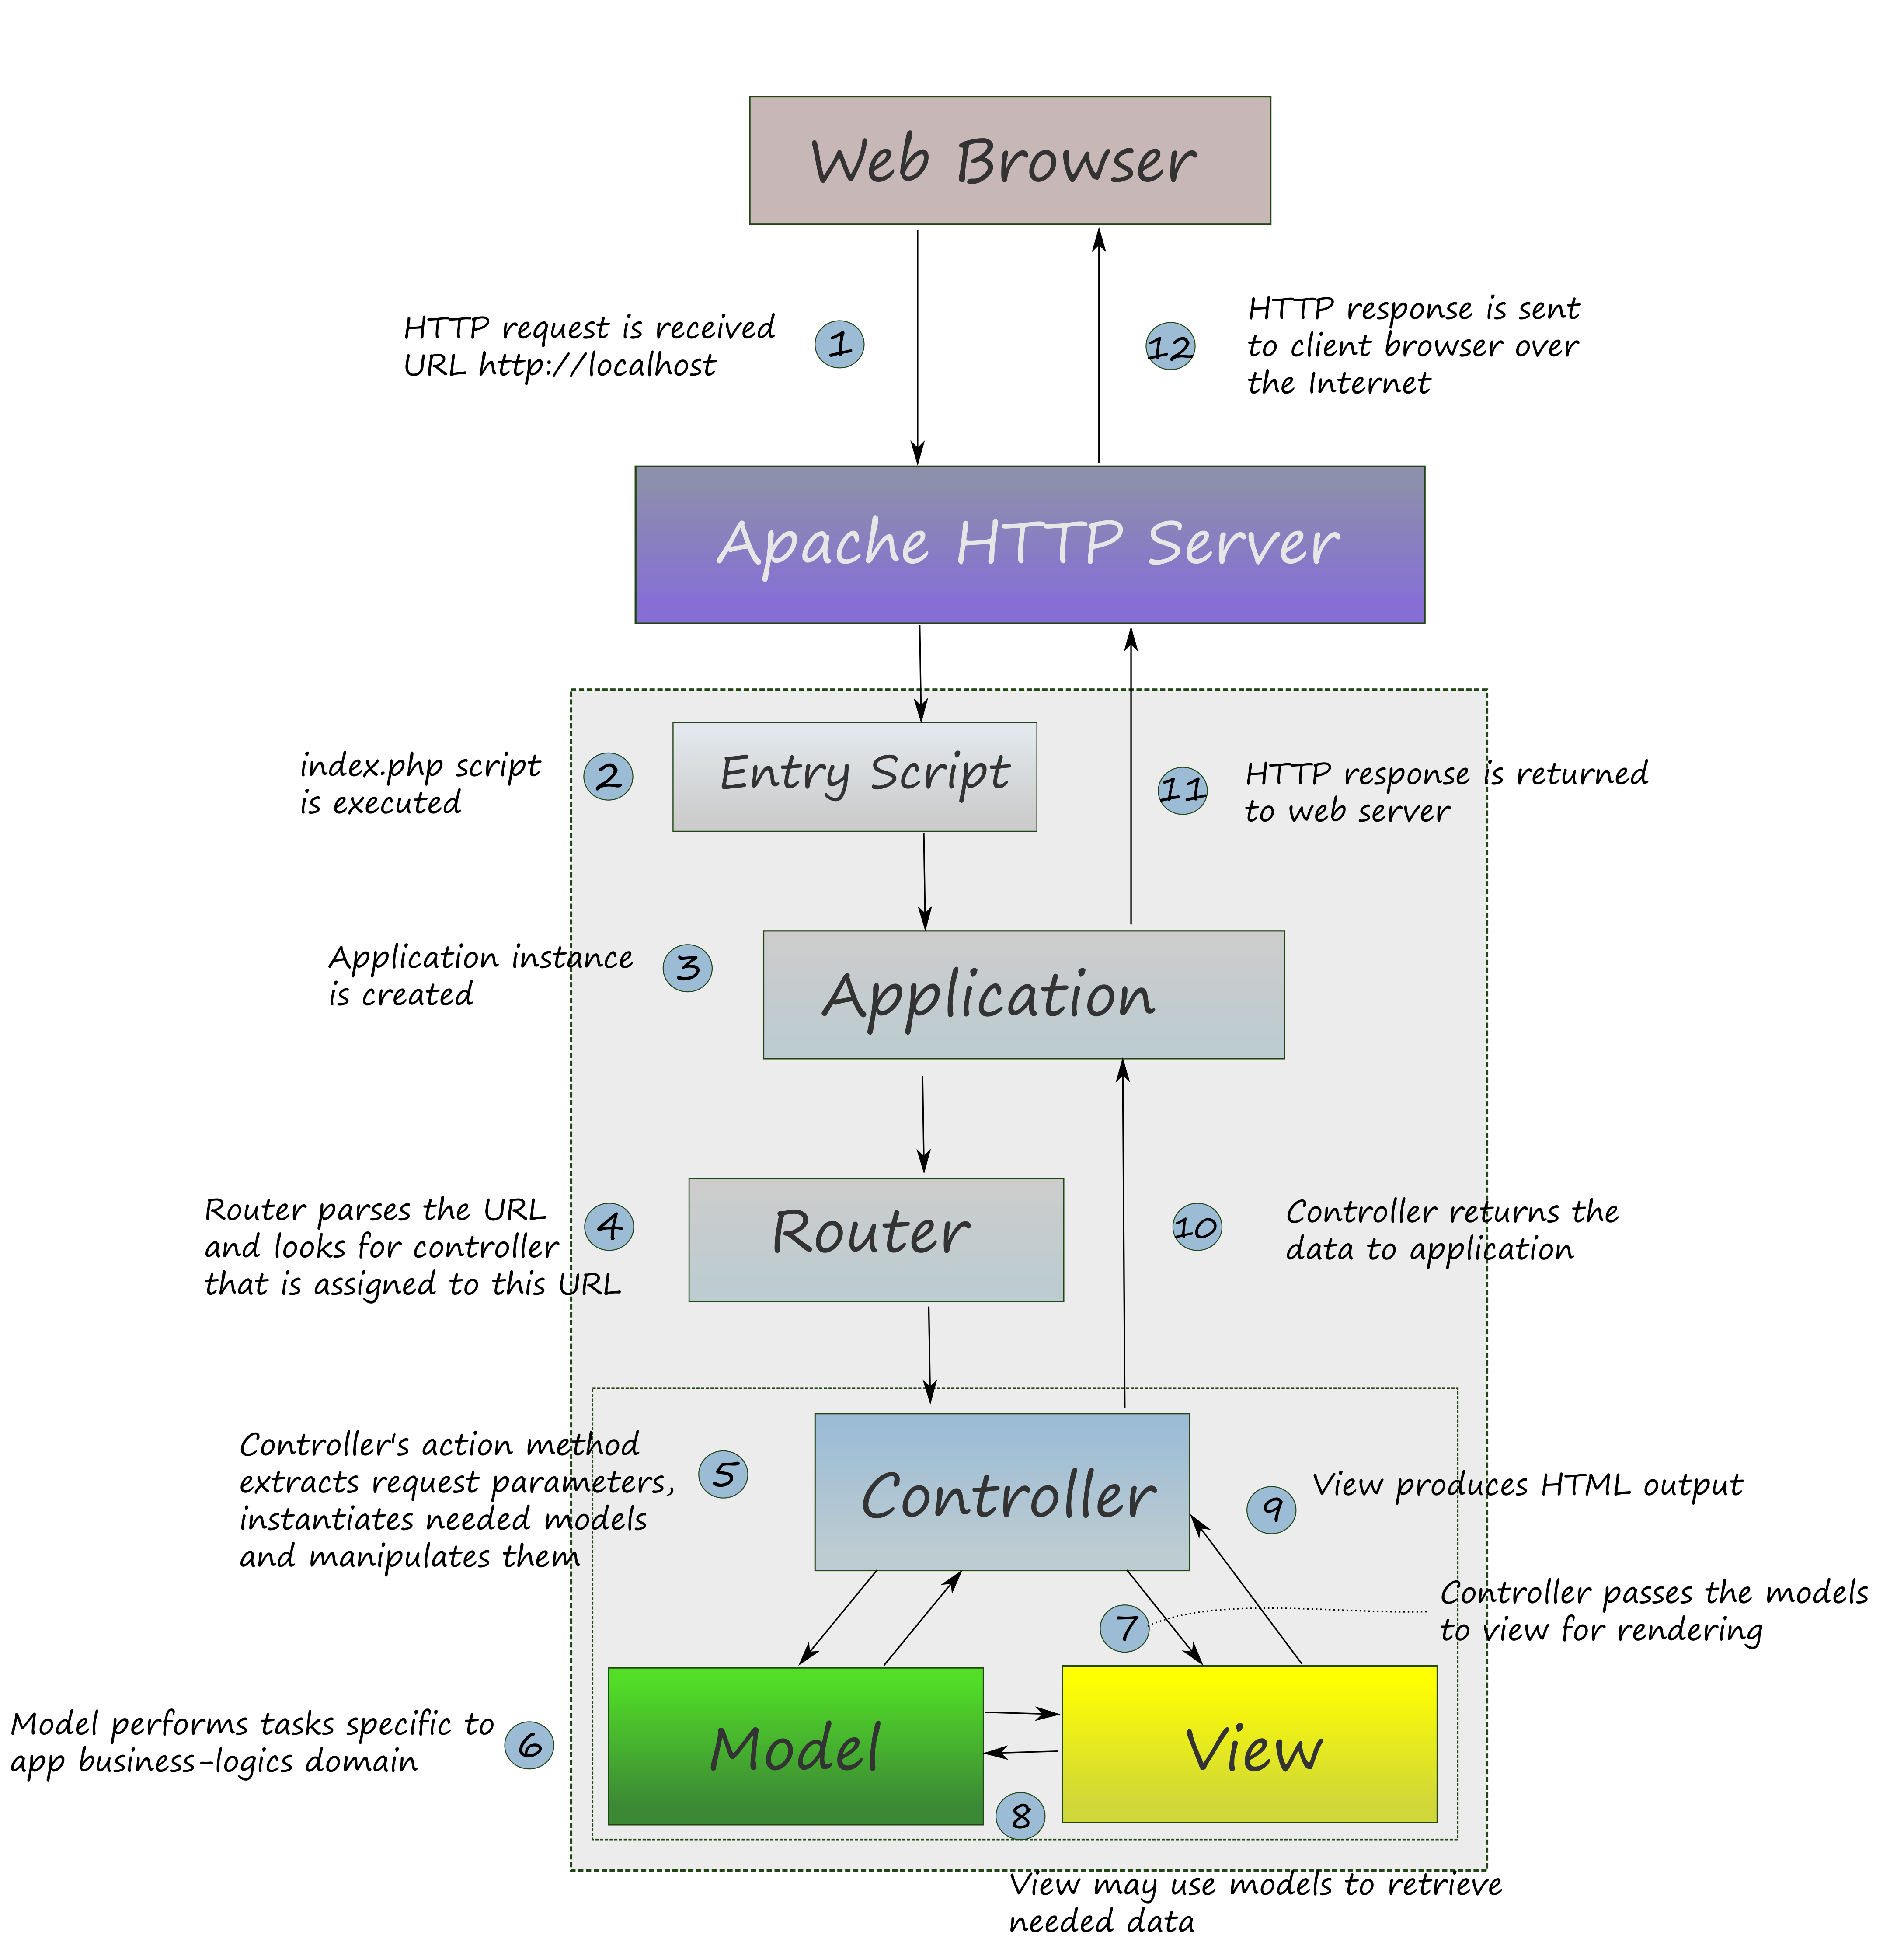
To better understand how this works, lets remember that any website is just a PHP program receiving an HTTP request from the web server, and producing an HTTP response. Figure 4.2 shows how an HTTP request is processed by the MVC application and how the response is generated:
-
First, a website visitor enters a URL in his/her web browser, for example http://localhost, and the web browser sends the request to the web server over the Internet.
-
Web server's PHP engine runs the index.php entry script. The only thing the entry script does is creating the @
Laminas\Mvc\Applicationclass instance. -
The application uses its router component for parsing the URL and determining to which controller to pass the request. If the route match is found, the controller is instantiated and its appropriate action method is called.
-
In the controller's action method, parameters are retrieved from GET and POST variables. To process the incoming data, the controller instantiates appropriate model classes and calls their methods.
-
Model classes use business logic algorithms to process the input data and return the output data. The business logic algorithms are application-specific, and typically include retrieving data from database, managing files, interacting with external systems and so on.
-
The result of calling the models are passed to the corresponding view script for the rendering of the HTML page.
-
View script uses the model-provided data for rendering the HTML page.
-
Controller passes the resulting HTTP response to application.
-
Web server returns the resulting HTML web page to the user's web browser.
-
The user sees the page in browser window.
Now you might have some idea how models, views and controllers cooperate to generate HTML output. In the next sections, we describe them in more details.
Controllers
A controller provides communication between the application, models and views: gets input from HTTP request and uses the model(s) and the corresponding view to produce the necessary HTTP response.
Controllers belonging to module typically reside in the Controller subdirectory
of module's source directory (shown in figure 4.3).
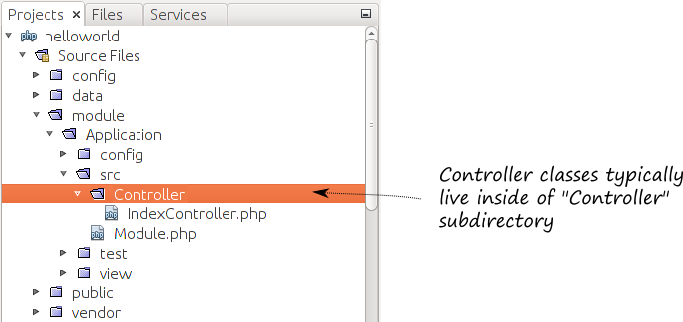
Laminas Skeleton Application provides you with the default implementation of IndexController
class. The IndexController is typically the main controller class of the website. Its code
is presented below (some parts of code were omitted for simplicity):
<?php
namespace Application\Controller;

use Laminas\Mvc\Controller\AbstractActionController;
use Laminas\View\Model\ViewModel;

class IndexController extends AbstractActionController
{
    public function indexAction()
    {
        return new ViewModel();
    }
}
From the example above, you can see that controllers usually define their own namespace (line 2).
The Index controller, as all other controllers from the Application module, lives in Application\Controller
namespace.
A controller is a usual PHP class derived from the @AbstractActionController[Laminas\Mvc\Controller\AbstractActionController] base class (line 7).
By default, the controller class contains the single action method called indexAction() (see lines 9-12).
Typically, you will create other action methods in your controller classes.
Note
Laminas automatically recognizes the action methods by the Action suffix.
If a controller method's name does not have that suffix, it is considered as a usual method, not an action.
As its name assumes, an action method performs some site action, which typically results in producing a single web page. Index controller usually contains action methods for site-wide web pages (table 4.1). For example, you would have "index" action for the Home page, "about" action for About page, "contactUs" action for the Contact Us page and possibly other actions.
| Action Method | Description |
|---|---|
IndexController::indexAction() |
The "index" action displays the Home page of your site. |
IndexController::aboutAction() |
The "about" action displays the About page of the site. The About page contains contact and copyright information. |
IndexController::contactUsAction() |
The "contactUs" action displays the Contact Us page of the site. The Contact Us page displays the form for contacting site authors. |
Table 4.1. Index controller's typical actions
Base Controller Class
Every controller in your website is inherited from the @AbstractActionController[Laminas\Mvc\Controller\AbstractActionController] base class.
In figure 4.4, the class inheritance diagram is presented.
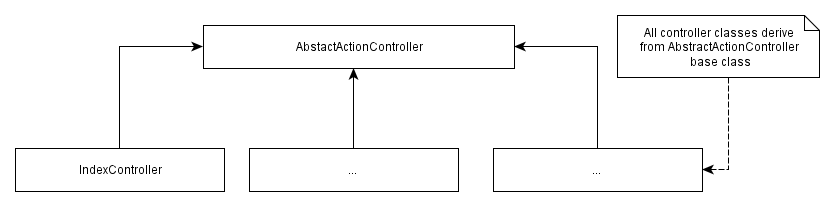
The @AbstractActionController[Laminas\Mvc\Controller\AbstractActionController] provides you with several useful methods you can use
in your controller classes. Table 4.2 provides you with a brief summary of the methods:
| Method Name | Description |
|---|---|
getRequest() |
Retrieves the @Laminas\Http\Request object, which is the representation of HTTP request data. |
getResponse() |
Retrieves the @Laminas\Http\PhpEnvironment\Response object allowing to set data of HTTP response. |
getEventManager() |
Returns the @Laminas\EventManager\EventManager object, allowing to trigger events and listen to events. |
getEvent() |
Returns the @Laminas\Mvc\MvcEvent object, which represents the event the controller responds to. |
getPluginManager() |
Returns the @Laminas\Mvc\Controller\PluginManager object, which can be used for registering controller plugins. |
plugin($name, $options) |
This method allows to access certain controller plugin with the given name. |
__call($method, $params) |
Allows to call a plugin indirectly using the PHP __call magic method. |
Table 4.2. AbstractActionController's useful methods
As you can see from the table above, the base controller class provides you with access to HTTP request and response data, and provides you with the access to the event manager. It also gives you an ability to register and call controller plugins (we will learn about controller plugins later in this chapter).
Retrieving Data from HTTP Request
In a controller's action method, you may need to retrieve the data from the HTTP request
(the data like GET and POST variables, cookies, HTTP headers and so on). For this purpose, Laminas Framework
provides you with @Laminas\Http\Request class, which is part of @Laminas\Http component.
To get the HTTP request object, inside of your action method, you can use the following code:
// Get HTTP request object
$request = $this->getRequest();
The code above returns the instance of @Laminas\Http\Request class, containing all the HTTP
request data. In table 4.3, you can find the most widely used methods of the @Request[Laminas\Http\Request] class together
with their brief description.
| Method Name | Description |
|---|---|
isGet() |
Checks if this is a GET request. |
isPost() |
Checks if this is a POST request. |
isXmlHttpRequest() |
Checks if this request is an AJAX request. |
isFlashRequest() |
Check if this request is a Flash request. |
getMethod() |
Returns the method for this request. |
getUriString() |
Returns the URI for this request object as a string. |
getQuery($name, $default) |
Returns the query parameter by name, or all query parameters. If a parameter is not found, returns the $default value. |
getPost($name, $default) |
Returns the parameter container responsible for post parameters or a single post parameter. |
getCookie() |
Returns the Cookie header. |
getFiles($name, $default) |
Returns the parameter container responsible for file parameters or a single file. |
getHeaders($name, $default) |
Returns the header container responsible for headers or all headers of a certain name/type. |
getHeader($name, $default) |
Returns a header by $name. If a header is not found, returns the $default value. |
renderRequestLine() |
Returns the formatted request line (first line) for this HTTP request. |
fromString($string) |
A static method that produces a Request object from a well-formed Http Request string |
toString() |
Returns the raw HTTP request as a string. |
Table 4.3. Methods of Laminas\Http\Request class.
Retrieving GET and POST Variables
To simply get a GET or POST variable from an HTTP request, you use the following code:
// Get a variable from GET
$getVar = $this->params()->fromQuery('var_name', 'default_val');

// Get a variable from POST
$postVar = $this->params()->fromPost('var_name', 'default_val');
In the example above, we used the @Params controller plugin, which provides you with
convenient methods of accessing GET and POST variables, uploaded files, etc.
In line 2 we use the fromQuery() method for retrieving a variable having name "var_name" from GET.
If such a variable does not present, the default value "default_val" is returned.
The default value is very convenient, because you don't have to use the isset() PHP
function to test if the variable exists.
In line 5 we use the fromPost() method to retrieve the variable from POST. The meaning
of this method's parameters is the same as for the fromQuery() method.
Note
In Laminas, you must not access request parameters through traditional PHP $_GET and $_POST
global arrays. Instead, you use laminas-provided API for retrieving the request data.
Putting Data to HTTP Response
Although you rarely interact with HTTP response data directly, you can do that
with the help of getResponse() method provided by the @AbstractActionController[Laminas\Mvc\Controller\AbstractActionController] base class.
The getResponse() method returns the instance of @Laminas\Http\PhpEnvironment\Response class.
Table 4.4 contains the most important methods of this class:
| Method Name | Description |
|---|---|
fromString($string) |
Populate response object from string. |
toString() |
Renders entire response as HTTP response string. |
setStatusCode($code) |
Sets HTTP status code and (optionally) message. |
getStatusCode() |
Retrieves HTTP status code. |
setReasonPhrase($reasonPhrase) |
Sets the HTTP status message. |
getReasonPhrase() |
Gets HTTP status message. |
isForbidden() |
Checks if the response code is 403 Forbidden. |
isNotFound() |
Checks if the status code indicates the resource is not found (404 status code). |
isOk() |
Checks whether the response is successful. |
isServerError() |
Checks if the response is 5xx status code. |
isRedirect() |
Checks whether the response is 303 Redirect. |
isSuccess() |
Checks whether the response is 200 Successful. |
setHeaders(Headers $headers) |
Allows to set response headers. |
getHeaders() |
Returns the list of response headers. |
getCookie() |
Retrieves Cookie header. |
setContent($value) |
Sets raw response content. |
getContent() |
Returns raw response content. |
getBody() |
Gets and decodes the content of the response. |
Table 4.4. Methods of Laminas\Http\PhpEnvironment\Response class.
For example, use the following code to set 404 status code for the response:
$this->getResponse()->setStatusCode(404);
Use the following code to add a header to response:
$headers = $this->getResponse()->getHeaders();
$headers->addHeaderLine(
             "Content-type: application/octet-stream");
Use the following code to set response content:
$this->getResponse()->setContent('Some content');
Variable Containers
After you have retrieved the data from the HTTP request, you would do something with that data (typically you will process the data with your model layer) and return the data from the action method.
You can see that the indexAction() method of the Index controller returns an instance of the @ViewModel[Laminas\View\Model\ViewModel] class.
The @ViewModel[Laminas\View\Model\ViewModel] class is some kind of a variable container. All variables passed to
its constructor, will be then automatically accessible by the view script.
Let's have some real-life example. We will create another action method in our IndexController class, which we
will call the aboutAction(). The "about" action will display the About page of our site.
In the action method, we will create two variables containing information about our website,
and return the variables for rendering in a view with the help of @ViewModel[Laminas\View\Model\ViewModel] object:
// The "about" action
public function aboutAction()
{
    $appName = 'HelloWorld';
    $appDescription = 'A sample application for the Using Laminas Framework book';

    // Return variables to view script with the help of
    // ViewModel variable container
    return new ViewModel([
        'appName' => $appName,
        'appDescription' => $appDescription
    ]);
}
In lines 4-5, we create the $appName and $appDescription variables. They store our application
name and description, respectively.
In lines 9-12, we pass the variables we've created to the constructor of the @ViewModel[Laminas\View\Model\ViewModel] object
as an associative array. The array keys define the names of the variables which on return
will be accessible to view script.
The @ViewModel[Laminas\View\Model\ViewModel] class provides several methods that you can additionally use to
set variables to @ViewModel[Laminas\View\Model\ViewModel] and retrieve variables from it. The table 4.5
provides the methods summary:
| Method name | Description |
|---|---|
getVariable($name, $default) |
Returns a variable by name (or default value if the variable does not exist). |
setVariable($name, $value) |
Sets a variable. |
setVariables($variables, $overwrite) |
Sets a group of variables, optionally overwriting the existing ones. |
getVariables() |
Returns all variables as an array. |
clearVariables() |
Removes all variables. |
Table 4.5. Methods of the ViewModel class
Expressing Error Conditions
Sometimes things go wrong and some error occurs. For example, you expect to receive a GET variable from HTTP request, but it is missing or has an invalid value. To express this error condition, you typically set 4xx status code in HTTP response and return from controller's action.
For example, in a Blog application, assume a user enters the following URL in his browser's navigation bar: http://localhost/posts/view?id=10000. The intention of such request is to display the blog post with ID=10000. If the post with such ID doesn't exist, we can't display it and use the following code to set 404 status code (Page Not Found) for the response:
// The "view" action displays a blog post with the given ID
public function viewAction()
{
    // Get ID argument from GET
    $id = (int)$this->params()->fromQuery('id', -1);

    // Validate the argument
    if ($id<1) {
        // Error condition - we can not display such post
        $this->getResponse()->setStatusCode(404);
        return;
    }

    // Try to find the post (we omit the actual SQL query for simplicity).
    $post = ...
    if (!$post) {
        // Error condition - post not found
        $this->getResponse()->setStatusCode(404);
        return;
    }

    // Normal execution
    // ...
}
When Laminas encounters the 4xx status code in response, it redirects the user to a special error page. We will talk about error pages later in this chapter.
Another way to express a (critical) error condition is to throw an Exception, for example, like this:
throw new \Exception("Post with ID=$id could not be found");
When Laminas encounters an unhandled exception, it displays another error page with the information about the exception.
Controller Registration
All controller classes belonging to a module should be registered in the module.config.php configuration file. If your controller class doesn't need to use some services (doesn't have dependencies), you can register it as follows:
<?php
use Laminas\ServiceManager\Factory\InvokableFactory;

return [
    // ...

    'controllers' => [
        'factories' => [
            Controller\IndexController::class => InvokableFactory::class
            // Put other controllers registration here
        ],
    ],

    // ...
];
In line 7, we have the controllers key, which contains the factories subkey.
To register a controller class, you
add the line in form of key=>value pair. The key should be the fully qualified name of the controller class,
like \Application\Controller\IndexController (we can use the PHP ::class keyword for class name resolution),
and value should be the name of a factory class that would create the controller class for use. In our case,
we use the standard @InvokableFactory, but you can create your own if you need.
By using the @InvokableFactory, you tell Laminas Framework
that it can invoke the controller by instantiating it with the new operator. This is the most
simple way of instantiating the controller. As an alternative, you can register your own factory
to create the controller instance, and inject dependencies into controller.
Registering a Controller Factory
If your controller class needs to call some service (this happens very often), you need to request that service from the service manager (we discussed the service manager in the Website Operation chapter) and pass that service to controller's constructor, and the controller saves the service you passed in a private property for internal use (this also called dependency injection).
This procedure is typically implemented inside of a factory class. For example, assume our controller class needs to use some CurrencyConverter
service which will convert money from USD to EUR. The factory class for our controller will look like below:
<?php
namespace Application\Controller\Factory;

use Laminas\ServiceManager\Factory\FactoryInterface;
use Application\Service\CurrencyConverter;
use Application\Controller\IndexController;

// Factory class
class IndexControllerFactory implements FactoryInterface
{
    public function __invoke(ContainerInterface $container,
                     $requestedName, array $options = null)
    {
        // Get the instance of CurrencyConverter service from the service manager.
        $currencyConverter = $container->get(CurrencyConverter::class);

        // Create an instance of the controller and pass the dependency
        // to controller's constructor.
        return new IndexController($currencyConverter);
    }
}
Then you register the controller the same way, but specify the factory class we have just written:
<?php
return [
    // ...

    'controllers' => [
        'factories' => [
            Controller\IndexController::class => Controller\Factory\IndexControllerFactory::class
        ],
    ],

    // ...
];
LazyControllerAbstractFactory
Writing a factory for almost every controller may seem boring at first sight. If you are so lazy that you
don't want to do that, you can use the standard @LazyControllerAbstractFactory factory class.
The @LazyControllerAbstractFactory factory uses reflection to determine which services your controller
wants to use. You just need to typehint the arguments of controller's constructor, and the factory will
itself retrieve the needed services and pass it to the constructor.
For example, to inject the CurrencyConverter service in your controller, make sure its constructor looks like below:
namespace Application\Controller;

use Application\Service\CurrencyConverter;

class IndexController extends AbstractActionController
{
    // Here we will save the service for internal use.
    private $currencyConverter;

    // Typehint the arguments of constructor to get the dependencies.
    public function __construct(CurrencyConverter $currencyConverter)
    {
        $this->currencyConverter = $currencyConverter;
    }
}
Then you register the controller the same way, but specify the @LazyControllerAbstractFactory factory:
<?php
use Laminas\Mvc\Controller\LazyControllerAbstractFactory;

return [
    // ...

    'controllers' => [
        'factories' => [
            Controller\IndexController::class => LazyControllerAbstractFactory::class
        ],
    ],

    // ...
];
When to Create a New Controller?
When your site grows in size, you should create new controller classes instead of putting
all actions to IndexController. The Index controller is used for defining the actions
which work for your entire site.
Note
It is not recommended to create huge controllers with hundreds of actions, because they are difficult to understand and support.
It is recommended to create new controller class for each model (or for most important ones) of your business logic domain.
For example, you can create UserController to manage users of your site.
This controller would have the default "index" action for displaying the page
with all users, "add" action for adding a new user, "edit" action for editing
user's profile and "delete" action for deleting the user.
By analogy, you would create PurchaseController and its actions to manage the purchases of your products
and implementing the shopping cart, DownloadController and its actions to manage file downloads for the site,
etc.
Controller Plugins
A controller plugin is a class which extends the functionality of all controllers in some way.
Without plugins, to extend the functionality of all controllers, you would have to
create a custom base class, say BaseController, and
derive other controllers from that base class. This way can also be used, but from Laminas creators' point of view, plugins are better
solution, because they use class composition 1, which provides better flexibility comparing
to class inheritance. You register your plugin controller and it automatically becomes
accessible from all controllers of your app (@AbstractActionController base class uses PHP's __call()
magic method to proxy calls to registered controller plugins).
There are several standard controller plugins available out of the box (table 4.6), and we've already used one of
them (the @Params plugin) in one of our previous examples.
| Standard Plugin Class | Description |
|---|---|
@Params |
Allows to retrieve variables from HTTP request, including GET and POST variables. |
@Url[Laminas\Mvc\Controller\Plugin\Url] |
Allows to generate absolute or relative URLs from inside controllers. |
@Layout[Laminas\Mvc\Controller\Plugin\Layout] |
Gives access to layout view model for passing data to layout template. |
@Identity[Laminas\Mvc\Plugin\Identity\Identity] |
Returns the identity of the user who has logged into the website. |
@FlashMessenger[Laminas\Mvc\Plugin\FlashMessenger\FlashMessenger] |
Allows to define "flash" messages which are stored in session and can be displayed on a different web page. |
@Redirect[Laminas\Mvc\Controller\Plugin\Redirect] |
Allows to redirect the request to another controller's action method. |
@PostRedirectGet[Laminas\Mvc\Plugin\Prg\PostRedirectGet] |
Redirects the POST request, converting all POST variables to GET ones. |
@FilePostRedirectGet[Laminas\Mvc\Plugin\FilePrg\FilePostRedirectGet] |
Redirects the POST request, preserving uploaded files. |
Table 4.6. Standard Controller Plugins
Inside of the controller's action method, you access a plugin in the following way:
// Access Url plugin
$urlPlugin = $this->url();

// Access Layout plugin
$layoutPlugin = $this->layout();

// Access Redirect plugin
$redirectPlugin = $this->redirect();
As an alternative, you can invoke a plugin by its fully qualified name with the plugin() method provided by the base controller
class, as follows:
use Laminas\Mvc\Controller\Plugin\Url;

// Inside your controller's action use the plugin() method.
$urlPlugin = $this->plugin(Url::class);
Writing Own Controller Plugin
In your websites, you will likely need to create custom controller plugins.
For example, assume you need that all your controller classes to be able to check
whether a site user is allowed to access certain controller action. This can be
implemented with the AccessPlugin class.
The controller plugin should be derived from the @AbstractPlugin[Laminas\Mvc\Controller\Plugin\AbstractPlugin] class.
Plugins typically live in their own namespace Plugin, which is nested in
Controller namespace:
<?php
namespace Application\Controller\Plugin;

use Laminas\Mvc\Controller\Plugin\AbstractPlugin;

// Plugin class
class AccessPlugin extends AbstractPlugin
{
    // This method checks whether user is allowed
    // to visit the page
    public function checkAccess($actionName)
    {
        // ...
    }
}
To let Laminas Framework know about your plugin, you need to register
it in your module.config.php file under the controller_plugins key.
See below for example:
<?php
return [
    // ...

    'controller_plugins' => [
        'factories' => [
            Controller\Plugin\AccessPlugin::class => InvokableFactory::class,
        ],
        'aliases' => [
            'access' => Controller\Plugin\AccessPlugin::class,
        ]
    ],

    // ...
];
Note
Please note that we also register an alias for the plugin to be able to get the plugin by its short name.
After that, you'll be able to access your custom plugin from all of your controller's actions in this way:
// Check if site user is allowed to visit the "index" page
$isAllowed = $this->access()->checkAccess('index');
Views
Views belong to the presentation layer of the web application, because their goal is to produce HTML output returned by the web server to site visitors.
In Laminas Framework, you implement a view as a template file, which is a file
having .phtml extension ("phtml" stands for PHP+HTML). View templates have such
a name because they usually contain HTML code mixed with PHP code snippets used
for rendering the web pages.
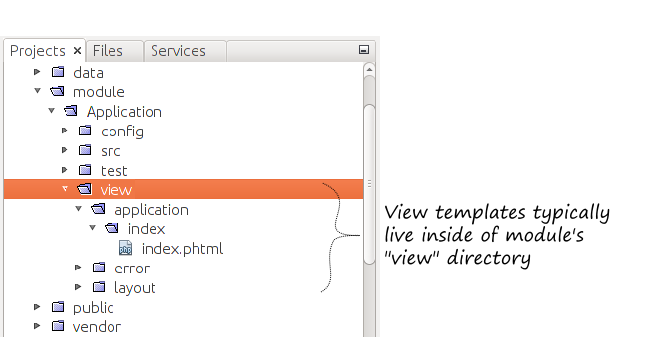
Views typically live inside of the view subdirectory of the module (see figure 4.5):
Why are view template files not stored under module's source directory?
View templates (.phtml files) are not stored under module's src/ directory,
because they are not usual PHP classes and do not need to be resolved by a PHP
class autoloading feature. View templates are resolved by the special Laminas class
called view resolver, and for this reason, view templates are stored under
the module's view directory.
View templates can have different behaviors, based on variables you pass to them from the controller's
action method. Data is passed to view templates with the help of a @ViewModel[Laminas\View\Model\ViewModel] variable container.
For example, let's implement the view template for the aboutAction() of our Index controller.
The About page will display the title and some information about our Hello World application.
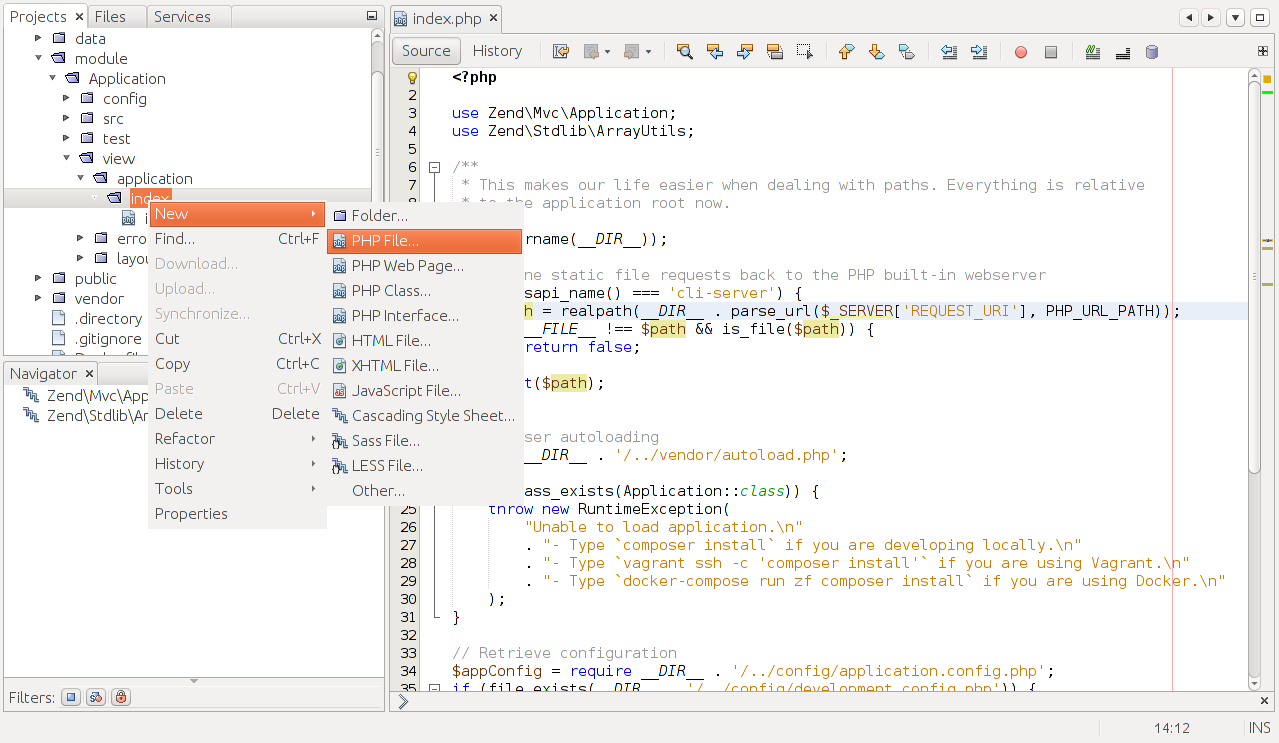
To create the view template file, in your NetBeans window, navigate to view/application/index directory (see figure 4.6), and right click on the "index" directory name. From the context menu that appears, select the New->PHP File... menu item.
In the "New PHP File" dialog that appears (figure 4.7), enter the name about.phtml and click the Finish button.
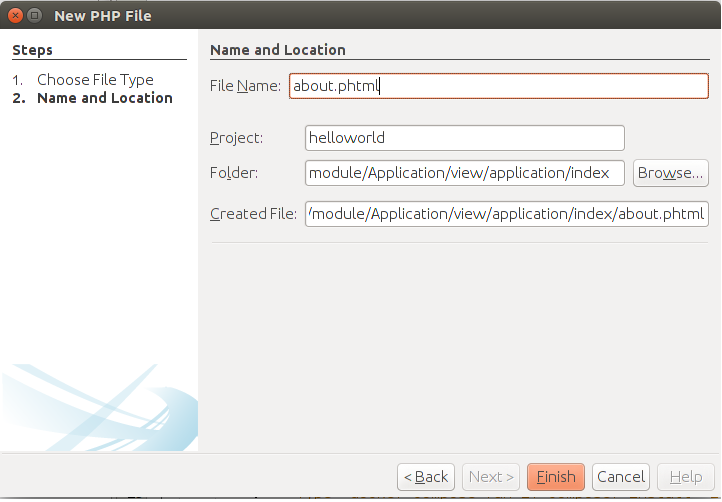
The about.phtml view template file will be created and displayed in the right pane of NetBeans window. In that file, enter the following:
<h1>About</h1>

<p>
    The Hello World application.
</p>

<p>
    Application name: <?= $this->escapeHtml($appName); ?>
</p>

<p>
    Application description: <?= $this->escapeHtml($appDescription); ?>.
</p>
As you can see, the view template is a usual HTML page with several PHP code fragments.
A view script just renders the data you pass to it with a @ViewModel[Laminas\View\Model\ViewModel] variable container.
For example, in line 8 we get the value of $appName variable and print it into the standard output stream.
Note
Inside the view template, you easily can access the variables that were passed from the controller's action.
For example, to get the value of the application name variable, use either
$appName or $this->appName syntax. These two ways of accessing the variable are equivalent, but the first one
requires less writing, so we will use it in the future.
Please note that we are using @EscapeHtml view helper to escape the string printed to the web page
to make the website resistant to hacker attacks.
Note
You should always escape variables that you print to your web page. Escaping allows to be sure that no malicious code is injected on your page.
In your view script, you can also use simple flow control operations (like if, foreach or switch) to
make the appearance of the page different depending on variable's value.
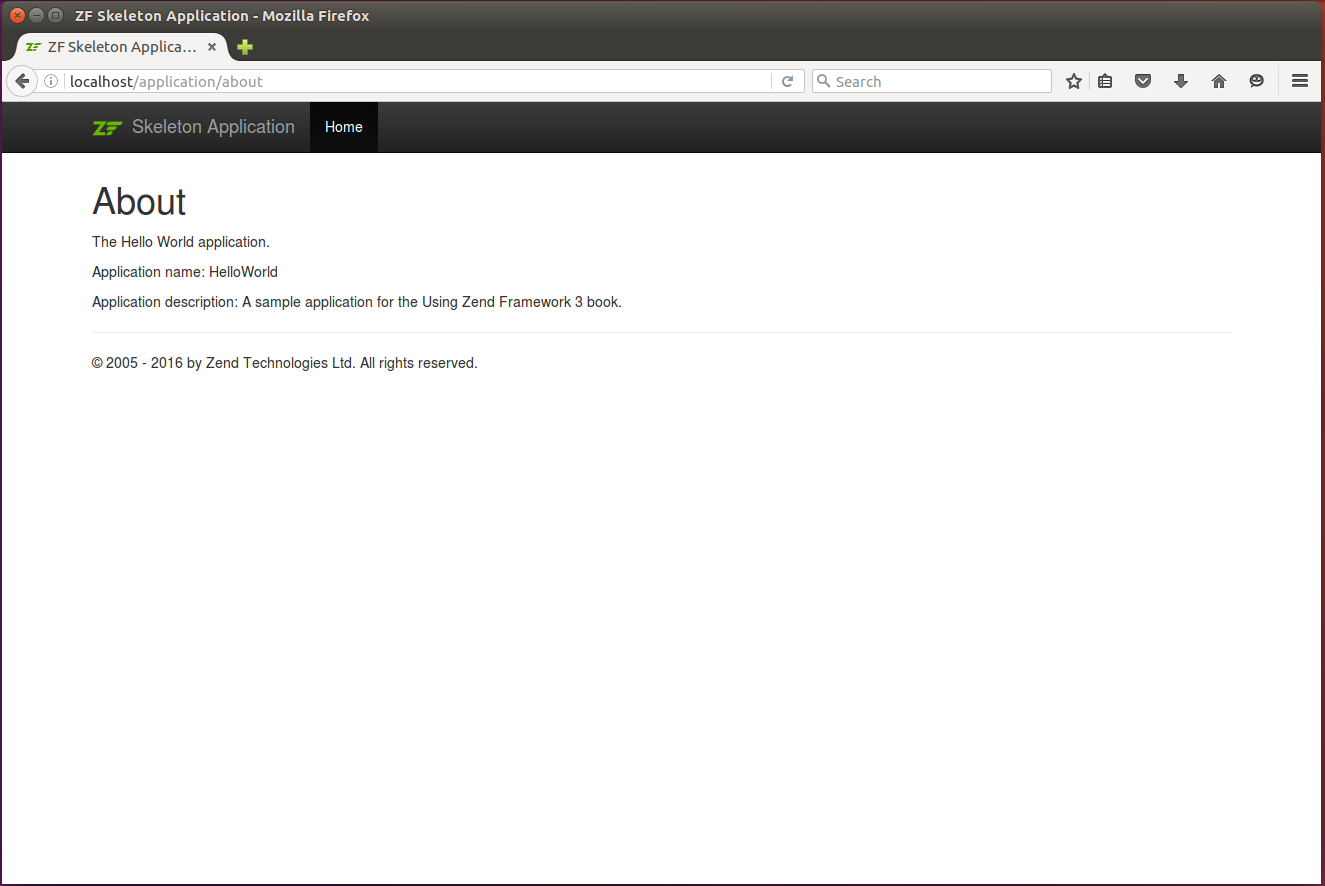
Now let's look at how the page looks like in the web browser. Type "http://localhost/application/about" URL in your browser's navigation bar. The About page should appear (see figure 4.8):
In general, the PHP code you use inside of views must be as simple as possible. Views typically do not modify the data you pass from controller. For example, a view can use the model you pass to it to walk through database table rows and render the items to an HTML page, but it should never create database tables or modify them itself.
View Helpers
View helpers are analogous to controller plugins: the controller plugins allow to "extend" the functionality of controllers, and view helpers allow to "extend" the functionality of view templates.
A view helper is typically a (relatively) simple PHP class whose goal is to render some part of a view. You can invoke view helpers from any view template. With view helpers, you can create reusable widgets (like menus, navigation bars, etc.) for your web pages.
Laminas provides many standard view helpers out of the box. In the table 4.7, some of them are presented with a brief description:
| Standard Plugin Class | Description |
|---|---|
@BasePath |
Allows to retrieve the base path to the web application, which is the absolute path to APP_DIR. |
@Url[Laminas\View\Helper\Url] |
Allows to generate absolute or relative URL addresses from inside view templates. |
@ServerUrl |
Retrieves the current request's URL. |
@Doctype |
Helper for setting and retrieving the doctype HTML element of the web page. |
@HeadTitle |
Helper for setting the title HTML element of the web page. |
@HtmlList |
Helper for generating ordered and unordered HTML lists. |
@ViewModel[Laminas\View\Helper\ViewModel] |
Helper for storing and retrieving the view model |
@Layout[Laminas\View\Helper\Layout] |
Retrieves the layout template view. |
@Partial |
Allows to render a "partial" view template. |
@InlineScript |
Helper for setting and retrieving script elements for inclusion in HTML body section. |
@Identity[Laminas\View\Helper\Identity] |
View helper to retrieve the authenticated user's identity. |
@FlashMessenger[Laminas\View\Helper\FlashMessenger] |
Allows to retrieve the "flash" messages stored in session. |
@EscapeHtml |
Allows to escape a variable outputted to a web page. |
Table 4.7. Standard View Helpers
To demonstrate the usage of a view helper, below we will show how to set a title for a web page.
Typically, it is required to give a different title per each web page. You can do this
with the @HeadTitle view helper. For example, you can set the title for the About
page by adding the following PHP code in the beginning of the about.phtml view template:
<?php
$this->headTitle('About');
?>
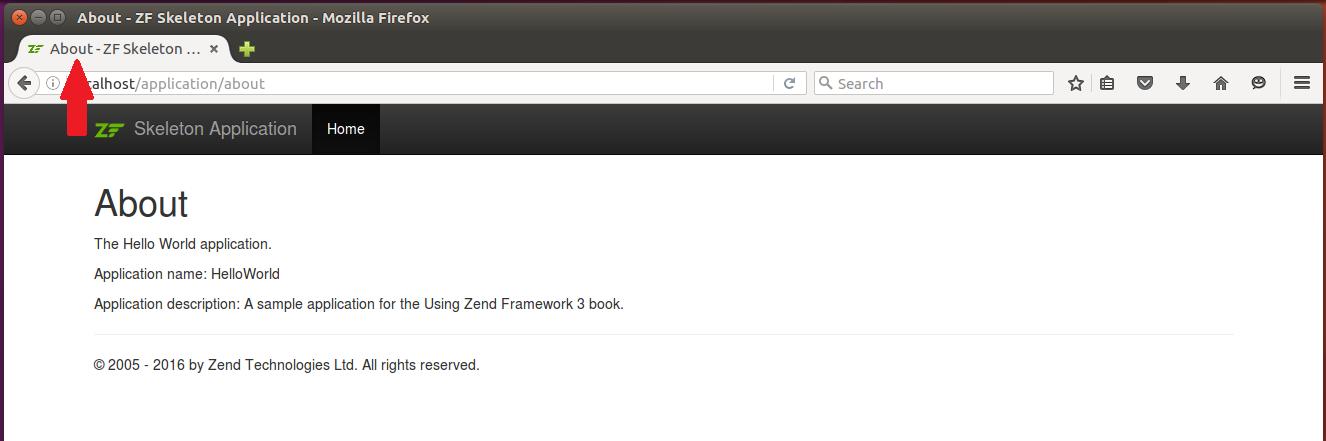
In the code above, we call the @HeadTitle view helper and pass it the page title string ("About")
as the argument. The @HeadTitle view helper internally sets the text for the <title> HTML
element of your web page. Then, if you open the About page in your web browser,
the page title will look like "About - Laminas Skeleton Application" (see the figure 4.9
below for an example):
We will discuss the view helpers in more details and provide more usage examples in the chapter Page Appearance and Layout.
View Template Names
When you return data with the @ViewModel[Laminas\View\Model\ViewModel] variable container from your controller's
action method, Laminas Framework knows the name of the corresponding view template file.
Laminas determines the correct view template name by module name, controller name and action name.
For example, IndexController::aboutAction() action belonging to Application module will
have the application/index/about.phtml view template by default.
Note
If your your controller or action name consists of several words in camel-case (like UserRegistrationController and registrationStep1Action),
the corresponding view template will be application/user-registration/registration-step-1.phtml (camel-cased names
are converted to lower-case and words are separated by dashes).
Overriding Default View Template Name
The @ViewModel[Laminas\View\Model\ViewModel] can also be used to override the default view template resolving.
Actually the @ViewModel[Laminas\View\Model\ViewModel] class is more than just a variable container. Additionally, it
allows to specify which view template should be used for page rendering. The summary
of methods provided for this purpose is shown in table 4.8.
| Method name | Description |
|---|---|
setTemplate() |
Sets the view template name. |
getTemplate() |
Returns the view template name. |
Table 4.8. Methods of the ViewModel class for setting and retrieving the view template name
To set the view template name, you use the setTemplate() method. The getTemplate() method
returns the view template name currently set for the view model.
The following code example shows how you can call the setTemplate()
method from your IndexController class' indexAction() method to
force Laminas to use the about.phtml view template file for rendering the Home
page, instead of the index.phtml file:
// Index action renders the Home page of your site.
public function indexAction()
{
    // Use a different view template for rendering the page.
    $viewModel = new ViewModel();
    $viewModel->setTemplate('application/index/about');
    return $viewModel;
}
In the code above, we created a new instance of the ViewModel class as usual (line 5).
Then we called the setTemplate() method on the view model object (line 6) and
passed the name of the view template name as its argument. The view template name
is actually a relative path to the about.phtml file, minus file extension.
Finally, we returned the view model object from the action method (line 7).
Note
However, calling the setTemplate() method in every action method is optional.
If you don't do that, Laminas will determine the view template name automatically
by concatenating the current module name, controller name and action method name.
View Resolver
When Laminas Framework has the template name, it only remains to determine the absolute path to the corresponding .phtml file. This is also called the view template resolving. View templates are resolved with the special Laminas Framework's class called the view resolver.
In Laminas, there are two view resolvers out of the box: @TemplatePathStack and @TemplateMapResolver.
Both resolvers take a view template name as input, and return path to view template file as output.
The template name is usually composed of module name followed by controller name followed by template name, like "application/index/about",
"application/index/index". An exception is "layout/layout", which doesn't include module name.
- The template map resolver uses a PHP nested array to determine path to view template file by its name. This way is fast, but you have to maintain some template map array and update it each time you add a new view script.
- The template path stack resolver assumes that the view template name can be mapped to directory structure. For example, "application/index/about" template name maps to APP_DIR/module/Application/view/application/index/about.phtml. This way is simpler, because you don't have to maintain any maps.
View resolver settings are stored inside of your module.config.php file under the view_manager key:
<?php
return [
    //...

    'view_manager' => [
        //...

        'template_map' => [
            'layout/layout'           => __DIR__ . '/../view/layout/layout.phtml',
            'application/index/index' => __DIR__ . '/../view/application/index/index.phtml',
            'error/404'               => __DIR__ . '/../view/error/404.phtml',
            'error/index'             => __DIR__ . '/../view/error/index.phtml',
        ],
        'template_path_stack' => [
            __DIR__ . '/../view',
        ],
    ],
];
You can see that template map resolver's settings are stored under the template_map key. By default, there are several "standard" view templates, which are resolved this way: the index page template, the layout template (we will talk about it in Page Appearance and Layout) and error templates (we will talk about them a little bit later). These standard pages are served with this type of resolver, because it is fast.
The template path stack resolver's settings are stored under the template_path_stack key. You can see that this resolver looks for your view scripts under the "view" directory of your module. That's why we could just put about.phtml file under that directory, and ZF will automatically find the template.
The template map resolver and template path stack resolver work in pair. First, the fast template map resolver tries to find the template view in its array map, and if the page is not found, the template path stack resolver is executed.
Disabling the View Rendering
Sometimes, you would need to disable the default view rendering.
To do that, just return the @Response[Laminas\Http\PhpEnvironment\Response] object from the the controller's action.
For example, let's create a DownloadController class, and add the "file" action,
which would allow site users to download files from your website. This
action does not need a corresponding file.phtml view template, because it just dumps file contents
to PHP standard output stream.
Add the DownloadController.php file to Controller directory of Application module, then put the following code into the file:
<?php
namespace Application\Controller;

use Laminas\Mvc\Controller\AbstractActionController;
use Laminas\View\Model\ViewModel;

/**
 * This is the controller class for managing file downloads.
 */
class DownloadController extends AbstractActionController
{
    /**
     * This is the 'file' action that is invoked
     * when a user wants to download the given file.
     */
    public function fileAction()
    {
        // Get the file name from GET variable
        $fileName = $this->params()->fromQuery('name', '');

        // Take some precautions to make file name secure
        $fileName = str_replace("/", "", $fileName);  // Remove slashes
        $fileName = str_replace("\\", "", $fileName); // Remove back-slashes

        // Try to open file
        $path = './data/download/' . $fileName;
        if (!is_readable($path)) {
            // Set 404 Not Found status code
            $this->getResponse()->setStatusCode(404);
            return;
        }

        // Get file size in bytes
        $fileSize = filesize($path);

        // Write HTTP headers
        $response = $this->getResponse();
        $headers = $response->getHeaders();
        $headers->addHeaderLine(
                 "Content-type: application/octet-stream");
        $headers->addHeaderLine(
                 "Content-Disposition: attachment; filename=\"" .
                $fileName . "\"");
        $headers->addHeaderLine("Content-length: $fileSize");
        $headers->addHeaderLine("Cache-control: private");

        // Write file content
        $fileContent = file_get_contents($path);
        if($fileContent!=false) {
            $response->setContent($fileContent);
        } else {
            // Set 500 Server Error status code
            $this->getResponse()->setStatusCode(500);
            return;
        }

        // Return Response to avoid default view rendering
        return $this->getResponse();
    }
}
The action method takes the name parameter from URL's query part (line 19),
removes slashes from file name (lines 22-23), adds HTTP headers to @Response[Laminas\Http\PhpEnvironment\Response] object
(lines 39-45) and file contents (lines 48-55). Finally, it returns the @Response[Laminas\Http\PhpEnvironment\Response] object
to disable the default view rendering.
Register the DownloadController class by adding the following line to
your module.config.php file:
<?php
return [
    // ...
    'controllers' => [
        'factories' => [
            // ...
            Controller\DownloadController::class => InvokableFactory::class
        ],
    ],
    // ...
];
You will also need to add a route to your module.config.php (a route tells Laminas to what URL to map the
controller action). Modify the routes key of the config file as follows:
<?php
return [
  // ...
  'router' => [
        'routes' => [
            // Add this route for the DownloadController
            'download' => [
                'type'    => Segment::class,
                'options' => [
                    'route'    => '/download[/:action]',
                    'defaults' => [
                        'controller'    => Controller\DownloadController::class,
                        'action'        => 'index',
                    ],
                ],
            ],
        ],
    ],
  // ...
];
To see how the file download works, create APP_DIR/data/download directory and put some text file named sample.txt in it. Then open your web browser and type the URL "http://localhost/download/file?name=sample.txt" in your browser's navigation bar and press the Enter key. The browser will download the sample.txt file and offer you to save it to some location.
View Rendering Strategies
A rendering strategy determines how the page will be rendered. By default, to produce the HTML
page, the .phtml view template is rendered with the help of @PhpRenderer class living in @Laminas\View\Renderer[Laminas\View]
namespace. This strategy works well in 99% of cases. But sometimes you may need to return something else, for example, a
JSON response or a RSS feed response.
Note
A response in JSON format is typically returned when you implement some kind of API (Application Programming Interface). API is used to retrieve some the data in machine-readable format. A response in RSS feed format is typically used to publish frequently changing information, like blog posts or news.
So, Laminas provides three view rendering strategies out of the box:
- the default one (also known as @
PhpRendererStrategy[Laminas\View\Strategy\PhpRendererStrategy]). - the @
JsonStrategyproducing an JSON response. - and the @
FeedStrategyproducing an RSS feed response.
Returning JSON Response
For example, let's show how to use @JsonStrategy to return JSON response from a controller action.
First, you'll need to register the strategy in module.config.php configuration file:
<?php
return [
    //...

    'view_manager' => [
        //...

        'strategies' => [
            'ViewJsonStrategy',
        ],
    ],
];
Then, return @JsonModel (instead of the usual @ViewModel[Laminas\View\Model\ViewModel]) from your controller's action method:
namespace Application\Controller;

use Laminas\Mvc\Controller\ActionController;
use Laminas\View\Model\JsonModel;

class IndexController extends ActionController
{
    public function getJsonAction()
    {
        return new JsonModel([
            'status' => 'SUCCESS',
            'message'=>'Here is your data',
            'data' => [
                'full_name' => 'John Doe',
                'address' => '51 Middle st.'
            ]
        ]);
    }
}
If you open the page http://localhost/application/get-json in your browser, you will see JSON response:
{'status':'SUCCESS', 'message':'Here is your data', 'data':{'full_name:'John Doe', 'address':'51 Middle st.'}}
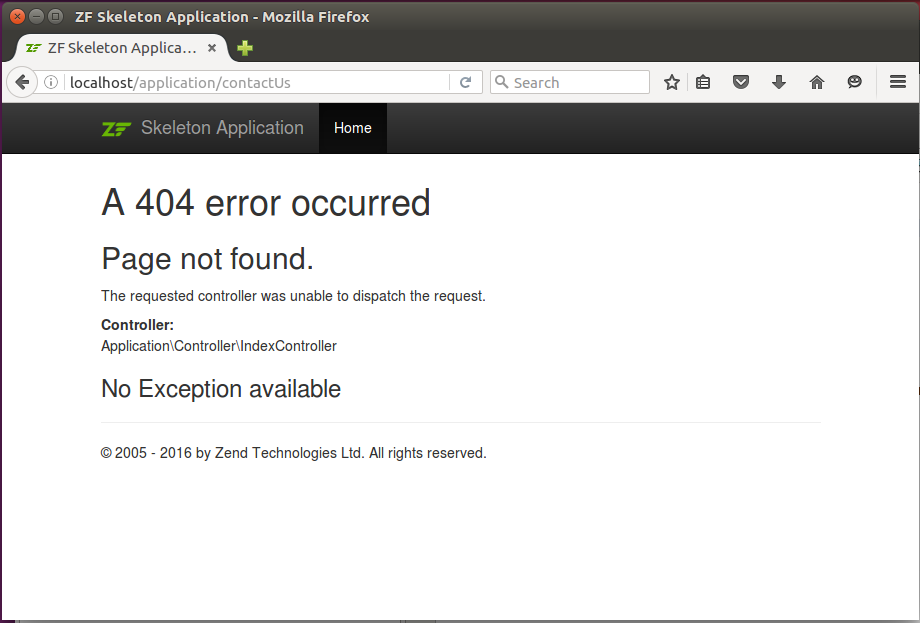
Error Pages
When a page could not be found or some other error happens inside of your web application, a standard error page is displayed. The appearance of the error page is controlled by the error templates. There are two error templates: error/404 which is used for "404 Page Not Found" error (shown in figure 4.10), and error/index which is displayed when a generic error occurs (such as an unhandled exception is thrown somewhere inside of the application).
The module.config.php file contains several parameters under the view_manager key, which you can use to configure the appearance of your error templates:
<?php
return [
    //...

    'view_manager' => [
        'display_not_found_reason' => true,
        'display_exceptions'       => true,
        //...
        'not_found_template'       => 'error/404',
        'exception_template'       => 'error/index',
        'template_map' => [
            //...
            'error/404' => __DIR__ . '/../view/error/404.phtml',
            'error/index'=> __DIR__ . '/../view/error/index.phtml',
        ],
        //...
    ],
];
- The display_not_found_reason parameter controls whether to display the detailed information about the "Page not Found" error.
- The display_exceptions parameter defines whether to display information about an unhandled exception and its stack trace.
- The not_found_template defines the template name for the 404 error.
- The exception_template specifies the template name for the unhandled exception error.
Note
You typically set the display_not_found_reason and display_exceptions parameters
to false in production systems, because you don't want site visitors see the details
about errors in your site. However, you will still be able to retrieve the detailed
information from Apache's error.log file.
Models
A model is a PHP class which contains the business logic of your application. The business logic is the "core" of your website. It implements the goal of site operation. For example, if you implement an E-commerce website, you will have models implementing the product catalog and the shopping cart.
In general, the term model means a simplified representation of a real-life object or phenomenon. Simplified because the real-life object has infinite amount of properties. For example, a real-life person who visits your site consists of billions of atoms, and you cannot describe them all. Instead, you take several properties of the object, which are the most important for your system and ignore all others. For example, the most important properties of the site visitor (from website architect's point of view) are first name, last name, country, city, post code and street address.
Models can have some behavior. For example, a mailer model may send E-mail messages, the currency converter model may be able to convert money and so on.
With Laminas, you represent models as usual PHP classes. Properties are implemented as class fields, and the behaviors are implemented as class methods.
Model Types
In Laminas Framework, there is no single Model directory for storing the model classes, as you could
assume. Instead, by convention, models are further subdivided into the following principal types, and each type is
stored in its own subdirectory (see table 4.9):
| Model Type | Directory |
|---|---|
| Entities | APP_DIR/module/Application/src/Entity |
| Repositories | APP_DIR/module/Application/src/Repository |
| Value Objects | APP_DIR/module/Application/src/ValueObject |
| Services | APP_DIR/module/Application/src/Service |
| Factories | In Factory subdirectory under each model type directory. For example, controller factories would be stored in APP_DIR/module/Application/src/Controller/Factory |
Table 4.9. Model Types and their Location
Separation of models into different types make it easier to design your business logic domain. This is also called the "Domain Driven Design" (or shortly, DDD). The person who proposed DDD was Eric Evans in his famous book called Domain-Driven Design — Tackling Complexity in the Heart of Software.
Below, we will describe the principal model types further.
Entities
Entities are intended for storing some data and always have some identifier property, so you can uniquely identify the data.
For example, a User entity always has a unique login property,
and you can identify the user by that attribute. You can change some other attributes
of the entity, like firstName, or address, but its identifier never changes.
Entities are usually stored in a database, in a file system or in any other storage.
Below, you can find an example a User entity, which represents a site visitor:
// The User entity represents a site visitor
class User
{
    // Properties
    private $login;     // e.g. "admin"
    private $title;     // e.g. "Mr."
    private $firstName; // e.g. "John"
    private $lastName;  // e.g. "Doe"
    private $country;   // e.g. "USA"
    private $city;      // e.g. "Paris"
    private $postCode;  // e.g. "10543"
    private $address;   // e.g. "Jackson rd."

    // Behaviors
    public function getLogin()
    {
        return $this->login;
    }

    public setLogin($login)
    {
        $this->login = $login;
    }

    //...
}
In lines 5-12, we define User model's properties. The best practice is to
define the properties using the private access type, and make
them available to the caller through getter and setter public methods
(like getLogin() and setLogin(), etc).
Note
Model's behavior methods are not limited by getters and setters.
You can create other methods which manipulate model's data.
For example, you can define the getFullName() convenience method,
which would return the user's full name, like "Mr. John Doe".
Repositories
Repositories are specific models responsible for storing and retrieving entities.
For example, a UserRepository may represent a database table and provide methods
for retrieving User entities. You typically use repositories when storing entities
in a database. With repositories, you can encapsulate SQL query logic in the
single place and easily maintain and test it.
We will learn about repositories in more details in Database Management with Doctrine, when talking about Doctrine library.
Value Objects
Value objects are a kind of model for which the identity is not as important as for entities. A value object is usually a small class identified by all of its attributes. It does not have an identifier attribute. Value objects typically have getter methods, but do not have setters (value objects are immutable).
For example, a model wrapping a money amount can be treated as a value object:
class MoneyAmount
{
    // Properties
    private $currency;
    private $amount;

    // Constructor
    public function __construct($amount, $currency='USD')
    {
        $this->amount = $amount;
        $this->currency = $currency;
    }

    // Gets the currency code
    public function getCurrency()
    {
        return $this->currency;
    }

    // Gets the money amount
    public function getAmount()
    {
        return $this->amount;
    }
}
In lines 4-5 we define two properties: currency and amount. The model
has no identifier property, instead it is identified by all properties as
a whole: if you change either the currency or amount, you would have a
different money amount object.
In lines 8-12 we define the constructor method, which initializes the properties.
In lines 15-24, we define getter methods for model's properties. Note that we do not have setter methods (the model is immutable).
Services
Service models usually encapsulate some business logic functionality.
Services usually have easily recognizable names ending with "er" suffix, like FileUploader or UserManager.
Below, an example of Mailer service is presented. It has the sendMail()
method which takes an EmailMessage value object and sends an E-mail message
using standard PHP mail() function:
<?php

// The Email message value object
class EmailMessage
{
    private $recipient;
    private $subject;
    private $text;

    // Constructor
    public function __construct($recipient, $subject, $text)
    {
        $this->recipient = $recipient;
        $this->subject = $subject;
        $this->text = $text;
    }

    // Getters
    public function getRecipient()
    {
        return $this->recipient;
    }

    public function getSubject()
    {
        return $this->subject;
    }

    public function getText()
    {
        return $this->text;
    }
}

// The Mailer service, which can send messages by E-mail
class Mailer
{

    public function sendMail($message)
    {
        // Use PHP mail() function to send an E-mail
        if(!mail($message->getRecipient(), $message->getSubject(),
             $message()->getText()))
        {
            // Error sending message
            return false;
        }

        return true;
    }
}
In Laminas Framework, you typically register your service models in Service Manager.
Factories
Factories are usually being designed to instantiate other models (particularly, service models). In the simplest cases you
can create an instance of a service without any factory, just by using the new operator, but
sometimes class creation logic might be rather complex. For example, services often depend on each other,
so you might need to inject dependencies to a service. Also, sometimes it may be required to initialize the service
right after instantiation by calling one (or several) of its methods.
Factory classes typically have names ending with Factory suffix, like
CurrencyConverterFactory, MailerFactory, etc.
For a real-life example, let's imagine that we have a PurchaseManager service, which can process purchases of some goods,
and that the PurchaseManager service uses another service named CurrencyConverter, which can connect to an external
system providing money exchange rates. Let's write a factory class for the PurchaseManager, which would instantiate
the service and pass it the dependency:
<?php
namespace Application\Service\Factory;

use Interop\Container\ContainerInterface;
use Laminas\ServiceManager\Factory\FactoryInterface;
use Application\Service\CurrencyConverter;
use Application\Service\PurchaseManager;

/**
 * This is the factory for PurchaseManager service. Its purpose is to instantiate the
 * service and inject its dependencies.
 */
class PurchaseManagerFactory implements FactoryInterface
{
    public function __invoke(ContainerInterface $container,
                $requestedName, array $options = null)
    {
        // Get CurrencyConverter service from the service manager.
        $currencyConverter = $container->get(CurrencyConverter::class);

        // Instantiate the service and inject dependencies.
        return new PurchaseManager($currencyConverter);
    }
}
In the code above we have the PurchaseManagerFactory class which implements the
Laminas\ServiceManager\Factory\FactoryInterface interface. The factory class has the __invoke() method
whose goal is to instantiate the object. This method has the $container argument which is the service
manager. You can use $container to retrieve services from service manager and pass them to the constructor
method of the service being instantiated.
Determining the Correct Model Type
Isn't it confusing to have so many model types?
Well, yes and no. At first, it may be a little difficult to determine the correct model type, but as soon you improve your skills, you will be able to do that intuitively. Just remember that model types improve the structure of your domain models.
When writing your own application, you may be confused when trying to decide to which model type your class belongs (whether it is an entity, value object, repository, service or factory). Below, a simple algorithm is provided to make it easier for you to determine the correct model type when writing your own application:
- Your model class is definitely a Service
- if it encapsulates some business logic
- if you call it from your controller class
- if you think the best name for it ends with "er": suffix, like
FileUploaderorVersionChecker
- Your model class is an Entity:
- if your model is stored in a database
- if it has an ID attribute
- if it has both getters and setters methods
- Your model class is a ValueObject:
- if changing any attribute would make the model completely different
- if your model has getters, but not setters (immutable)
- Your model is a Repository:
- if it works with a database to retrieve entities
- Your model is a Factory:
- if it can create other objects and can do nothing else
Hmm... what if I just store all my models in a single Model directory?
Of course, you can, if you strongly wish. But, when you use Doctrine ORM library, you will notice that it utilizes DDD principles as well, so using DDD makes your application well-organized.
Other Model Types
In your website, you will typically divide your principal model types (described above) into subtypes. For example, you will have:
-
Forms. Forms are models whose purpose is to collect data entered by web user. Forms are a subtype of entities. You will typically store forms in
APP_DIR/module/Application/src/Formdirectory. -
Filters. Filters are designed for transforming input data. Filters are a subtype of services. You will typically store filters in
APP_DIR/module/Application/src/Filterdirectory. -
Validators. Validators are used for checking input data for correctness. Validators are also a subtype of services. You will typically store validators in
APP_DIR/module/Application/src/Validatordirectory. -
View Helpers. They encapsulate some page rendering functionality. View helpers are similar to services. You will typically store view helpers in
APP_DIR/module/Application/src/View/Helperdirectory. -
Routes. Routes are a specific service model used for implementing custom mapping rules between URLs and your controllers. You will typically store custom routes in
APP_DIR/module/Application/src/Routedirectory.
So, eventually you will have the following typical directory structure of your website's module:
/Application/src
    /Controller
        /Factory
        /Plugin
            /Factory
    /Entity
    /Filter
    /Form
    /Repository
    /Route
    /Service
        /Factory
    /Validator
    /ValueObject
    /View
        /Helper
            /Factory
It is possible to have arbitrarily many model subtypes. The more complex is your application, the more model subtypes you may have.
Skinny Controllers, Fat Models, Simple Views
When developing a website using Model-View-Controller pattern, there is a risk of misunderstanding the role of controllers, views and models. This results in making the controllers huge and models small, which in turn makes it difficult to test and support your application. This section's goal is to give you a general understanding of what code may be placed in a controller class, what code may be placed in a view template, and what code may be placed in a model class.
Skinny Controllers
The idea behind the term "skinny controller" is that typically, in your controller classes, you put only the code that:
- accesses user request data (
$_GET,$_POST,$_FILESand other PHP variables); - checks the validity of the input data;
- (optionally) makes some basic preparations to the data;
- passes the data to model(s) and retrieves the result returned by the model(s);
- and finally returns the output data as a part of a
ViewModelvariable container.
A controller class should avoid:
- containing complex business logic, which is better kept in model classes;
- containing any HTML or any other presentational markup code. This is better be put in view templates.
For an example of a "skinny" controller, look at the CurrencyConverterController
class below. This controller provides the "convert" action method whose goal is to convert
an amount of money from EUR to USD currency. The user passes the amount of money through the
"amount" GET variable.
class CurrencyConverterController extends AbstractActionController
{
    // Currency converter model
    private $currencyConverter;

    // Constructor. It's purpose is to "inject" dependencies.
    public function __construct($currencyConverter)
    {
        $this->currencyConverter = $currencyConverter;
    }

    // The "convert" action displays the converted money amount
    public function convertAction()
    {
        // Get the money amount from GET
        $amount = (float)$this->params()->fromQuery('amount', -1);

        // Validate input data
        if($amount<0) {
            // Money amount is missing
            $this->getResponse()->setStatusCode(404);
            return;
        }

        // Pass the data to the CurrencyConverter model
        $convertedAmount = $this->currencyConverter->convertEURtoUSD($amount);

        return new ViewModel([
            'amount'=>$amount,
            'convertedAmount'=>$convertedAmount
        ]);
    }
}
The controller's action method above does the following:
-
Takes the data passed by site user (line 16). This data is usually part of
Requestobject and can be retrieved using the controller'sgetRequest()method or @Paramscontroller plugin. -
Performs the basic check on the data passed by user (line 19), and if the data is missing (or invalid), sets an HTTP error code (line 21).
-
Passes the money amount to the
CurrencyConvertermodel (line 26) by calling itsconvertEURtoUSD()method. The method then returns the converted amount. -
Constructs the @
ViewModel[Laminas\View\Model\ViewModel] variable container and passes the resulting data to it (line 28). This variable container can be further accessed in the corresponding view template responsible for data presentation.
Fat Models
Because you need to keep your controllers as thin as possible, most of the business logic of your application should be put into model classes. In a properly designed Model-View-Controller application, models look "huge". A model class may contain the code which:
-
Performs complex data filtering and validation. Because the data that you retrieved in controller is passed to your application from an outside world, in your model, you have to take a lot of effort to verify the data and ensure the data will not break your system. This results in a secure website resistant to hacker attacks.
-
Performs data manipulation. Your models should manipulate the data: e.g. load the data from database, save it to database and transform the data. Models are the right place for storing database queries, file reading and writing functionality, and so on.
In a model class you are not recommended to:
-
Access the data from the HTTP request,
$_GET,$_POSTand other PHP variables. It is the controller's work to extract that data and pass it to model's input. -
Produce HTML or other code specific to presentation. The presentational code may vary depending on the user request, and it is better to put it in a view template.
If you follow these principles, you will encounter that your models are easy to test, because they have clearly identified input and output. You can write a unit test which passes some test data to input end of the model, retrieves the output data and verifies that the data is correct.
If you are confused whether to put certain code in a controller or in a model, ask yourself: is this an important business logic that needs to be carefully tested? If the answer is yes, you should put the code in a model.
Simple View Templates
Because most of the logic is stored in models, your view templates should be as simple as possible to produce the presentation of the data passed through the variable container. In a view template, you may:
-
Keep static HTML markup code.
-
Retrieve the data from a variable container and echo them to PHP output stream.
-
If a controller passed a certain model through a variable container, poll the model for data (e.g. you can retrieve table rows from a database table and render them).
-
Contain simple PHP flow control operations, like
if,foreach,switchand so on. This allows to vary the presentation depending on variables passed by the controller.
The view template is not recommended to:
-
Access data from the HTTP request and super global PHP variables.
-
Create models, manipulate them and modify the state of the application.
If you follow these principles, you will encounter that your views can easily be substituted without modifying the business logic of your application. For example, you can easily change the design of your web pages, or even introduce changeable themes.
Summary
A Laminas Framework based website is just a PHP program receiving an HTTP request from the web server, and producing an HTTP response. The web application uses the Model-View-Controller pattern to separate business logic from presentation. The goal of this is to allow for code reusability and separation of concerns.
A controller is a mediator between the application, models and views: it gets input from HTTP request and uses the model(s) and the corresponding view to produce the necessary HTTP response. A controller is a usual PHP class containing action methods.
Views are simple HTML+PHP code snippets producing HTML output returned by the web
server to site visitors. You pass the data to view scripts through the @ViewModel[Laminas\View\Model\ViewModel]
variable container.
A model is a PHP class which contains the business logic of your application. The business logic is the "core" of your website which implement the goal of site operation. Models can access database, manipulate disk files, connect to external systems, manipulate other models and so on.
-
Composition is a relationship between two classes that is best described as a "has-a" and "whole/part" relationship. The owner class contains a reference to another class (plugin). The owner is responsible for the lifetime of the object it holds. ↩