Collecting User Input with Forms
In this chapter, you will become familiar with using web forms for gathering data
entered by website users. In Laminas Framework, functionality
for working with forms is mainly spread across four components: the @Laminas\Form component,
which allows you to build forms and contains the view helpers for rendering form elements;
the @Laminas\Filter, @Laminas\Validator and @Laminas\InputFilter components which allow you to filter
and validate user input.
| Component | Description |
|---|---|
@Laminas\Form |
Contains base form model classes. |
@Laminas\Filter |
Contains various filters classes. |
@Laminas\Validator |
Implements various validator classes. |
@Laminas\InputFilter |
Implements a container for filters/validators. |
@Laminas\Mail |
Contains E-mail sending functionality. |
Get the Form Demo Sample from GitHub
We will demonstrate form usage on the Form Demo sample web application bundled with the book. This sample is a complete web site you can install and see the working forms in action.
To download the Form Demo application, visit this page and click the Clone or Download button to download the code as a ZIP archive. When the download is complete, unpack the archive to a directory of your choosing.
Then navigate to the formdemo directory which contains the complete
source code of the Form Demo web application:
/using-laminas-book-samples
  /formdemo
  ...
To install the example, you can either edit your default virtual host file or create a new one. After editing the file, restart the Apache HTTP Server and open the web site in your web browser. For additional information on Apache virtual hosts, you can refer to Appendix A. Configuring Web Development Environment.
About HTML Forms
Form functionality provided by Laminas Framework internally uses HTML forms. Because of that, we start with a brief introduction to HTML forms topic.
In HTML, forms are enclosed with <form> and </form> tags. A form typically
consists of fields: text input fields, check boxes, radio buttons, submit buttons,
hidden fields and so on. HTML provides several tags intended for defining form
fields:
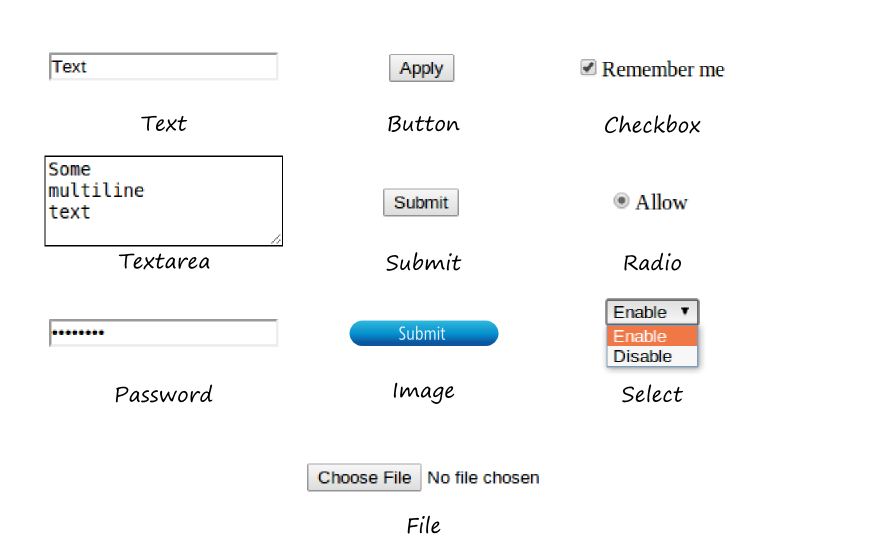
<input>- specifies an input field where the user can enter some data (field appearance and behavior depends on the field type);<textarea>- multi-line text area which can contain an unlimited number of characters;<button>- a clickable button1;<select>- a dropdown list;<option>- used inside the<select>element for defining the available options in a dropdown list.
In table 7.1, you can find examples of HTML form field definitions. Figure 7.1 contains corresponding field visualizations (except the "hidden" field type, which has no visual representation).
| Field | Definition |
|---|---|
| Text input field | <input type="text"> |
| Text area | <textarea rows=4></textarea> |
| Password | <input type="password"> |
| Button | <input type="button" value="Apply"> or |
<button type="button">Apply</button> |
|
| Submit button | <input type="submit" value="Submit"> |
| Image (graphical submit button) | <input type="image" src="button.jpg"> |
| Reset button | <input type="reset" value="Reset"> |
| Checkbox | <input type="checkbox">Remember me</input> |
| Radio | <input type="radio" value="Radio">Allow</input> |
| Select | <select><option>Enable</option><option>Disable</option></select> |
| File | <input type="file"> |
| Hidden field | <input type="hidden"> |
Table 7.1. Standard HTML form fields
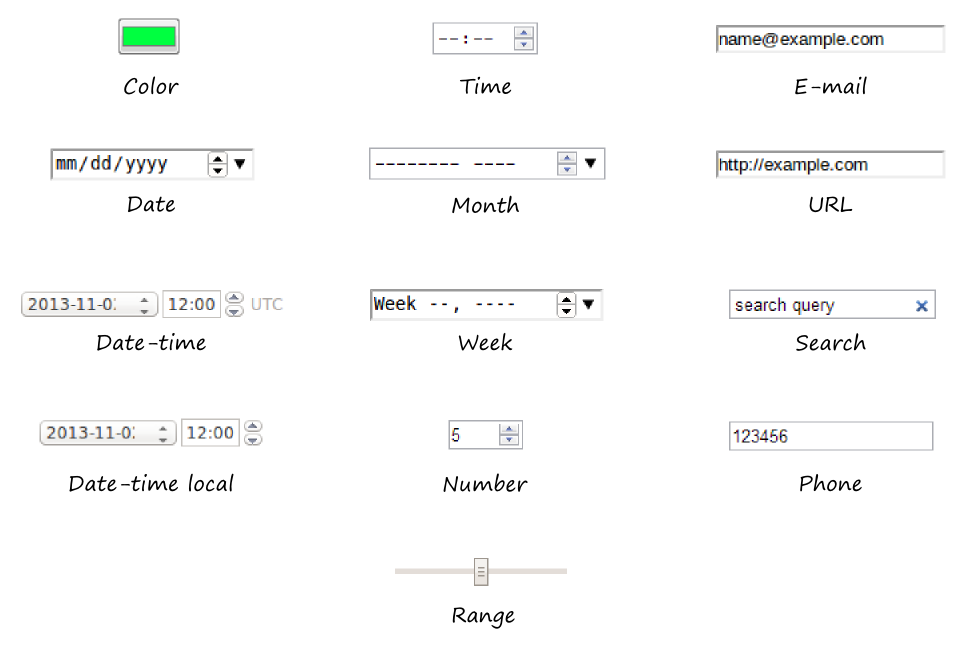
HTML5 introduced several new form field types (listed in table 7.2); figure 7.2 contains corresponding field visualizations.
HTML5 fields provide more convenient ways for entering the most frequently used data types: numbers, dates, E-mails, URLs, etc. Additionally, on form submit, the web browser validates that the user entered data is in a correct format, and if not the browser will prevent form submission and ask the user to correct the input error.
| Field | Definition |
|---|---|
| Color picker | <input type="color"> |
| Date | <input type="date"> |
| Date-time (with time zone) | <input type="datetime"> |
| Date-time (without time zone) | <input type="datetime-local"> |
| E-mail address | <input type="email"> |
| Number | <input type="number"> |
| Time | <input type="time"> |
| Month | <input type="month"> |
| Week | <input type="week"> |
| URL | <input type="url"> |
| Range (slider) | <input type="range"> |
| Search field | <input type="search" name="googlesearch"> |
| Telephone number | <input type="tel"> |
Table 7.2. HTML5 form fields
Fieldsets
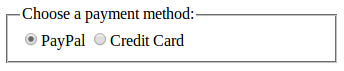
You can group related form fields with the help of the <fieldset> tag, as shown in the
example below. The optional <legend> tag allows you to define the caption for the group.
<fieldset>
  <legend>Choose a payment method:</legend>
  <input type="radio" name="payment" value="paypal">PayPal</input>
  <input type="radio" name="payment" value="card">Credit Card</input>
</fieldset>
The HTML markup presented above will generate the group as in figure 7.3:
Example: "Contact Us" Form
An example of a typical HTML form is presented below:
<form name="contact-form" action="/contactus" method="post">
  <label for="email">E-mail</label>
  <input name="email" type="text">
  <br>
  <label for="subject">Subject</label>
  <input name="subject" type="text">
  <br>
  <label for="body">Message</label>
  <textarea name="body" class="form-control" rows="6"></textarea>
  <br>
  <input name="submit" type="submit" value="Submit">
</form>
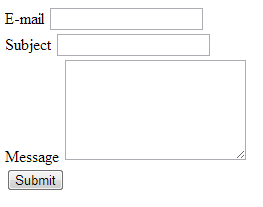
In the example above, we have the feedback form which allows the
user to enter his E-mail address, message subject, and text, and then submit them to the server. The
form definition begins with the <form> tag (line 1).
The <form> tag contains several important attributes:
- the
nameattribute specifies the name of the form ("contact-form"). - the
actionattribute defines the URL of the server-side script which is responsible for processing the submitted form ("/contactus"). - the
methodattribute defines the method (either GET or POST) to use for delivering form data. In this example, we use the POST method (recommended).
In line 3, we define a text input field with the help of the <input> element. The name attribute
specifies the name of the field ("email"). The type attribute
specifies the purpose of the element (the type "text" means the input field is intended for
entering text).
In line 2, we have the <label> element which represents the label for the E-mail
text input field (the corresponding input field's name is determined by the for
attribute of the <label> element).
In lines 5-6, by analogy, we have the "Subject" input field and its label.
In line 9, we have the text area field which is suited well for entering
multi-line text. The height of the text area (6 rows) is defined by the rows
attribute.
In line 11, we have the submit button (input element with "submit" type).
The value attribute allows you to set the title text for the button ("Submit").
By clicking this button, the user will send the form data to the server.
Line break <br> elements are used in lines 4, 7 and 10 to position
form controls one below another (otherwise they would be positioned in
one line).
To see what this form looks like, you can put its HTML markup code in a .html file
and open the file in your browser. You will see the form visualization
as in figure 7.4.
If you enter some data in the feedback form and click the Submit button, the web browser will
send an HTTP request to the URL you specified in the action attribute of the form.
The HTTP request will contain the data you entered.
GET and POST Methods
HTML forms support GET and POST methods for submitting the data to server. These methods have important technical differences.
When using POST method for submitting the form, the data is sent in HTTP request body. For example, when you press the Submit button on the feedback form, an HTTP request will look like the example below:
POST http://localhost/contactus HTTP/1.1
Host: localhost
Connection: keep-alive
Content-Length: 76
Accept: text/html,application/xhtml+xml,application/xml
Origin: null
User-Agent: Mozilla/5.0 (Windows NT 6.1; WOW64)
Content-Type: application/x-www-form-urlencoded

email=name%40example.com&subject=Example+Subject&body=Hello%21&submit=Submit
Above, you can see that the form data is transmitted in request body (line 10). Form fields are concatenated in a single string and then URL-encoded to replace unsafe characters with allowed characters from the ASCII table.
In comparison, when you set the GET method for the form, an HTTP request will look like the example below:
GET http://localhost/contactus?email=name%40example.com&subject=Example+Subject&body=Hello%21&submit=Submit HTTP/1.1
Host: localhost
Connection: keep-alive
Accept: text/html,application/xhtml+xml,application/xml
User-Agent: Mozilla/5.0 (Windows NT 6.1; WOW64)
Accept-Encoding: gzip,deflate,sdch
In the example above, you can see that the form data is concatenated, URL-encoded and sent as part of the HTTP request's URL (line 1), which makes the URL long and harder to read. Since the form data is sent inside the URL, this makes it easily visible to site visitors.
In most cases, you will use the POST method for delivering form data in the request body, because the user doesn't need to see the data in the browser's navigation bar (especially when submitting passwords or other sensitive data).
W> Please note that submitting form data using the POST method does not protect your W> sensitive data (like passwords, credit card numbers, etc.) from being stolen. To W> protect such data, you'll have to direct your HTTP traffic to an SSL tunnel W> (SSL stands for Secure Sockets Layer). Protected SSL connections are distinguished by W> using the https:// schema in web page URLs. To enable SSL for your Apache HTTP W> server, you will need to obtain an SSL certificate from a trusted provider W> (like VeriSign) and install it on your server.
Styling HTML Forms with Twitter Bootstrap
In laminas-based web sites, we use the Twitter Bootstrap CSS Framework that provides default
CSS rules for styling forms and form fields. To apply the CSS rules to a form field
(like <input>, <textarea>, etc.), you should assign it the .form-control CSS class. Additionally,
when using labels together with input fields, put the label-input pairs inside of <div> elements
with the .form-group CSS class. For submit buttons, you can use the .btn CSS class plus a theme
class like .btn-default, .btn-primary, etc.
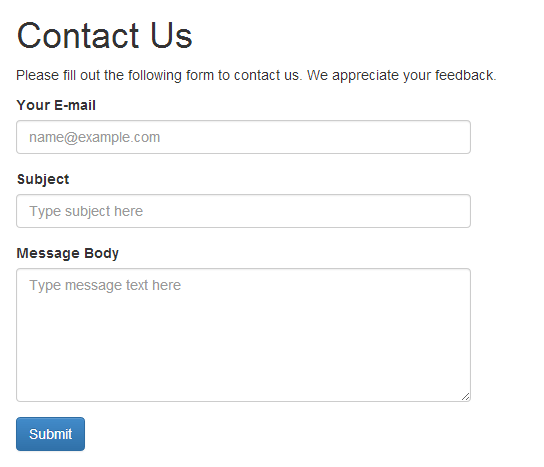
Below, we provide the modified example of the feedback form which uses the Bootstrap styling:
<h1>Contact Us</h1>

<p>
    Please fill out the following form to contact us.
    We appreciate your feedback.
</p>

<form name="contact-form" action="/contactus" method="post">

  <div class="form-group">
    <label for="email">Your E-mail</label>
    <input name="email" type="text" class="form-control"
           placeholder="name@example.com">
  </div>

  <div class="form-group">
    <label for="subject">Subject</label>
    <input name="subject" type="text" class="form-control"
           placeholder="Type subject here">
  </div>

  <div class="form-group">
    <label for="body">Message Body</label>
    <textarea name="body" class="form-control" rows="6"
              placeholder="Type message text here"></textarea>
  </div>

  <input name="submit" type="submit"
         class="btn btn-primary" value="Submit">
</form>
The visualization of the form is presented in figure 7.5.
Because Twitter Bootstrap is designed to support mobile phones, tablets, and desktops, it makes the form fields as wide as the size of the screen. This may make your form too wide and hard to understand. To limit form width, you can use the Bootstrap-provided grid, like in the example below:
<div class="row">
  <div class="col-md-6">
    <form>
      ...
    </form>
  </div>
</div>
In the HTML markup above, we put a form inside of the 6-column-width grid cell, which makes the form half the width of the screen.
Installing Laminas form components
To use forms in an MVC web application, you need to install at least the
laminas/laminas-mvc-form Composer metapackage:
php composer.phar require laminas/laminas-mvc-form
When you install this metapackage, there will be installed all necessary
components implementing forms in Laminas: @Laminas\Form, @Laminas\InputFilter, @Laminas\Filter, @Laminas\Validator,
and probably others.
Retrieving Form Data in a Controller's Action
The website user typically works with the form in the following order:
- First, a controller's action is executed rendering the web page containing the form prompting the site user for input. Once the user fills the form fields, they click the Submit button, and this generates an HTTP request and sends the data to the server.
- Second, in your controller's action method, you can extract the submitted data from POST (and/or GET) variables, and display the page with the results of the form processing.
Typically these two web pages are handled by the same controller action.
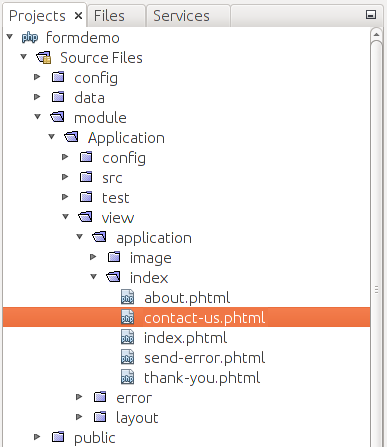
In the following example, we will show how you can create a controller action for displaying the feedback form and retrieving the data submitted by the user. To start, add the contact-us.phtml view template in the application/index/ directory under the module's view/ directory (see figure 7.6 for example).
Put the HTML markup code of the feedback form from the previous section into the view template file.
Then, add the contactUsAction() action method to the IndexController class. In the action method, we
want to extract raw data from the feedback form submitted by the site user:
<?php
namespace Application\Controller;

// ...

class IndexController extends AbstractActionController
{
  // This action displays the feedback form
  public function contactUsAction()
  {
    // Check if user has submitted the form
    if($this->getRequest()->isPost()) {

      // Retrieve form data from POST variables
      $data = $this->params()->fromPost();

      // ... Do something with the data ...
      var_dump($data);
    }

    // Pass form variable to view
    return new ViewModel([
          'form' => $form
       ]);
  }
}
In the code above, we define the contactUsAction() action method in the
IndexController class (line 9).
Then, in line 12, we check whether the request is a POST request (checking the starting line of the HTTP request). Typically, the form uses the POST method for submitting the data. For this reason, we can detect if the form is submitted or not by checking the starting line of the HTTP request.
In line 15 we retrieve the raw data submitted by the user. We extract all the POST variables
with the help of the @Params controller plugin. The data is returned in the form of an array and
saved into the $data variable.
Finally, we have to add a literal route to make a short and memorable URL
for the Contact Us page. Add the following contactus key to the routing configuration in the
module.config.php file:
<?php
return [
  // ...
  'router' => [
    'routes' => [
      // Add the following routing rule for the "Contact Us" page
      'contactus' => [
        'type' => Literal::class,
          'options' => [
             'route'    => '/contactus',
             'defaults' => [
               'controller' => Controller\IndexController::class,
               'action'     => 'contactUs',
             ],
           ],
         ],
       ],
    ],
  ],
  // ...
];
Now, if you type the "http://localhost/contactus" URL in your web browser's navigation bar, you should see the page as in figure 7.7.

Enter an E-mail, subject, and body text and
click the Submit button on the form. The data will be sent to the server, and finally extracted
in the IndexController::contactUsAction() method.
Below, an example of the $data array (produced with the var_dump()
PHP function) is shown. As you can see, the array contains a key for each form field,
including the "submit" field.
array (size=4)
    'email' => string 'name@example.com' (length=16)
    'subject' => string 'Happy New Year!' (length=15)
    'body' => string 'Dear Support, I'd like to thank you for the
              excellent quality of your support service and wish you
              a Happy New Year!' (length=118)
    'submit' => string 'Submit' (length=6)
Forms and Model-View-Controller
In the previous section, we've considered a very simple form usage case: we prepared the view template with form HTML markup and a controller action responsible for displaying the form and dumping raw user input to the screen. However, using raw user input in real-life applications has a disadvantage in that we do not check user-submitted data for possible errors and/or malicious code. Here we will discuss how to perform such validation.
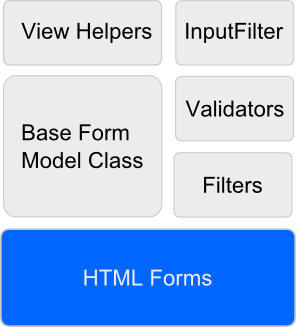
In a laminas-based web site that uses the Model-View-Controller pattern, form functionality is usually separated into form models responsible for field definition, filtering and validation; and form presentation (view) which is typically implemented with the help of special view helpers.
The functionality allowing to create form models, add filtering and validation rules and use view helpers, is schematically shown in figure 7.8. As you can see from the figure, the standard HTML forms functionality is used as a base.
The MVC approach to working with forms has the following advantages:
- You are able to reuse your form model in different controller's actions.
- By using the view helpers, you can (partly) avoid the boring work of preparing HTML markup for rendering the form and its possible validation errors.
- You are able to create one or several visual representations for the same form model.
- By encapsulating the form validation logic in a single form model class you have fewer places in your code where you need to check user input, thus you improve your site security.
A Typical Form Usage Workflow
Generally speaking, you instantiate a form model inside of your controller's action method, then you retrieve the user-submitted data from PHP variables, and pass it to the form model for validation. Form view helpers are used in a view template for generating HTML markup of the form. This typical workflow is illustrated by figure 7.9.
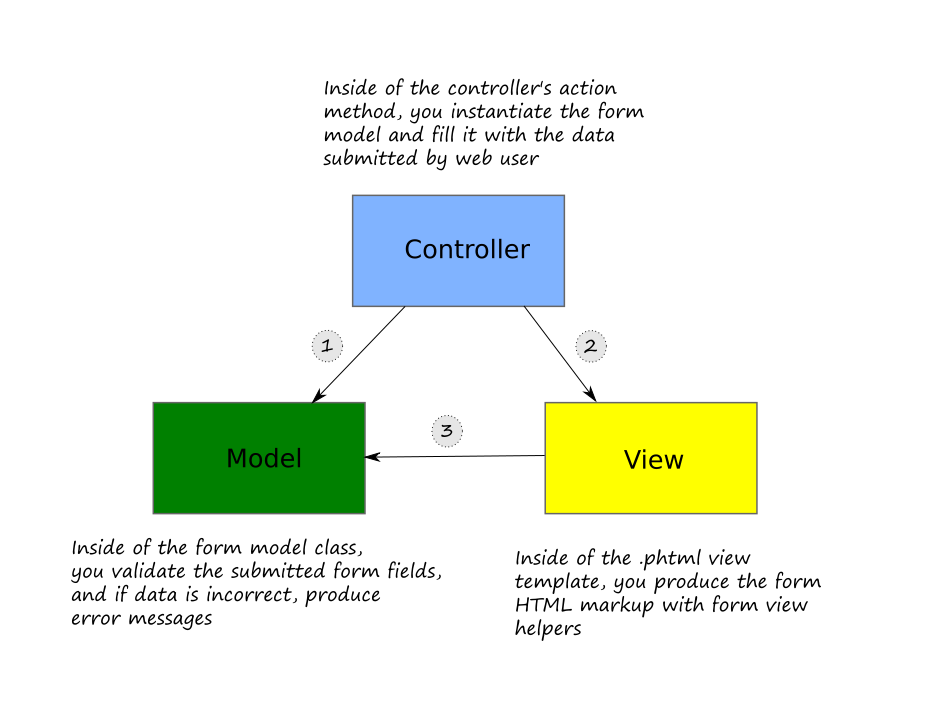
Arrows in figure 7.9 denote the direction of the actions:
-
First, inside of the controller's action method, you retrieve the data submitted by the site user from GET, POST (and possibly other) PHP variables. Then you create an instance of the form model and pass it the user-submitted data. The form model's work is to check (validate) the data for correctness, and if something is wrong, produce error message(s) for any invalid form field.
-
Secondly, you pass the form model to the
.phtmlview template for rendering (with the help of the @ViewModel[Laminas\View\Model\ViewModel] variable container). The view template then will be able to access the form model and call its methods. -
And finally, the view template uses the form model and the view helpers provided by Laminas Framework to render the form fields (and to display possible validation error messages produced at the validation stage). As a result, the HTML markup of the form is produced.
In the following sections, we will discuss these in more detail.
A Form Model
A form model is usually a PHP class which creates a number of fields.
The base class for all form models is the @Form[Laminas\Form\Form] class defined in the @Laminas\Form
component.
Fields in a form model can optionally be grouped into fieldsets. Moreover, the form model itself can be considered as a fieldset. This fact is reflected in form class inheritance (figure 7.10).
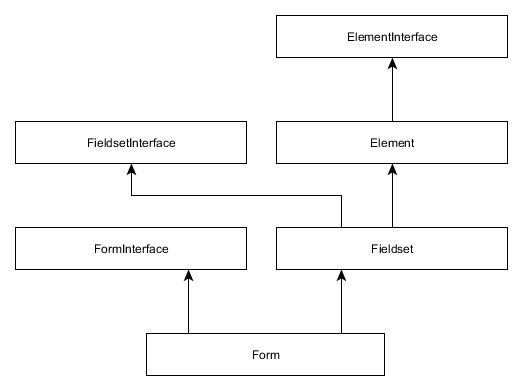
As you can see from the figure, the @Form[Laminas\Form\Form] class extends the @Fieldset class.
The @Fieldset class, in turn, is derived from the @Element class which represents a single
form field and its attributes.
This class inheritance may look strange at first sight, but everything becomes logical
if you remember that the @Form[Laminas\Form\Form] class inherits methods for adding form fields from the @Fieldset
class, and that it inherits methods for setting form attributes from the @Element class.
Below, we provide a stub model class for the feedback form from our previous examples:
<?php
namespace Application\Form;

use Laminas\Form\Form;

// A feedback form model
class ContactForm extends Form
{
  // init() method
  public function init() : void
  {
    // Set POST method for this form
    // The default is alread POST so it is not needed;
    // but it is here as a reference in case you want to set it to GET
    $this->setAttribute('method', 'post');

    // Create the form fields here ...
  }
}
As you can see, form models of the web site's Application module
(by convention) belong to Application\Form namespace (line 2).
In line 7, we define the ContactForm form model class which extends the @Form[Laminas\Form\Form] base class.
In line 10, we define the constructor method for the class. Because we derive our form
model from the base @Form[Laminas\Form\Form] class, we have to call the parent class' constructor to initialize
it (line 13). The parent class' constructor accepts an optional argument allowing it to set the form's name
('contact-form').
We can also set form data delivery method (POST) by using the setAttribute()
method provided by the base class (line 16). The setAttribute() takes two parameters:
the first one is the name of the attribute to set, and the second one is the value of the
attribute.
Note
Setting the "action" attribute for the form is optional, because empty form action forces the browser to submit form data to the URL of the current page. This is sufficient in most scenarios, because usually you use the single controller action for both displaying the form and processing its data.
Form fields are typically created inside of the form model's init-method. In the next section, we will learn which form fields are available and how to add them to the form model.
Form Elements
In a form model, an input field is typically paired with the text label (<label> and <input> tags are
used together). Such a pair is also called a form model's element.
Analogous to an HTML form field, a form model's element may contain the name and other (optional) attributes (e.g. "id", "class", etc.) Additionally, you may set options to an element; the options mostly allow you to specify the text and attributes for the element's label.
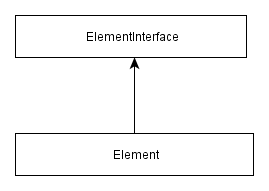
All form model's elements are inherited from the base class @Element which also belongs
to the @Laminas\Form component. The Element base class implements the @ElementInterface interface.
The class inheritance diagram is shown in figure 7.11.
Concrete form element classes extend the @Element base class. They are listed in tables 7.3 - 7.7.
These classes live in the @Laminas\Form\Element[Laminas\Form] namespace.
| Class name | Description |
|---|---|
@Button |
Button. |
@Checkbox[Laminas\Form\Element\Checkbox] |
Check box. |
@File[Laminas\Form\Element\File] |
File field. |
@Hidden |
Hidden field. |
@Image[Laminas\Form\Element\Image] |
Image field. |
@Password[Laminas\Form\Element\Password] |
Password field. |
@Radio |
Radio button. |
@Select[Laminas\Form\Element\Select] |
Dropdown list. |
@Submit |
Submit button. |
@Text[Laminas\Form\Element\Text] |
General-purpose text input field. |
@Textarea |
Multi-line text area. |
Table 7.3. Form elements compatible with HTML 4
| Class name | Description |
|---|---|
@Color |
Color picker. |
@Date[Laminas\Form\Element\Date] |
Date picker. |
@DateTime[Laminas\Form\Element\DateTime] |
Date & time (with time zone). |
@DateTimeLocal |
Date & time (without time zone). |
@Email |
E-mail field. |
@Month |
Month input field. |
@Number[Laminas\Form\Element\Number] |
A text input field accepting numbers. |
@Time[Laminas\Form\Element\Time] |
Text input field for entering time. |
@Url[Laminas\Form\Element\Url] |
Text input field for entering an URL. |
@Week |
Text input field for entering days of week. |
@Range[Laminas\Form\Element\Range] |
Range field (slider). |
Table 7.4. Form elements compatible with HTML 5
| Class name | Description |
|---|---|
@MultiCheckbox |
A group of related check boxes. |
@DateTimeSelect[Laminas\Form\Element\DateTimeSelect] |
Date & time select. |
@DateSelect[Laminas\Form\Element\DateSelect] |
Date select. |
@MonthSelect[Laminas\Form\Element\MonthSelect] |
Month select. |
Table 7.5. Compound fields
| Class name | Description |
|---|---|
@Captcha |
Human check image. |
@Csrf[Laminas\Form\Element\Csrf] |
Cross-site request forgery prevention. |
Table 7.6. Security Form Elements
| Class name | Description |
|---|---|
@Collection[Laminas\Form\Element\Collection] |
Element collection. |
Table 7.7. Other Form Elements
In the tables above, you can see that the laminas-provided form elements have direct mapping on HTML4 and HTML5 input fields (discussed in the beginning of this chapter).
For your convenience, Laminas also provides several "compound" fields. The
@MultiCheckbox field is a field which is composed of a group of typical checkboxes related to
each other. The @DateTimeSelect[Laminas\Form\Element\DateTimeSelect], @DateSelect[Laminas\Form\Element\DateSelect], and @MonthSelect[Laminas\Form\Element\MonthSelect] elements are analogous to corresponding
HTML5 elements, but simulate them with the usual select fields. These input fields have an advantage in that they
are supported by all web browsers, unlike the corresponding HTML5 fields. The visual representation of
these elements can be seen in figure 7.12.

Additionally, Laminas provides "security" form fields @Captcha[Laminas\Form\Element\Captcha] and @Csrf[Laminas\Form\Element\Csrf] which
can be used on a form for enhancing the security. The @Captcha[Laminas\Form\Element\Captcha] element is a graphical element (image)
that is placed on a form for checking if the site user is a human or a robot. The @Csrf[Laminas\Form\Element\Csrf] element has
no visual representation and is used for
prevention of hacker attacks related to cross-site request forgery 2.
There is another special form element called @Collection. This element is analogous to fieldset,
because it allows you to group related form elements. But, it is designed for adding form elements dynamically by binding
an array of objects to the form.
Adding Elements to a Form Model
The methods inherited by the @Form[Laminas\Form\Form] base class from the @Fieldset class are used to
add elements (and fieldsets) to the form model. These methods are summarized in the table 7.8.
| Method name | Description |
|---|---|
add($elementOrFieldset, $flags) |
Attaches an element (or fieldset). |
has($elementOrFieldset) |
Checks whether certain element is attached. |
get($elementOrFieldset) |
Retrieves the given element (or fieldset) by name. |
getElements() |
Retrieves all attached elements. |
getFieldsets() |
Retrieves all attached fieldsets. |
count() |
Return the count of attached elements/fieldsets. |
remove($elementOrFieldset) |
Removes the element (or fieldset). |
Table 7.8. Methods provided by the Fieldset class
Particularly, we are interested in the add() method which is used to attach
an element to a form. The add() method takes two arguments: the first one (named $elementOrFieldset)
is an element to insert, and the second one (named $flags) is the optional flags.
The $elementOrFieldset parameter may either be an instance of an
@Element-derived class (or the @Fieldset class), or an array describing the element that
should be created.
The optional $flags argument is an array which may contain a combination of the following keys: name
(allows you to set the element's name) and priority (allows to specify the zero-based
index in the list of elements to insert the element to). If the priority flag is not
specified, the element will be inserted at the end of the list of the form model's elements.
Below, we provide two code examples illustrating the possible ways of adding elements to a form.
Method 1: Passing an Instance of an Element
The following code fragment creates an instance of the @Laminas\Form\Element\Text class
and adds the element to the form model:
<?php
namespace Application\Form;

// Define an alias for the class name
use Laminas\Form\Form;
use Laminas\Form\Element\Text;

// A feedback form model
class ContactForm extends Form
{
  // init() method
  public function init() : void
  {
    // Create the form fields here ...
    $element = new Text(
                'subject',            // Name of the element
                [                     // Array of options
                 'label'=> 'Subject'  // Text label
                ]);
    $element->setAttribute('id', 'subject');

    // Add the "subject" field to the form
    $this->add($element);
  }
}
In the code above, we've created an instance of the @Laminas\Form\Element\Text class (line 15). The
class constructor takes two parameters: the element's name ("subject") and an array of options
(here we specify the text label "Subject").
Additionally, you may configure the element using the methods provided by the @Element base class.
For example, in line 20, we set the "id" attribute with the setAttribute() method. For your reference,
the (most important) methods of the @Element base class which can be used for
configuring a form element are presented in table 7.9.
| Method name | Description |
|---|---|
setName($name) |
Sets element's name. |
getName() |
Retrieves element's name. |
setOptions($options) |
Sets options. |
getOptions($options) |
Retrieves options. |
getOption($option) |
Retrieves the given option. |
setAttribute($key, $value) |
Sets a single element attribute. |
getAttribute($key) |
Retrieves a single element attribute. |
removeAttribute($key) |
Removes an attribute. |
hasAttribute($key) |
Checks whether such an attribute presents. |
setAttributes($arrayOrTraversable) |
Sets a group of attributes. |
getAttributes() |
Retrieves all attributes at once. |
clearAttributes() |
Removes all attributes at once. |
setValue() |
Sets the element value. |
getValue() |
Retrieves the element value. |
setLabel() |
Sets the label used for this element. |
getLabel() |
Retrieves the label string used for this element. |
setLabelAttributes() |
Sets the attributes to use with the label. |
getLabelAttributes() |
Gets the attributes to use with the label. |
setLabelOptions() |
Sets label specific options. |
getLabelOptions() |
Retrieves label specific options. |
Table 7.9. Methods provided by the Element class
Method 2: Using Array Specification
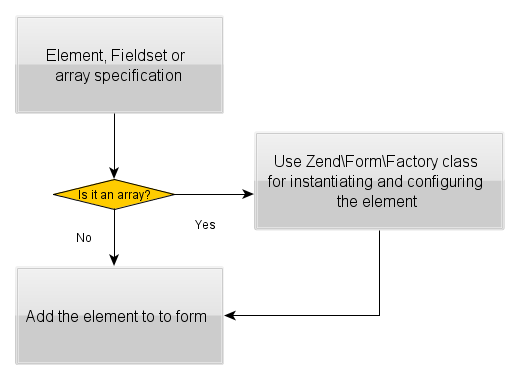
The second example below (equivalent to the first one) shows how to use an array specification to add an element to form. This method is preferable, because it requires less code to write.
When using array specification for adding an element to a form, the element will
be instantiated and configured automatically. Internally, this is accomplished with the
help of the @Laminas\Form\Factory factory class (illustrated by figure 7.13).
<?php
namespace Application\Form;

// Define an alias for the class name
use Laminas\Form\Form;

// A feedback form model
class ContactForm extends Form
{
  // init() method
  public function init() : void
  {
    // Add "subject" field
    $this->add([
      'type'  => 'text',        // Element type
      'name' => 'subject',      // Field name
      'attributes' => [         // Array of attributes
        'id'  => 'subject',
      ],
      'options' => [            // Array of options
         'label' => 'Subject',  // Text label
      ],
    ]);
  }
}
In line 14 above, we call the form model's add() method to add the element to form.
We pass the element specification to the add() method in the form of an array. The array
has the following typical keys:
-
the
typekey (line 15) defines the class name to use for instantiation of the element. Here you can use either the fully qualified class name (e.g.Text::class) or its short alias 3 (e.g. "text"). -
the
namekey (line 16) defines the name for the field ("subject"). -
the
attributeskey (line 17) defines the list of HTML attributes to set (here we set the "id" attribute). -
the
optionsarray (line 18) allows you to specify the text label for the element.
Example: Creating the Contact Form Model
Now that we know how to set the form name, action, and method attributes and how to add fields (elements) to the form, let's create the complete model class for the feedback form that we used in our previous examples.
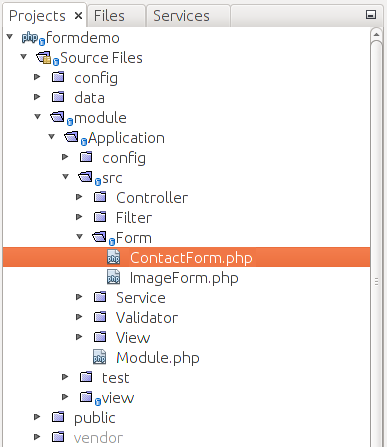
As we know, form model classes for the Application module live
inside the Application\Form namespace. So, we have to create the
ContactForm.php file inside of the Form directory under the
Application module's source directory (figure 7.14).
We will have two methods in our form class:
__construct()constructor will define the form name and method (POST), and initialize the form by adding its elements;addElements()private method will contain the actual code for adding form elements and will be called by the constructor.
We put the field creation logic into the addElements() private method to better structure the form model's code.
The code of the ContactForm class is presented below:
<?php
namespace Application\Form;

use Laminas\Form\Form;

/**
 * This form is used to collect user feedback data like user E-mail,
 * message subject and text.
 */
class ContactForm extends Form
{
  // init() method
  public function init() : void
  {
    // Define form name
    parent::__construct('contact-form');

    // Set POST method for this form
    $this->setAttribute('method', 'post');

    // Add form elements
    $this->addElements();
  }

  // This method adds elements to form (input fields and
  // submit button).
  private function addElements()
  {
    // Add "email" field
    $this->add([
            'type'  => 'text',
            'name' => 'email',
            'attributes' => [
                'id' => 'email'
            ],
            'options' => [
                'label' => 'Your E-mail',
            ],
        ]);

    // Add "subject" field
    $this->add([
            'type'  => 'text',
            'name' => 'subject',
            'attributes' => [
              'id' => 'subject'
            ],
            'options' => [
                'label' => 'Subject',
            ],
        ]);

    // Add "body" field
    $this->add([
            'type'  => 'text',
            'name' => 'body',
            'attributes' => [
              'id' => 'body'
            ],
            'options' => [
                'label' => 'Message Body',
            ],
        ]);

    // Add the submit button
    $this->add([
            'type'  => 'submit',
            'name' => 'submit',
            'attributes' => [
                'value' => 'Submit',
            ],
        ]);
    }
}
In line 10 above, we define the ContactForm class which extends the
@Form[Laminas\Form\Form] base class.
In lines 13-23, we have the constructor method. It calls the base class'
constructor (line 16) and passes the form name as its argument ("contact-form").
In line 19, the base class' setAttribute() method is called allowing you to set the method
name for the form (we set the POST method).
In line 22, the addElements() private method is called, which does the actual work of
adding elements to the form. The code of the addElements() is located in lines 27-73.
To add elements to the form, we call the add() method provided by the base class.
This method accepts the single argument -- an array containing configuration for an
element. We add four fields: the email, the subject, the body and the submit field.
In figure 7.15, you can see a schematic graphical representation of the form model we have created.

Adding Form Filtering and Validation Rules
Form validation is the procedure of filtering and checking the data passed to the server during the form submission. For example, for our feedback form, we want to perform the following checks:
- We want to test that the E-mail address, message subject, and body fields are always present (because these fields are required).
- We want to ensure that the user entered a valid E-mail address like name@example.com.
- Users may add white space characters to the beginning and/or the end of the E-mail address, so we would like to filter such characters out (perform the string trimming operation).
- It would be useful to check for minimum and maximum allowed length of the message subject and body text.
- For the message subject, we would like to filter out (strip) the new line characters and HTML tags 4.
- We also want to strip HTML tags from the message body.
The requirements above are called filtering and validation rules. Those rules can be divided into two categories: filters and validators.
The filters transform the user-entered data to fix possible errors or to ensure the data conforms to a certain format. Filters are typically applied first, validators are applied in the last turn.
Validators check whether the data is acceptable or not. If all data is correct, the form is considered valid and the data can be safely used by the business logic layer. If a certain field is invalid, a validator raises an error flag. In that case, the form is typically shown to the user again, and the user is asked to correct any input errors and resend the form to server.
What happens if I don't add a validation rule for a certain form field?
If you do not add a validation rule then the user-submitted field value will not be checked, leaving a hole in your site's security. It is recommended to always add a validation rule per each form field entered by user and add as many checks per each field as needed to keep your form secure.
Input Filter
In Laminas, you store the filtering and validation rules with the help of the @InputFilter[Laminas\InputFilter\InputFilter] class.
The @InputFilter[Laminas\InputFilter\InputFilter] class is defined in the @Laminas\InputFilter component.
The input filter is a container for so called inputs. Typically, you add an input
per each form model's field you have.
Note
An input may consist of filters and/or validators and some additional information. For example, an input may contain the flag telling if the field is required or if its value may be missing from HTTP request.
Analogous to adding a form model's fields, there are two possible ways of adding
inputs to the input filter container: either via passing an instance of an input
class as the argument of its add() method, or via passing the array specification 5.
In the next section, we will describe the latter method (it is preferable,
because it requires less code to write).
Adding Inputs to Input Filter
To add an input to the input filter, you use its add() method, which takes the single
argument - an array specification of the input in the following form:
[
  'name'     => '<name>',
  'type'     => '<type>',
  'required' => <required>,
  'filters'  => [
     // Add filters configuration here ...
  ],
  'validators' => [
     // Add validators configuration here ...
  ]
]
In the above array, we have the following keys:
-
The
namekey (line 2) defines the name of the input. The name should be the same as the name of the form model's field. If the name of the input doesn't match the name of the corresponding form model's field, the validation rule won't be applied to the field. -
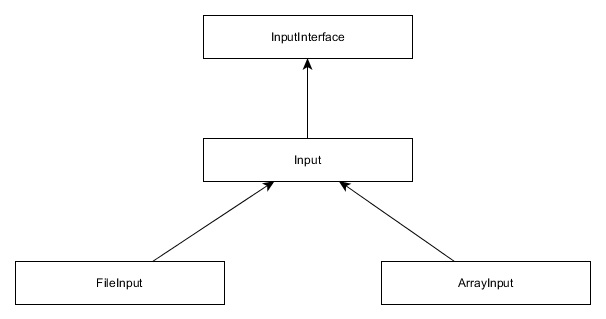
The
typekey (line 3) defines the class name of the input. This key is optional. By default (when this key is omitted), the @Laminas\InputFilter\Inputclass is used. Available input classes are shown in figure 7.16. In figure 7.16, the @Input[Laminas\InputFilter\Input] class is designed to be used with regular scalar values, @ArrayInputis used for filtering/validating array values, and @FileInputis used for checking uploaded files. -
The
requiredkey (line 4) tells whether the form field is required or optional. If the field is required, the site user will have to fill it in; otherwise he will receive a validation error. -
the
filters(line 5) andvalidators(line 8) keys may contain the configuration for zero, one, or several filters and/or validators applied to the form model's field.
Filter Configuration
A typical filter configuration is presented below:
[
  'name' => '<filter_name>',
  'priority' => <priority>,
  'options' => [
    // Filter options go here ...
  ]
],
The name key (line 2) is the name for the filter. This may be either
a fully qualified filter class name (e.g. StringTrim::class) or an alias (e.g. @StringTrim).
The optional priority key (line 3) defines filter priority in the list of filters. The priority
must be an integer number. The filters with the highest priority will be applied first. By default,
the FilterChain::DEFAULT_PRIORITY constant (value 1000) is assigned.
The options array (line 4) is specific to a certain filter and may contain
parameters for configuring the filter.
Validator Configuration
A typical validator configuration is presented below:
[
  'name' => '<validator_name>',
  'break_chain_on_failure' => <flag>,
  'options' => [
    // Validator options go here ...
  ]
],
The name key (line 2) is the name for the validator. This may be either
a fully qualified validator class name (e.g. EmailAddress::class) or an alias
(e.g. @EmailAddress).
The break_chain_on_failure optional key (line 3) defines the behavior in
case the validator check fails. If this equals to true, subsequent validators
in the list will not be executed; otherwise every validator in the list will be executed
without depending on the result of other validators.
The options array (line 4) is specific to certain validator class and may contain
parameters for configuring the validator.
Creating Input Filter for the Contact Form
Now that you have a general idea on know how to define the input filter container
and populate it with filters and validators for each form field, let's complete
our ContactForm form model class. Below, we add the addInputFilter()
private method, which defines the filtering/validation rules and stores them in input filter container:
<?php
// ...
use Laminas\InputFilter\InputFilter;

class ContactForm extends Form
{
  // init() method
  public function init() : void
  {
    // ... call this method to add filtering/validation rules
    $this->addInputFilter();
  }

  // ...

  // This method creates input filter (used for form filtering/validation).
  private function addInputFilter()
  {
    // Get the default input filter attached to form model.
    $inputFilter = $this->getInputFilter();

    $inputFilter->add([
        'name'     => 'email',
        'required' => true,
        'filters'  => [
           ['name' => 'StringTrim'],
        ],
        'validators' => [
           [
            'name' => 'EmailAddress',
            'options' => [
              'allow' => \Laminas\Validator\Hostname::ALLOW_DNS,
              'useMxCheck' => false,
            ],
          ],
        ],
      ]
    );

    $inputFilter->add([
        'name'     => 'subject',
        'required' => true,
        'filters'  => [
           ['name' => 'StringTrim'],
           ['name' => 'StripTags'],
           ['name' => 'StripNewlines'],
        ],
        'validators' => [
           [
            'name' => 'StringLength',
              'options' => [
                'min' => 1,
                'max' => 128
              ],
           ],
        ],
      ]
    );

    $inputFilter->add([
        'name'     => 'body',
        'required' => true,
        'filters'  => [
          ['name' => 'StripTags'],
        ],
        'validators' => [
          [
            'name' => 'StringLength',
            'options' => [
              'min' => 1,
              'max' => 4096
            ],
          ],
        ],
      ]
    );
  }
}
As you can see from the code above, first we declare the alias for the
@Laminas\InputFilter\InputFilter class (line 3).
In the form model's constructor (line 10), we call the addInputFilter() method
which we define in lines 16-76.
The addInputFilter() method's goal is to add filtering/
validation rules to the InputFilter container (lines 21-75). For inserting filtering/validation rules into the
input filter container, we use the add() method provided by the InputFilter class, which takes the array specification
of an input to create.
We add three inputs (per each field of our form model, except its submit button):
-
For the
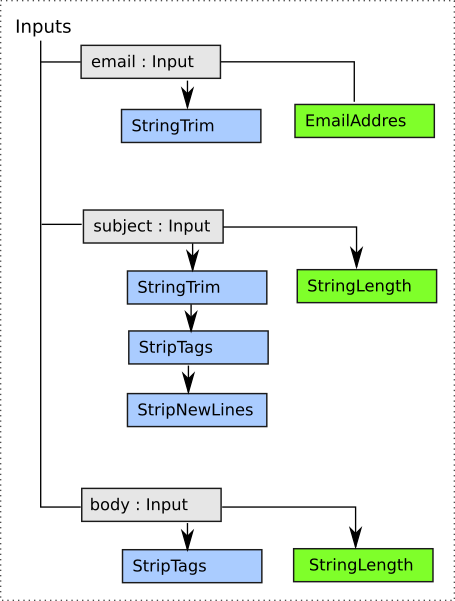
emailfield, we set therequiredflag totrueto make filling this field mandatory. We use the @StringTrimfilter to remove white spaces from the beginning and the end of the E-mail address; and the @EmailAddressvalidator for checking the user-entered E-mail address for correctness. We configure the @EmailAddressvalidator to allow domain names as E-mail addresses (the\Laminas\Validator\Hostname::ALLOW_DNSflag) and disable MX record checking (setuseMxCheckoption tofalse). -
For the
subjectfield, by analogy, we make it required, and use the @StringTrimfilter to remove white spaces from the beginning and the end. Additionally, we use the @StripNewlinesand @StripTagsfilters to filter out the new line characters and HTML tags, respectively. We constrain subject string length to be between 1 and 128 characters in length by using the @StringLengthvalidator. -
For the
bodyfield, we require it to be mandatory, and we use the @StripTagsfilter to strip HTML tags from E-mail text. We also use the @StringLengthvalidator to constrain E-mail text to be between 1 and 4096 characters in length.
In figure 7.17, you can find the schematic graphical representation of the input filter we've created.
Above, we briefly described how to create an input filter for the form model. For detailed information about the above mentioned (and other) filters and validators and their usage examples, please refer to Transforming Input Data with Filters and Checking Input Data with Validators.
Using the Form in a Controller's Action
When the form model class is ready, you finally can use the form in a controller's action method.
As you might already know, the way the site user works with form is typically an iterative process (schematically illustrated by figure 7.18):
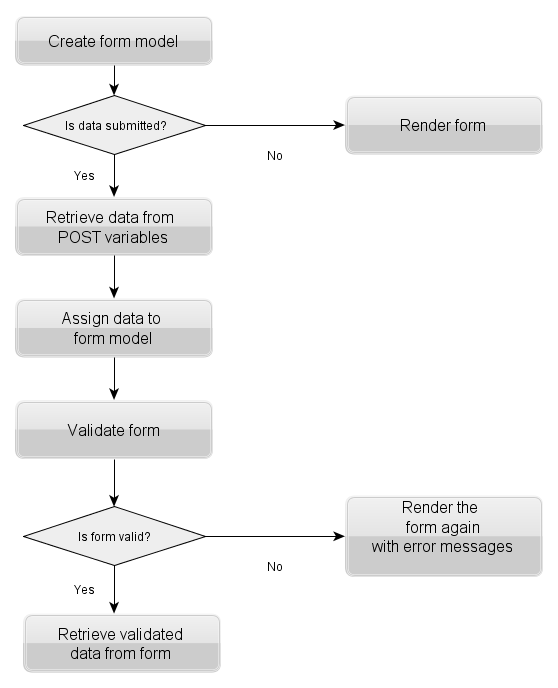
- First, you display the form and its fields on a web page, prompting user for input. Once the user fills the form fields, he clicks the Submit button and sends the data to server.
- Next, your controller extracts the submitted data and asks the form model to validate it. If there were input errors, you display the form again, asking the user to correct input errors. If the data is correct, you process the data with your business logic layer and (usually) redirect the user to another web page.
The @Form[Laminas\Form\Form] base class provides several methods for accomplishing these (see table 7.11).
| Method name | Description |
|---|---|
setData($data) |
Sets form data for validation. |
getData($flag) |
Retrieves the validated data. |
isValid() |
Validates the form. |
hasValidated() |
Check if the form has been validated. |
getMessages($elementName = null) |
Returns a list of validation failure messages, if any, for a single element or for all form elements. |
Table 7.11. Methods provided by the Form base class
So, a generic form usage workflow is the following:
-
Check whether the form data has been submitted, and if not, display the form on the web page.
-
If the data has been submitted by site user, the raw data is retrieved from
POST(and/orGET) variables in the form of an array. -
The data is assigned to the form model's fields using the form's
setData()method. -
The filtering and validation is performed using the form's
isValid()method (this results in executing the input filter attached to the form). If a certain field(s) is/are invalid, display the form again and ask the user to correct their input. -
As soon as the data has been filtered/validated you retrieve the data from the form model using the
getData()method and can pass the data to other models or use it any other way.
The code example below illustrates how to implement this typical workflow in your controller's action method:
<?php
namespace Application\Controller;

use Application\Form\ContactForm;
// ...

class IndexController extends AbstractActionController
{
  // This action displays the feedback form
  public function contactUsAction()
  {
    // Create Contact Us form
    $form = new ContactForm();

    // Check if user has submitted the form
    if($this->getRequest()->isPost())
    {
      // Fill in the form with POST data
      $data = $this->params()->fromPost();
      $form->setData($data);

      // Validate form
      if($form->isValid()) {

        // Get filtered and validated data
        $data = $form->getData();

        // ... Do something with the validated data ...

        // Redirect to "Thank You" page
        return $this->redirect()->toRoute('application', ['action'=>'thankYou']);
      }
    }

    // Pass form variable to view
    return new ViewModel([
          'form' => $form
       ]);
  }
}
In the code above, we define the contactUsAction() action method in the
IndexController class (line 10). In the action method, we create an instance
of the ContactForm class (line 13).
Then, in line 16, we check whether the request is a POST request (checking the starting line of HTTP request).
In line 19 we retrieve the raw data submitted by the user. We extract all the POST variables
with the help of the @Params controller plugin. The data is returned in the form of an array and
saved into the $data variable.
The data submitted by the user may contain mistakes and should be filtered and validated
before further usage. To do that, in line 20 we set the data to the form model with the
setData() method provided by the Form base class. We validate form data with the
isValid() method (line 23), which returns true upon successful validation.
If the validation succeeds, we retrieve the validated data using the getData()
method (line 26) and then can pass the data to our business logic layer.
Once we have used the validated data, in line 31, we redirect the web user to the
Thank You page. The redirect is performed with the @Redirect controller plugin.
The @Redirect plugin's toRoute() method takes two parameters: the first parameter is the
name of the route ("application"), and the second one is the array of parameters
to pass to the router. These identify the web page where you redirect the user.
We will prepare the controller's action and view template for the Thank You page a little bit later.
In line 37, we pass the form model through the $form variable to the view template. The view template
will access this variable and will use it for rendering the form (and possible
validation errors).
Passing Form Data to a Model
To give you a real-life example of how you can use the validated data of the feedback form,
in this section we will create a simple MailSender model 6 class which
can be used for sending an E-mail message to an E-mail address. When the user submits the form,
we will validate the form data and pass the validated data to the MailSender model and ask
it to send the E-mail message to the recipient.
Note
Reading this section is optional and intended mostly for beginners. You may skip it and refer directly to the next section Form Presentation.
The MailSender model will internally use the @Laminas\Mail component. The @Laminas\Mail component
is a component provided by Laminas Framework and designed to give you the convenient functionality
for composing mail messages (the @Laminas\Mail\Message class) and several classes implementing available
transports for sending mail (in this example, we will use the @Laminas\Mail\Transport\Sendmail class which
uses the sendmail program for delivering E-mails).
Install the @Laminas\Mail component with Composer by typing the following command:
php composer.phar require laminas/laminas-mail
What is sendmail?
The sendmail program is a free open-source mail transfer agent for Linux/Unix operating systems. It accepts messages that a PHP script passes to it, deciding based upon the message header which delivery method it should use, and then passes the message through the SMTP protocol to the appropriate mail server (like Google Mail) for delivery to the recipient.
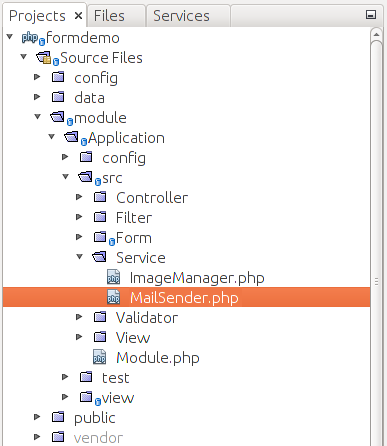
Start with creating the MailSender.php file under the Service directory under the module's source directory (see figure 7.19 for example).
The following is the code that should be put into the MailSender.php file:
<?php
namespace Application\Service;

use Laminas\Mail;
use Laminas\Mail\Message;
use Laminas\Mail\Transport\Sendmail;

// This class is used to deliver an E-mail message to recipient.
class MailSender
{
  // Sends the mail message.
  public function sendMail($sender, $recipient, $subject, $text)
  {
    $result = false;
    try {

      // Create E-mail message
      $mail = new Message();
      $mail->setFrom($sender);
      $mail->addTo($recipient);
      $mail->setSubject($subject);
      $mail->setBody($text);

      // Send E-mail message
      $transport = new Sendmail('-f'.$sender);
      $transport->send($mail);
      $result = true;
    } catch(\Exception $e) {
      $result = false;
    }

    // Return status
    return $result;
  }
}
In the code above, we define the Application\Service namespace (line 2), because
the MailSender class can be related to service models (its goal is to manipulate
data, not to store it).
In lines 4-6, we declare the aliases for the @Mail, @Message[Laminas\Mail\Message] and @Laminas\Mail\Transport\Sendmail
classes provided by the @Laminas\Mail component.
In lines 9-35, we define the MailSender class. The class has the single method
sendMail() (line 12), which takes four arguments: sender's E-mail address, recipient's E-mail address,
message subject and, finally, message body text.
In line 18, we create an instance of the @Message[Laminas\Mail\Message] class. We use the methods provided
by this class for composing the message (set its subject, body etc.) in lines 19-22.
In line 25, we create an instance of the @Sendmail class, which uses the sendmail
program to pass the message to the appropriate mail server (see lines 25-26). Since the classes
provided by the @Laminas\Mail component may throw an exception on failure, we enclose the
block of code with the try-catch exception handler.
The sendMail() method will return true if the E-mail message sent successfully; otherwise
it will return false (line 33).
Note
Configuring mail system for your web server is a rather complex task. It typically requires installing sendmail and configuring the server's MX DNS record to use certain mail server (either local mail server, e.g. Postfix, or remote server, like Google Mail). Because of the complexity of the topic, it is not discussed in this book. You can find additional information on configuring mail for your particular system online.
Now, register the MailSender service in your module.config.php file as follows:
return [
    //...
    'service_manager' => [
        'factories' => [
            Service\MailSender::class => InvokableFactory::class,
        ],
    ],

    //...
];
Later, you can instantiate the MailSender model in your IndexController::contactUsAction()
method and pass it the validated form data.
Because we use the MailSender service in our controller, this service is a dependency for the controller.
So, we will need to create a factory for the controller and inject the dependency into controller's constructor.
Looks complex at the first sight, but as you improve your skills, you will find this is rather simple and greatly
improves the structure of your code.
Let's create the factory for the IndexController (put it into the Factory subdirectory under the Controller subdirectory).
You can see that the only work of the factory class is creating the controller and passing it the dependency.
<?php
namespace Application\Controller\Factory;

use Interop\Container\ContainerInterface;
use Laminas\ServiceManager\Factory\FactoryInterface;
use Application\Service\MailSender;
use Application\Controller\IndexController;

class IndexControllerFactory
{
    public function __invoke(ContainerInterface $container,
                             $requestedName, array $options = null)
    {
        $mailSender = $container->get(MailSender::class);

        // Instantiate the controller and inject dependencies
        return new IndexController($mailSender);
    }
}
Modify the module.config.php file to use the custom factory we have just created:
return [
    //...
    'controllers' => [
        'factories' => [
            Controller\IndexController::class => Controller\Factory\IndexControllerFactory::class,
        ],
    ],

    //...
];
Next, add the constructor, the contactUsAction(), thankYouAction() and sendErrorAction()
methods to the controller. Below, the complete code is presented:
<?php
// ...
use Application\Service\MailSender;

class IndexController extends AbstractActionController
{
  private $mailSender;

  public function __construct($mailSender)
  {
    $this->mailSender = $mailSender;
  }

  public function contactUsAction()
  {
    // Create Contact Us form
    $form = new ContactForm();

    // Check if user has submitted the form
    if($this->getRequest()->isPost()) {

      // Fill in the form with POST data
      $data = $this->params()->fromPost();

      $form->setData($data);

      // Validate form
      if($form->isValid()) {

        // Get filtered and validated data
        $data = $form->getData();
        $email = $data['email'];
        $subject = $data['subject'];
        $body = $data['body'];

        // Send E-mail
        if(!$this->mailSender->sendMail('no-reply@example.com', $email,
                        $subject, $body)) {
          // In case of error, redirect to "Error Sending Email" page
          return $this->redirect()->toRoute('application',
                        ['action'=>'sendError']);
        }

        // Redirect to "Thank You" page
        return $this->redirect()->toRoute('application',
                        ['action'=>'thankYou']);
      }
    }

    // Pass form variable to view
    return new ViewModel([
      'form' => $form
    ]);
  }

  // This action displays the Thank You page. The user is redirected to this
  // page on successful mail delivery.
  public function thankYouAction()
  {
    return new ViewModel();
  }

  // This action displays the Send Error page. The user is redirected to this
  // page on mail delivery error.
  public function sendErrorAction()
  {
    return new ViewModel();
  }
}
As you can see from the code above, we do the following:
-
In line 3, we declare an alias for
Application\Service\MailSenderclass. This will allow you to refer to the model class by its short name. -
In lines 32-34, after we've validated the form, we extract the validated field values into the
$email,$subjectand$bodyPHP variables. -
In line 37, we call the
sendMail()method of theMailSenderservice and pass it four parameters: the sender's address (here we use "no-reply@example.com", but you can replace this with the address of your sendmail); the recipient's E-mail address, the E-mail subject and body. -
If mail has been sent successfully (if the
sendMail()method returnedtrue), we redirect the user to the Thank You page (line 45). On failure (ifsendMail()method returnedfalse), we redirect the user to the Send Error page (line 40). -
In lines 58-61, we have the
thankYouAction()method which displays the Thank You page. This page is shown if the E-mail message is sent successfully. -
In line 65-68, we have the
sendErrorAction()method which shows the Error Sending Email page. This page is shown on E-mail delivery failure.
Form Presentation
When your controller's action is ready, all you have to do is prepare the .phtml
view template file to display your form on a web page. In the view template, you need
to define the markup using <form>, <label>, <input>, and possibly other HTML tags.
Additionally, you will have to display error messages if the form validation failed. Because this work is rather boring, Laminas Framework provides you with special view helpers intended for rendering the form.
Note
For simple forms (which do not show error messages), you can use raw HTML tags for rendering the form and ignore laminas-provided form view helpers. But, form view helpers are really unavoidable when rendering complex forms that may display validation errors and/or add fields dynamically.
Preparing the Form Model for Rendering
Before rendering, it is required that you call the prepare() method on the form model's
instance (see table 7.12). If you forget to call this method, there may be undesired
effects.
| Method name | Description |
|---|---|
prepare() |
Ensures the form state is ready for use. |
Table 7.12. Methods provided by the Form base class
The prepare() method does the following form model preparations:
- It calls the input filter container attached to the form model, to ensure validation error messages are available;
- It prepares any elements and/or fieldsets that require preparation 7.
Standard Form View Helpers
Standard form view helpers provided by Laminas are shown in tables 7.13 - 7.16 below. These classes
live in the @Laminas\Form\View\Helper[Laminas\Form] namespace. As you can see from the table,
the view helpers can be divided into the following categories:
-
Generic form view helpers. These classes are designed to render the whole form (@
Form[Laminas\Form\View\Helper\Form] helper) or its single element (@FormElementhelper) and possible validation errors (@FormElementErrorshelper). -
View helpers for rendering HTML fields of certain types. These allow you to generate HTML markup for concrete form fields (e.g. @
FormButton, @FormRadio, etc.) and a text label (@FormLabel). -
View helpers for rendering form fields introduced in HTML5. These are analogous to the view helpers from the previous category, but intended for rendering HTML5 fields (e.g. @
FormDate, @FormUrl, etc.) -
Other view helpers. In this category, we can put the view helper classes designed for rendering laminas-specific fields, like @
FormMultiCheckbox, @FormCaptcha, etc.
| Method name | Description |
|---|---|
| Generic helpers | |
@Form[Laminas\Form\View\Helper\Form] |
Renders the entire form and all its elements. |
@FormElement |
Renders a generic form element. |
@FormElementErrors |
Renders validation errors for a form element. |
@FormRow |
Renders the label, the field and validation errors. |
Table 7.13. View helpers designed for using with forms
| Method name | Description |
|---|---|
@FormButton |
Renders the <button> form field. |
@FormCheckbox |
Renders the <input type="checkbox"> field. |
@FormFile |
Renders the <input type="file"> form field. |
@FormHidden |
Renders the <input type="hidden"> form field. |
@FormInput |
Renders an <input> form field. |
@FormImage |
Renders the <input type="image"> form field. |
@FormLabel |
Renders the <label> tag. |
@FormPassword |
Renders the <input type="password"> form field. |
@FormRadio |
Renders the <input type="radio"> form field. |
@FormReset |
Renders the <input type="reset"> form field. |
@FormSelect |
Renders the <select> dropdown field. |
@FormSubmit |
Renders the <input type="submit"> form field. |
@FormText |
Renders the <input type="text"> form field. |
@FormTextarea |
Renders the <textarea> multi-line text field. |
Table 7.14. HTML 4 field helpers
| Method name | Description |
|---|---|
@FormColor |
Renders the <input type="color"> HTML5 form field. |
@FormDate |
Renders the <input type="date"> HTML5 form field. |
@FormDateTime |
Renders the <input type="date"> HTML5 form field. |
@FormDateTimeLocal |
Renders the <input type="datetime-local"> HTML5 form field. |
@FormEmail |
Renders the <input type="email"> HTML5 form field. |
@FormMonth |
Renders the <input type="month"> HTML5 form field. |
@FormNumber |
Renders the <input type="number"> HTML5 form field. |
@FormRange |
Renders the <input type="range"> HTML5 form field. |
@FormTel |
Renders the <input type="tel"> HTML5 form field. |
@FormTime |
Renders the <input type="time"> HTML5 form field. |
@FormUrl |
Renders the <input type="url"> HTML5 form field. |
@FormWeek |
Renders the <input type="week"> HTML5 form field. |
Table 7.15. HTML 5 field helpers
| Method name | Description |
|---|---|
@FormCaptcha |
Renders the CAPTCHA security field. |
@FormDateSelect |
Renders the date select field. |
@FormDateTimeSelect |
Renders the datetime select field. |
@FormMonthSelect |
Renders the month select field. |
@FormMultiCheckbox |
Renders the multi checkbox field. |
@FormCollection |
Renders the collection of elements. |
Table 7.16. Other helpers
In the next sections, we will provide an overview of several frequently used form view helpers and their usage examples.
Rendering a Form Element
You can render a form field with the @FormElement view helper. It is designed to be as flexible
as possible and recognize as many field types as possible. So, with this view helper
you are able to produce HTML markup for text fields, buttons, dropdown lists and so on.
The methods provided by this view helper are listed in table 7.17.
| Method name | Description |
|---|---|
render($element) |
PHP magic method which renders the given form field. |
__invoke($element) |
PHP magic method which renders the given form field (the effect is the same as render()). |
Table 7.17. Methods provided by the FormElement view helper
As you can see, there are two methods doing the same thing:
- The
render()method produces the HTML markup for the form field. It accepts the single argument -- the instance of the element to render. You can retrieve the form element with the form model'sget()method (see example below). - The
__invoke()method is a convenience wrapper which results in less code to write.
<?php
// We assume that the form model is stored in $form variable.
// Render the E-mail field with the render() method.
echo $this->formElement()->render($form->get('email')); ?>

// The same, but with __invoke
echo $this->formElement($form->get('email'));
When executed, the code above will generate the HTML code as follows:
<input type="text" name="email" id="email" value="">
Note
Typically, there is no need to call view helpers for concrete HTML (or HTML5)
fields (e.g. @FormText, @FormSubmit, etc.)
Instead, you can use the generic @FormElement view helper which determines the
field type automatically and produces the needed HTML code.
Rendering an Element's Validation Errors
The @FormElementErrors view helper class allows you to produce HTML markup for
field validation errors (if present). If there are no validation errors for
certain element, this view helper does not produce any output.
An example of using the @FormElementErrors view helper is presented below:
<?php
// We assume that the form model is stored in $form variable.
// Render validation errors for the E-mail field.
echo $this->formElementErrors($form->get('email'));
If there were any validation errors, this code will generate the unordered list
of errors using the <ul> HTML tag, and the list will contain as many items as
there are errors for certain field. An example of such list for the E-mail field
of our feedback form is presented below:
<ul>
<li>'hostname' is not a valid hostname for the email address</li>
<li>The input does not match the expected structure for a DNS hostname</li>
<li>The input appears to be a local network name but local network names are not allowed</li>
</ul>
Rendering an Element's Label
The @FormLabel helper allows you to render the text label for an element:
<?php
// We assume that the form model is stored in $form variable.
// Render text label for the E-mail field.
echo $this->formLabel($form->get('email'));
When executed, the code above will generate the HTML code as follows:
<label for="email">Your E-mail</label>
Rendering a Form Row
The @FormRow view helper is designed to simplify the rendering of a form field,
it's label, and validation errors. With this class, you are able to render these
in a single step. This helper is flexibly configurable, so you can apply a different
decoration to the form row. The methods of this view helper class are listed in table 7.18.
| Method name | Description |
|---|---|
render($element) |
Renders the form row. |
__invoke($element, $labelPosition, $renderErrors, $partial) |
Renders the form row (convenience wrapper). |
setInputErrorClass($inputErrorClass) |
Sets input error CSS class. |
setLabelAttributes($labelAttributes) |
Sets label attributes. |
setLabelPosition($labelPosition) |
Sets label position (before or after the field). |
setRenderErrors($renderErrors) |
Set if the errors are rendered by this helper. |
setPartial($partial) |
Set a partial view script to use for rendering the row. |
Table 7.18. Methods provided by the FormRow view helper
An example of using the @FormRow view helper is presented below:
<?php
// We assume that the form model is stored in $form variable.
// Render the E-mail field, its label and (possible) validation errors.
echo $this->formRow($form->get('email'));
When executed, the code above will generate the HTML code as follows:
<label for="email">Your E-mail</label>
<input type="text" name="email" id="email">
<ul>
<li>'hostname' is not a valid hostname for the email address</li>
<li>The input does not match the expected structure for a DNS hostname</li>
<li>The input appears to be a local network name but local network names
are not allowed</li>
</ul>
Rendering the Entire Form
The @Form[Laminas\Form\View\Helper\Form] view helper allows you to render the opening <form> tag and its attributes;
and the closing </form> tag. But its major purpose is to render the entire form and
all of its fields with a single line of code. Public methods of the Form[Laminas\Form\View\Helper\Form] view helper
class are summarized in table 7.19.
| Method name | Description |
|---|---|
render($form) |
Renders the entire form and all its elements. |
__invoke($form) |
PHP magic method which renders the entire form and all its elements (the effect is the same as render()). |
openTag($form) |
Renders the opening <form> tag. |
closeTag() |
Renders the closing </form> tag. |
Table 7.19. Methods provided by the Form view helper
You can render the whole form with the help of the @Form[Laminas\Form\Form]'s render() method as follows:
// We assume that the form model is stored in $form variable

// Render the whole form
echo $this->form()->render($form);
The same effect can be achieved with the __invoke magic method (see example below):
// The same, but with `__invoke`
echo $this->form($form);
Example: Creating the View Template for the Contact Form
Now we are ready to define the presentation for our feedback form. If you remember, earlier we added the contact-us.phtml view template in application/index/ directory under the module's view/ directory. Replace the code in that file with the following:
<?php
$form = $this->form;
$form->prepare();
?>

<?= $this->form()->openTag($form); ?>

<?= $this->formLabel($form->get('email')); ?>
<?= $this->formElement($form->get('email')); ?>
<?= $this->formElementErrors($form->get('email')); ?>

<?= $this->formLabel($form->get('subject')); ?>
<?= $this->formElement($form->get('subject')); ?>
<?= $this->formElementErrors($form->get('subject')); ?>

<?= $this->formLabel($form->get('body')); ?>
<?= $this->formElement($form->get('body')); ?>
<?= $this->formElementErrors($form->get('body')); ?>

<?= $this->formElement($form->get('submit')); ?>

<?= $this->form()->closeTag(); ?>
As you can see from the code above, we do the following things to render the form:
-
In line 2, we access the
$formvariable passed from the controller's action. -
In line 3, we call the @
Form[Laminas\Form\Form]'sprepare()method to prepare the form for rendering. Please note that calling this method is very important. If you forget to do that, there may be some undesired rendering problems. -
In line 6, we call the
openTag()method of the @Form[Laminas\Form\View\Helper\Form] view helper. Its purpose is to render the opening<form>tag and its attributes. The method takes a single argument -- an instance of the form model. Paired closing</form>tag is rendered in line 22 with the help of thecloseTag()method of the @Form[Laminas\Form\View\Helper\Form] view helper. -
In lines 8-10, we render the E-mail field's label, the text field itself and (possible) validation errors with the help of the @
FormLabel, @FormElementand @FormElementErrorsview helpers. Those helpers take the instance of the form model's element as a single argument. We get an instance of the element with theget()method provided by the @Form[Laminas\Form\Form] base class. -
In lines 12-14, by analogy, we render the Subject field, its label and validation errors.
-
And in lines 16-18, we render the label, the field and the validation errors for the body text area field.
-
In line 20, we render the Submit button.
When the view template renderer evaluates this code, it will produce the HTML output like below:
<form action="/contact" method="post" name="contact-form">
  <label for="email">Your E-mail</label>
  <input type="text" name="email" id="email" value="">

  <label for="subject">Subject</label>
  <input name="subject" type="text" id="subject" value="">

  <label for="body">Message Body</label>
  <textarea name="body" id="body"></textarea>

  <input name="submit" type="submit" value="Submit">
</form>
In the code above, we mostly used the @FormElement, @FormElementErrors
and @FormLabel view helpers. You may use the generic @FormRow or @Form[Laminas\Form\View\Helper\Form] view
helpers if you want to reduce the amount of code to write, but this
may result in less control of form decoration.
If certain fields have validation errors, those errors will be
outputted below the field in the form of the <ul> unordered HTML list.
For example, if you enter the "123@hostname" into E-mail form field,
you would receive the following validation errors:
<label for="email">Your E-mail</label>
<input type="text" name="email" value="123@hostname">
<ul>
<li>'hostname' is not a valid hostname for the email address</li>
<li>The input does not match the expected structure for a DNS hostname</li>
<li>The input appears to be a local network name but local network names
are not allowed</li>
</ul>
Applying the Bootstrap CSS Styles to Form
The HTML markup above is missing CSS styling. What we want to achieve is to use Twitter Bootstrap CSS classes to give the form a nice, professional-looking appearance. To add Bootstrap styling to the form, you have to modify the code in the .phtml file to make it look like below:
<?php
$form = $this->form;
$form->prepare();

$form->get('email')->setAttributes([
  'class'=>'form-control',
  'placeholder'=>'name@example.com'
  ]);

$form->get('subject')->setAttributes([
  'class'=>'form-control',
  'placeholder'=>'Type subject here'
  ]);

$form->get('body')->setAttributes([
  'class'=>'form-control',
  'rows'=>6,
  'placeholder'=>'Type message text here'
  ]);

$form->get('submit')->setAttributes(['class'=>'btn btn-primary']);
?>

<h1>Contact Us</h1>

<p>
  Please fill out the following form to contact us.
  We appreciate your feedback.
</p>

<div class="row">
  <div class="col-md-6">
    <?= $this->form()->openTag($form); ?>

    <div class="form-group">
      <?= $this->formLabel($form->get('email')); ?>
      <?= $this->formElement($form->get('email')); ?>
      <?= $this->formElementErrors($form->get('email')); ?>
    </div>

    <div class="form-group">
      <?= $this->formLabel($form->get('subject')); ?>
      <?= $this->formElement($form->get('subject')); ?>
      <?= $this->formElementErrors($form->get('subject')); ?>
    </div>

    <div class="form-group">
      <?= $this->formLabel($form->get('body')); ?>
      <?= $this->formElement($form->get('body')); ?>
      <?= $this->formElementErrors($form->get('body')); ?>
    </div>

    <?= $this->formElement($form->get('submit')); ?>

    <?= $this->form()->closeTag(); ?>
  </div>
</div>
In the code above, we added the .form-control CSS class to every
input field in the form. We did that with the setAttribute() method (see lines 5, 10 and 15).
With that method, we also added the "placeholder" attribute to define the
nice-looking placeholder text when a field is empty. For the "body" field,
we added the "rows" attribute defining the height of the field (6 rows).
For the form's Submit button, we use the .btn and .btn-primary
CSS classes (see line 21).
We also put label-input pairs inside of <div> elements with .form-group
CSS class (lines 35, 41, 47).
We put a form inside of the 6-column-width grid cell, which makes the form half the width of the screen (look at lines 31-32).
Note
Sometimes it is impossible to use Twitter Bootstrap styling with standard Laminas form view helpers.
For example, standard view helpers @FormCheckbox and @FormRadio can't be tweaked to support
Bootstrap styles. Fortunately, there is a third-party module neilime/twbs-helper-module
that you can install with Composer.
This module provides convenient view helpers for rendering Laminas forms
and applying Bootstrap styling to them. It works transparently, so once you installed the module, standard Laminas form view helpers
become replaced with module-provided form view helpers, so you don't need to change your view template code.
Styling the Validation Errors List
The error messages on your form, by default, look like a typical unordered list (<ul>). To
give them a nice visual appearance, we add a couple of CSS rules to the style.css file
in APP_DIR/public directory:
form ul {
  list-style-type: none;
  padding: 0px;
  margin: 0px 5px;
}

form ul li {
  color: red;
}
The CSS rules above will remove bullets from the list and make validation error messages appear in red.
Adding the "Thank You" & "Error Sending Email" Pages
The last small thing we will do is preparing the view templates for the "Thank You" and "Error Sending Email" pages.
Add the thank-you.phtml view template in application/index/ directory under the module's view/ directory. Put the following HTML markup into the view template file:
<h1>Thank You!</h1>

<p>
  <div class="alert alert-success">
    We will respond to the E-mail address you have provided.
  </div>
</p>
Next, add the send-error.phtml view template file. The HTML markup for the Error Sending Email page is presented below:
<h1>Error Sending Email!</h1>

<p>
  <div class="alert alert-warning">
    Sorry, but we had an unexpected problem when trying to deliver
    your message. Please try again later.
  </div>
</p>
Results
Congratulations! Now, if you open the "http://localhost/contactus" URL in your web browser, you should see a page like that shown in figure 7.20.
{width=80%}
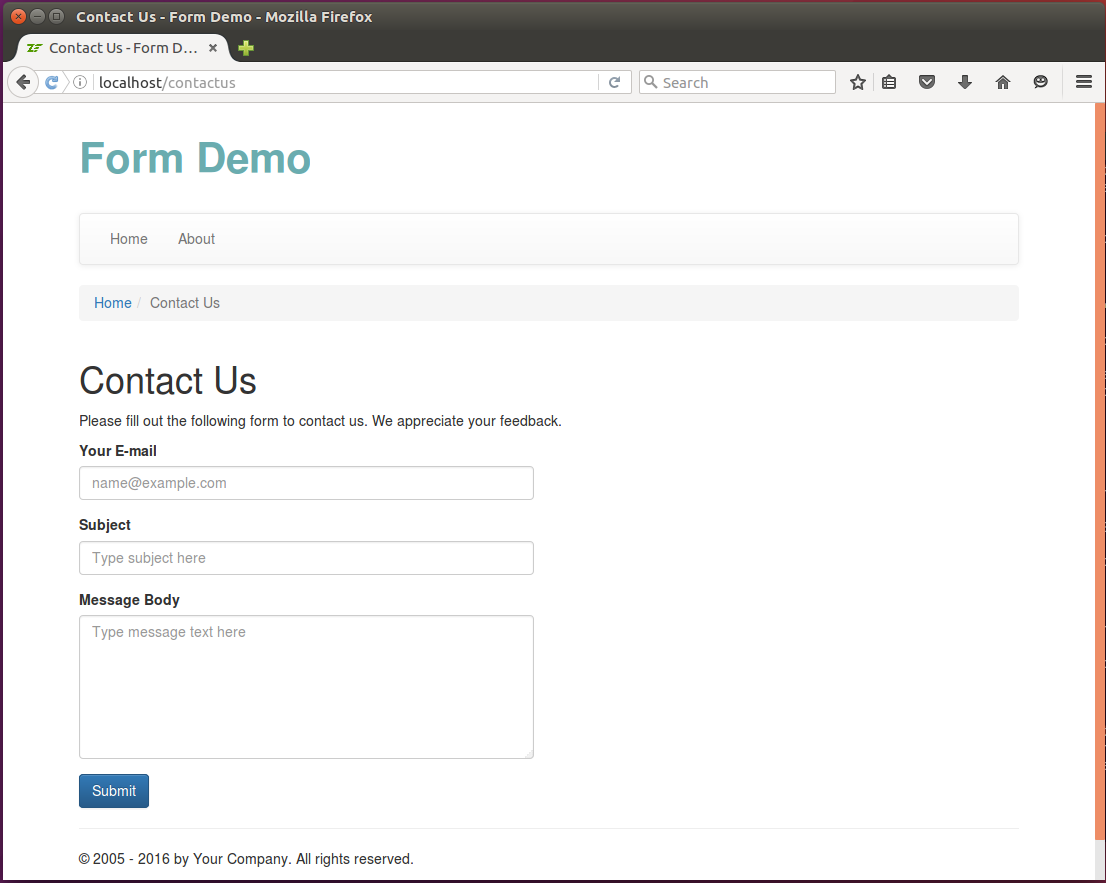
If you enter some invalid data in the form and click the Submit button, you should see the validation errors (figure 7.21).
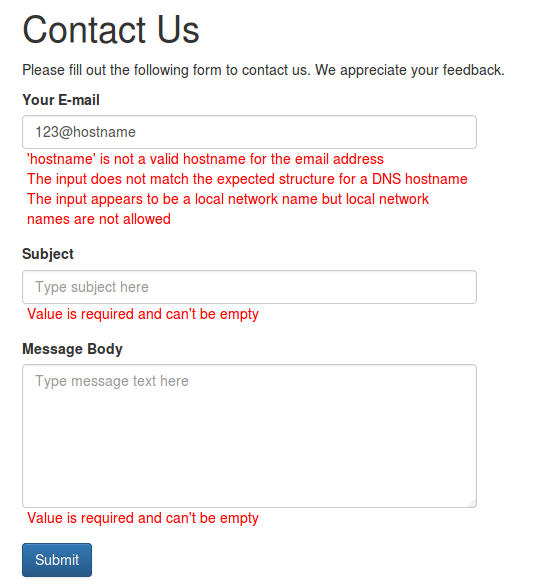
Entering the correct E-mail, subject and message text and submitting the form results in sending the message and displaying the Thank You page (see figure 7.22).
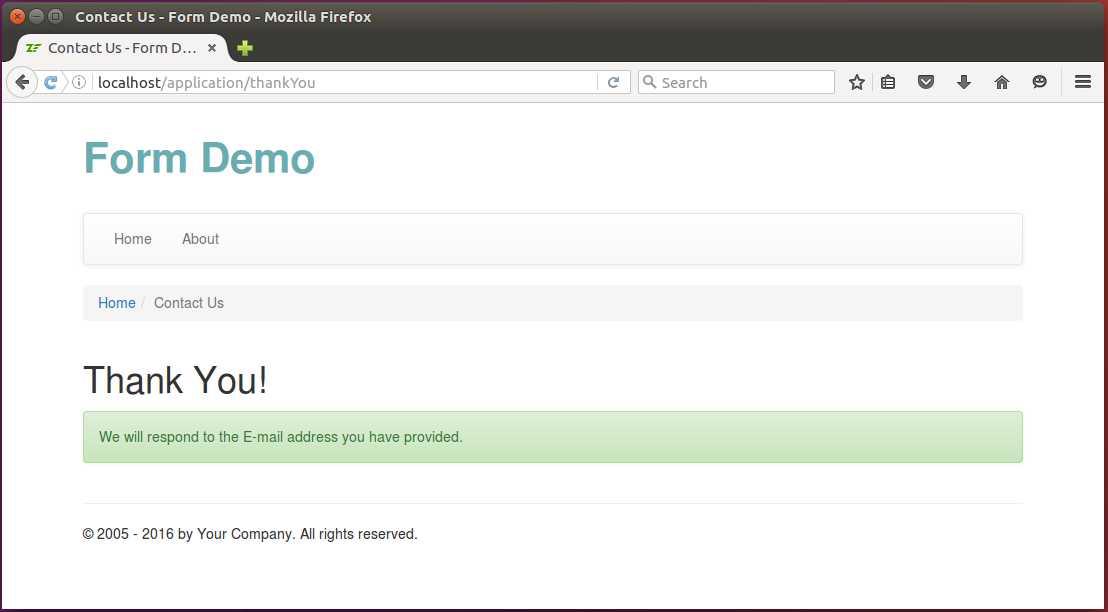
On a sending failure, you will see the Error Sending Email page (see figure 7.23 for example):
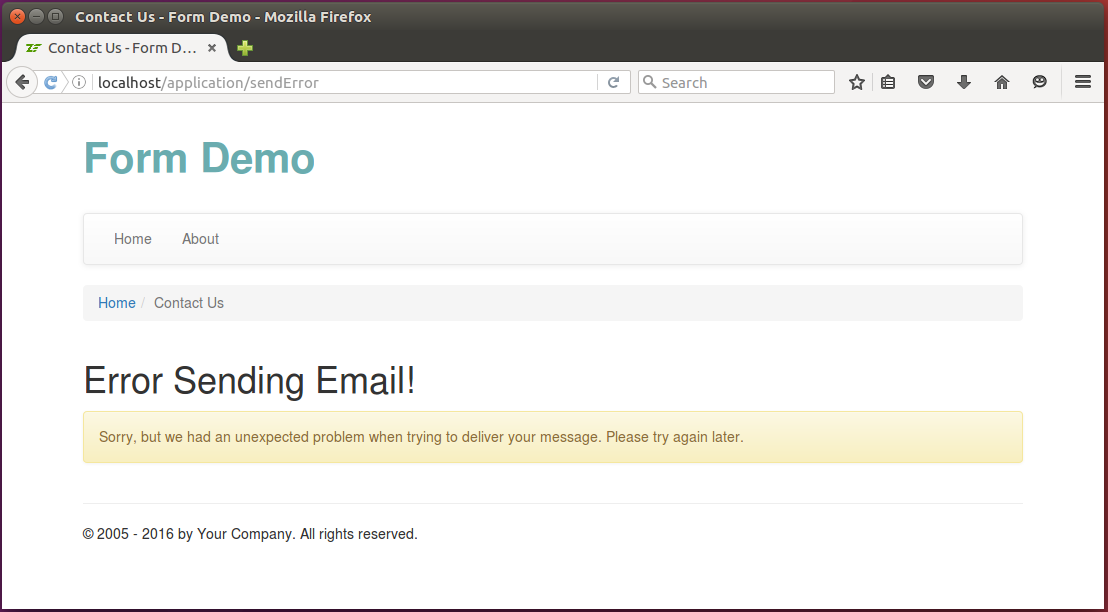
You can see the Contact Us form in action in the Form Demo sample application bundled with this book.
Summary
Forms are the way of collecting user-entered data on web pages. A form usually consists of elements (input field + label pairs). Elements can optionally be grouped into fieldsets.
In an MVC-based web site, form functionality is separated into form models responsible for element definition and validation, and form presentation implemented with the help of special view helpers.
To create a form model, you write a class deriving from the @Form[Laminas\Form\Form] base class.
The form model is initialized by adding its elements with the help of the base
class-provided methods.
To submit form data to the server, the user clicks the Submit button, then the data is sent as part of a HTTP request. Once the user submits the form, you can extract the form data in your controller and ask the form model to validate it.
For checking and filtering the user-entered data, filters and validators
are utilized. You use the @InputFilter[Laminas\InputFilter\InputFilter] class which is the container for validation
rules.
If there are input errors, you display the form again, asking the user to correct the input errors. If the data is correct, you process the data with your business logic layer.
-
Cross-site request forgery (CSRF) is a type of malicious exploit of a website whereby unauthorized commands are transmitted from a user that the website trusts. ↩
-
If you are confused where we take element aliases from, than you should know that they are defined inside of the @
Laminas\Form\FormElementManager\FormElementManagerTraitclass. ↩ -
There may be malicious users inserting HTML code in the message. If you open such code in your browser, you may see some undesired content. To avoid this, we need to replace HTML tags in message subject and text. ↩
-
In the latter (array specification) case, the input will be automatically created with the help of the @
Laminas\InputFilter\Factoryclass. ↩ -
In DDD terms, the
MailSendercan be related to service models, because its goal is to manipulate data, not to store data. ↩ -
Typically, this results in wrapping field names with the form/fieldset name (for example, the "email" field's name will become "contact-form[email]") which technically results in a more convenient field grouping in a HTTP request body. ↩